
Hey, Pull Up a Chair—Let’s Talk Chile Colorado
So, Chile Colorado in the crockpot. If you’re picturing me frantically running around my kitchen, pawing through the pantry for dried chilies while the dog tries to eat a fallen onion slice—yep, that’s about right. The first time I made this, I had half a mind to quit and just order a pizza, but I stuck it out (pizza still sounds good though), and wow, am I glad I did. If you’ve never inhaled the smell of slow-cooking beef in a pool of brick-red, earthy chile sauce, then boy are you in for a treat.


There's something about long-simmered stews that just feels right on a lazy Sunday, especially when you can basically toss everything in, cover it up, and ignore it for most of the day. Kind of like adulting, but tastier.
Why You’ll Love This Even More Than Leftover Pizza
I drag out my slow cooker for this Chile Colorado recipe anytime the weather even slightly threatens rain (or if I just want to trick my folks into thinking I cooked all day). There's almost zero hands-on fuss—seriously, it’s mostly waiting. My family goes wild because the beef turns out ridiculously tender (like, do-I-even-need-a-knife tender). And the sauce! It’s a little spicy, deep in flavor, and just cozy. Sometimes I get cranky if my blender leaks while puréeing the chilies, but, eh, kitchen towels exist for a reason. Oh—and if you think you don’t like chiles, just wait until you try this blend. It’s not the "make your nose run off your face" spicy, more like a big hug in a bowl.
Gather Up These Ingredients (Or Whatever’s Close Enough)
- 2.5 lbs boneless beef chuck roast, cut into large chunks (I've swapped for stew meat in a hurry, works fine)
- 5 dried guajillo chiles, stemmed and seeded (ancho chilies will also work if that's what you found)
- 3 dried ancho chiles, stemmed and seeded
- 1 small white onion, quartered (sometimes I use yellow, shh)
- 4 cloves garlic, peeled
- 2 cups low-sodium beef broth (I’ve used chicken broth once, and honestly, no one noticed)
- 1 teaspoon dried oregano (Mexican oregano is traditional but I just use what’s in my cabinet)
- 1 teaspoon cumin
- 1 teaspoon kosher salt, plus more to taste
- ½ teaspoon black pepper
- 1 tablespoon tomato paste
- 1 tablespoon vegetable oil (or any oil, really—I used olive oil once and survived)
- Optional: ½ teaspoon smoked paprika (for a hint of extra smokiness—I like it for kicks)
How to Make Crockpot Chile Colorado—A Little Messy, A Lot Tasty
- Start by snipping the stems off all your dried chiles and shaking out most of the seeds (don’t sweat it if a few stick around, the sauce gets blended anyway).
- In a dry skillet, toast the chiles over medium heat until they puff up and start to smell amazing—30 seconds per side does it. Don’t walk away; they burn fast! Ask me how I know.
- Stuff the toasted chiles in a bowl and pour very hot water over to cover. Let them soak while you handle the rest (about 20ish minutes—enough time to wash the knife you just used or stare into the fridge and wonder where the leftovers went).
- While the chiles soak, add a splash of oil to the same skillet and brown the beef chunks on all sides. You want a little color; don’t overcrowd the pan (if you do, just pretend you wanted to steam them, it'll be fine). Transfer to the slow cooker when done.
- Now, in the blender, add soaked chiles, onion, garlic, tomato paste, broth, oregano, cumin, salt, pepper, and smoked paprika if you’re using it. Blend until super smooth—like, really go for it (this is where I usually sneak a taste, and sometimes add a pinch more salt if needed).
- Pour the glorious sauce all over the beef in the crockpot. Give it a little stir (it always looks kind of gnarly before it cooks, don’t worry).
- Cover and cook on low for 8 hours, or high for about 5. Don’t go peeking halfway—that just lets out heat. Trust the process, amigo.
- Give everything a gently stir when it’s done, taste for seasoning (I usually toss in a little more salt at this point, depends on the broth I used), and skim some fat if you feel like it. Or don’t; live your best life.


Notes I Learned the Hard Way
- If you can’t find dried guajillo or ancho chiles, just use whatever the store has—I've even done this with all pasilla before. Still tasty.
- Some folks swear you have to strain the sauce after blending for ultimate smoothness. Honestly, I can never be bothered, and nobody in my crowd complains about a little texture.
- If you forget to brown the beef first, your stew will still taste good, just a little less rich. I’ve made it both ways. Depends how motivated I am in the morning.
Variations (Some Winners, One Flop)
- I’ve swapped out beef for boneless pork shoulder in a pinch—different vibe, but still totally delicious.
- Tried tossing in a cinnamon stick one time—thought it’d be daring. Nope, didn't like it at all. Don’t recommend! But hey, to each their own.
- Ooh, I’ve added canned chipotle in adobo for more heat and a smoky twist. Good if you like some fire.


Essential Gear and How to Fake It
- Slow cooker (obviously). Don’t have one? I’ve honestly just used a big Dutch oven in the oven at 300°F for 3-ish hours before—same deal, just fussier.
- Blender is handy but, truth be told, I’ve mashed everything up with an immersion blender right in the measuring jug during a rental kitchen situation. Worked surprisingly well.
How to Store (But It Never Lasts Long Around Here)
This stuff keeps in the fridge—just covered up—for about three days. It actually tastes even better the next day, somehow? You can freeze it for almost a month, but honestly, in my house it never lasts more than a day because everyone sneaks extra helpings at midnight.
How I Like to Serve My Chile Colorado
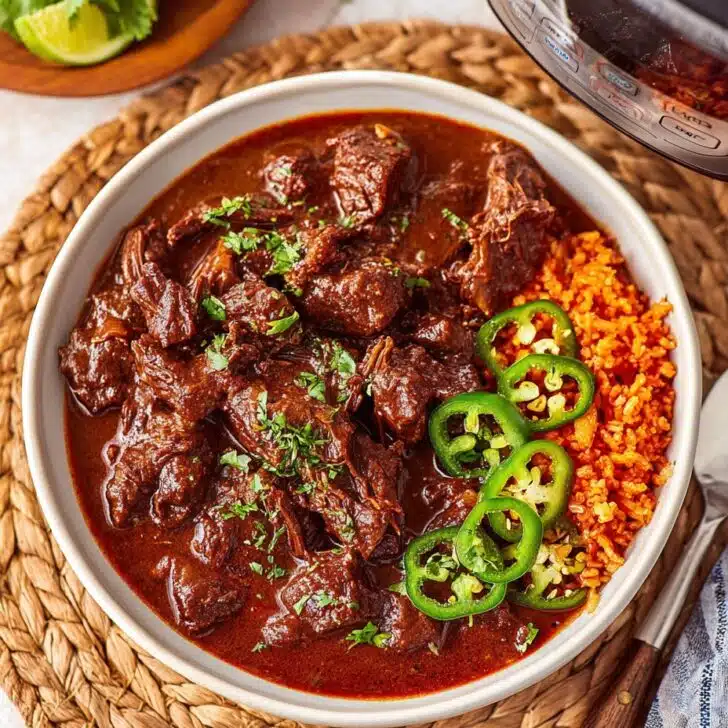
My favorite way? Spooned over fluffy white rice. Or, if I’m feeling fancy, tucked inside warm corn tortillas with avocado slices (and maybe a little squeeze of lime, but that’s probably just me). Sometimes my cousin demands we pile it on top of crispy oven fries. Not traditional, but highly satisfying.
Lessons Learned: A Few Pro Tips
- I once tried rushing the browning step by cramming all the beef in at once—don’t. You end up with steamed, gray cubes. Take your time, batch it if you need to.
- Don’t skip soaking the dried chiles! One time I thought my blender was strong enough to handle it dry—let’s just say, it was not. I’m still digging bits of chile skin out of the gasket ring a year later.
Your Chile Colorado Questions, Answered (and Then Some)
- Can I make this less spicy? Oh totally. Just leave out a chile or two or scoop out all the seeds. It’s actually pretty mild compared to most chile-forward recipes, so I’d taste the sauce before committing to any changes.
- What cut of beef works best? Chuck roast is my gold standard, 'cause it's got just enough fat to stay juicy. Stew meat is easier (and usually already cut up). I’ve experimented with brisket, but I thought it turned out kind of stringy.
- Can I make this ahead? Absolutely. In fact, like most stews, it’s even better the day after, once it’s had time to think about what it’s done.
- What if I don’t have a slow cooker? Use a heavy pot in the oven at a low temp. Oh, and just check to make sure you’ve got enough liquid; add a splash of water if it starts looking dry.
- Do I really need to blend the sauce? I mean, yes. Unless you’re after a chunky experience. Which—go for it, I guess!
That’s it. You’ve survived my novel and, if all has gone well, your kitchen now smells like the best little corner taqueria you’ve ever stumbled into. If not, well, consider ordering that pizza and trying again next weekend. Either way, you’ll eat!
Ingredients
- 2.5 lbs boneless beef chuck roast, cut into large chunks (I've swapped for stew meat in a hurry, works fine)
- 5 dried guajillo chiles, stemmed and seeded (ancho chilies will also work if that's what you found)
- 3 dried ancho chiles, stemmed and seeded
- 1 small white onion, quartered (sometimes I use yellow, shh)
- 4 cloves garlic, peeled
- 2 cups low-sodium beef broth (I’ve used chicken broth once, and honestly, no one noticed)
- 1 teaspoon dried oregano (Mexican oregano is traditional but I just use what’s in my cabinet)
- 1 teaspoon cumin
- 1 teaspoon kosher salt, plus more to taste
- ½ teaspoon black pepper
- 1 tablespoon tomato paste
- 1 tablespoon vegetable oil (or any oil, really—I used olive oil once and survived)
- Optional: ½ teaspoon smoked paprika (for a hint of extra smokiness—I like it for kicks)
Instructions
-
1Start by snipping the stems off all your dried chiles and shaking out most of the seeds (don’t sweat it if a few stick around, the sauce gets blended anyway).
-
2In a dry skillet, toast the chiles over medium heat until they puff up and start to smell amazing—30 seconds per side does it. Don’t walk away; they burn fast! Ask me how I know.
-
3Stuff the toasted chiles in a bowl and pour very hot water over to cover. Let them soak while you handle the rest (about 20ish minutes—enough time to wash the knife you just used or stare into the fridge and wonder where the leftovers went).
-
4While the chiles soak, add a splash of oil to the same skillet and brown the beef chunks on all sides. You want a little color; don’t overcrowd the pan (if you do, just pretend you wanted to steam them, it'll be fine). Transfer to the slow cooker when done.
-
5Now, in the blender, add soaked chiles, onion, garlic, tomato paste, broth, oregano, cumin, salt, pepper, and smoked paprika if you’re using it. Blend until super smooth—like, really go for it (this is where I usually sneak a taste, and sometimes add a pinch more salt if needed).
-
6Pour the glorious sauce all over the beef in the crockpot. Give it a little stir (it always looks kind of gnarly before it cooks, don’t worry).
-
7Cover and cook on low for 8 hours, or high for about 5. Don’t go peeking halfway—that just lets out heat. Trust the process, amigo.
-
8Give everything a gently stir when it’s done, taste for seasoning (I usually toss in a little more salt at this point, depends on the broth I used), and skim some fat if you feel like it. Or don’t; live your best life.
Approximate Information for One Serving
Nutrition Disclaimers
Number of total servings shown is approximate. Actual number of servings will depend on your preferred portion sizes.
Nutritional values shown are general guidelines and reflect information for 1 serving using the ingredients listed, not including any optional ingredients. Actual macros may vary slightly depending on specific brands and types of ingredients used.
To determine the weight of one serving, prepare the recipe as instructed. Weigh the finished recipe, then divide the weight of the finished recipe (not including the weight of the container the food is in) by the desired number of servings. Result will be the weight of one serving.
Did you make this recipe?
Please consider Pinning it!