
Let Me Tell You About My Garlic Parmesan Chicken Meatloaf
You know when you crave comfort food but want something a bit different than the usual beef meatloaf? That’s exactly where this garlic parmesan chicken meatloaf came in for me. Actually, the first time I tried making it was on a rainy Wednesday when my fridge looked like a culinary graveyard (half a bag of spinach, questionable cheese, and ground chicken that was giving me the ol’ ‘use me or lose me’ vibes). By the way, don’t ask me what happened to the spinach—let’s just say it didn’t make the cut. Anyway, this recipe has become my weeknight hero. Oh, and if you’re wondering: Yes, the kitchen will smell amazing. My neighbor once popped by asking if I was making garlic bread! (Nope, just this meatloaf.)
Why I Think You'll Love This (and When I Make It)
I whip this up whenever my family’s bored of chicken breasts (which is, honestly, most weeks). My kids actually request seconds (unheard of, except for pizza night), and I love that it’s not as heavy as traditional meatloaf. Sometimes I do get annoyed grating the parmesan (I’ve had my share of knuckle scrapes), but honestly, the flavor is worth it. Plus, if you’re feeding picky eaters, the garlic and cheese cover a multitude of sins. Oh, and the leftovers? Even better for lunch the next day—if you somehow have leftovers, which, in my house, is a rare event.
What You Need (And What I Swap When I’m Out of Stuff)
- 500g ground chicken (or turkey—I've done both, and chicken just feels a bit juicier to me)
- ⅔ cup grated parmesan cheese (I sometimes use the pre-shredded stuff; my grandma would probably have something to say about that, but hey, it works)
- 3 cloves garlic, minced (or a big spoonful of the jarred kind if I'm in a rush—no shame)
- 1 cup breadcrumbs (I've swapped in crushed crackers before; don't judge me!)
- ½ cup milk (any kind—I've done it with oat milk and it was...fine, actually)
- 1 large egg
- ⅓ cup fresh parsley, chopped (dried parsley if you must—sometimes I forget to buy fresh)
- 1 teaspoon salt
- ½ teaspoon black pepper
- 1 teaspoon Italian seasoning (optional, but I love it)
- ¼ cup melted butter (or olive oil if you want to feel healthier, but I usually just go for butter)
How I Make It—In My Sometimes-Messy Kitchen
- Preheat your oven to 180°C (350°F). If you forget, like I do half the time, no worries—just pop it in once your oven finally catches up.
- Grab a big bowl—metal, glass, whatever. Combine the chicken, parmesan, garlic, breadcrumbs, milk, egg, parsley, salt, pepper, and Italian seasoning. Get in there with your hands (I swear it mixes better; plus, it’s oddly satisfying). This is where I usually sneak a tiny taste (just kidding—don’t eat raw chicken). If it feels too wet, add more breadcrumbs; too dry, splash in a bit more milk.
- Line a loaf pan with parchment paper, or just grease it well. Don’t stress if you don’t have a loaf pan—a baking dish will do, but you might have to shape the mixture into a loaf shape yourself. I once used a pie dish. It was... not the neatest, but still tasty.
- Press the mixture into your pan. Smooth the top (or, on second thought, leave it a little lumpy—the crust gets a bit more interesting that way).
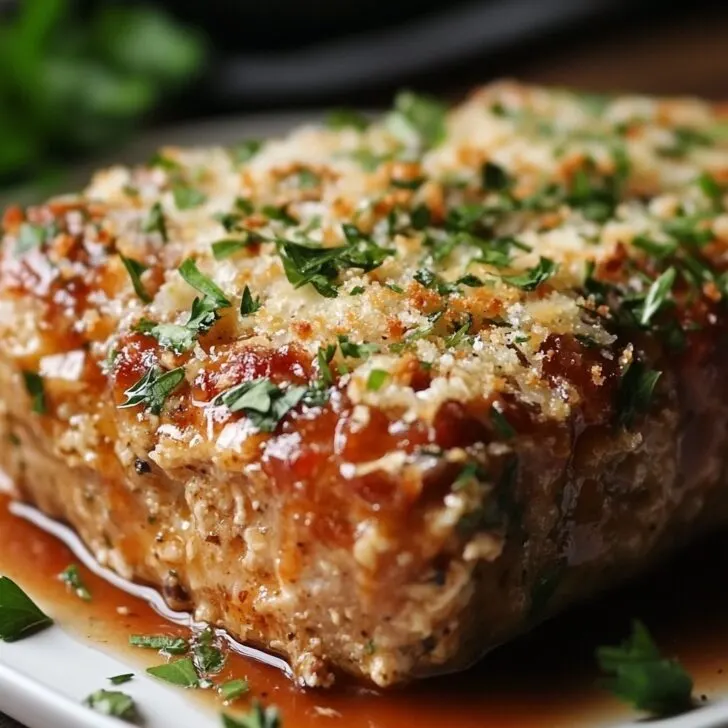
- Drizzle (or, honestly, just brush if you like) the melted butter over the top. This step is what makes the crust so irresistible. I once skipped it—never again.
- Bake for 50–60 minutes. If your oven runs hot (like mine), start checking at 45 minutes. The top should be golden and a thermometer should read 75°C (165°F) in the center. Don’t worry if it looks a little weird at first—trust me, it’ll come together.
- Let it rest for at least 10 minutes before slicing. I know it’s tempting, but if you cut it too soon it’ll just fall apart. (Ask me how I know!)
Little Lessons I've Learned (And Random Notes)
- If you accidentally use too much milk and it gets soupy, just toss in more breadcrumbs. It’s not the end of the world.
- Fresh garlic is best, but sometimes I use garlic powder if I’m feeling lazy—just use about a teaspoon.
- Actually, I find it works better if you don’t overmix; otherwise, it gets a bit tough. Just until it comes together is perfect.
Things I’ve Tried—Not All Were Winners
- I subbed in feta for parmesan once—too salty, don’t recommend. But mozzarella, mixed in, was lovely.
- I’ve added chopped spinach for a bit of green; my kids picked it out, though, so... make of that what you will.
- Sometimes I sprinkle a bit of extra cheese on top halfway through baking. It melts into these golden brown bits. Highly recommend!
Do You Need Fancy Equipment?
Honestly, a loaf pan is nice, but I’ve shaped it by hand on a baking sheet when I couldn’t find mine. If you have a meat thermometer, great—if not, just check that the juices run clear and it feels firm. And if you’re in the UK, a trusty Pyrex dish does the trick too.


What About Leftovers?
Store slices in an airtight container in the fridge up to three days... though honestly, in my house it never lasts more than a day! It reheats surprisingly well in the oven or microwave. Sometimes I’ll even have a cold slice in a sandwich. Don’t knock it till you try it.
How I Serve It (and What My Family Does)
I love mine with garlicky mashed potatoes and green beans (my kids drown theirs in ketchup; I’ve stopped fighting it). Sometimes, if I’m feeling fancy, I’ll whip up a little simple green salad on the side. Or just eat it straight out of the pan—no judgement here. On Sundays, I might even do a quick roasted carrots as a side.
Stuff I Learned the Hard Way (AKA Pro Tips)
- Let it rest after baking. I once tried slicing it right away because we were starving, and it sort of collapsed. Lesson learned.
- Use parchment paper for easy removal (I used to skip this step, but cleaning that pan was a bear).
- If you want a crispier top, broil for the last 2–3 minutes. Just keep an eye on it—ask me about the time I got distracted by a phone call and ended up with a charcoal brick!
FAQ—Because People Always Ask
- Can I make this ahead?
- Absolutely! I sometimes prep it in the morning and bake it at dinnertime. It holds up well in the fridge for a few hours before cooking.
- Can I freeze it?
- Yep. I usually slice it first, wrap in foil, and freeze. Just thaw and reheat in the oven. That said, the texture is a bit firmer after freezing—still good, though.
- Is there a low-carb option?
- You can swap the breadcrumbs for almond flour or crushed pork rinds. I tried it once, wasn’t totally convinced, but maybe you’ll love it. Worth a shot!
- What about leftovers for lunch?
- I swear it tastes better the next day. Cold in a sandwich is my secret favorite. Also, you can make little meatloaf sliders if you’re feeling fancy!
- Can I add veggies?
- Sure thing! Just chop them small—bell peppers, shredded carrots, or even spinach (unless your family’s like mine and will pick out every green bit).
And just a quick digression—has anyone else noticed that ground chicken sometimes comes in weird package sizes? I once ended up with 600g and just tossed it all in; it was a bit bigger but still tasty. So don’t sweat the small stuff. Happy cooking, mate!


Ingredients
- 1 lb ground chicken
- ½ cup grated Parmesan cheese
- ½ cup breadcrumbs
- 2 large eggs
- 3 cloves garlic, minced
- ¼ cup chopped fresh parsley
- ½ teaspoon dried Italian seasoning
- ½ teaspoon salt
- ¼ teaspoon black pepper
- ¼ cup milk
Instructions
-
1Preheat your oven to 375°F (190°C). Line a loaf pan with parchment paper or lightly grease it.
-
2In a large bowl, combine ground chicken, grated Parmesan cheese, breadcrumbs, eggs, minced garlic, chopped parsley, Italian seasoning, salt, black pepper, and milk.
-
3Mix all ingredients together until well combined, being careful not to overmix.
-
4Transfer the mixture into the prepared loaf pan and shape it into a loaf.
-
5Bake for 45 minutes, or until the meatloaf is cooked through and the top is golden brown.
-
6Let the meatloaf rest for 5 minutes before slicing. Serve warm, garnished with extra Parmesan and parsley if desired.
Approximate Information for One Serving
Nutrition Disclaimers
Number of total servings shown is approximate. Actual number of servings will depend on your preferred portion sizes.
Nutritional values shown are general guidelines and reflect information for 1 serving using the ingredients listed, not including any optional ingredients. Actual macros may vary slightly depending on specific brands and types of ingredients used.
To determine the weight of one serving, prepare the recipe as instructed. Weigh the finished recipe, then divide the weight of the finished recipe (not including the weight of the container the food is in) by the desired number of servings. Result will be the weight of one serving.
Did you make this recipe?
Please consider Pinning it!!