
Let Me Tell You About This French Silk Slab Pie
Okay, so you know when you stumble onto a dessert so good, you’re actually annoyed you have to share? That’s this French Silk Slab Pie for me. I first made it for my neighbor’s barbecue maybe three years ago, and honestly, I had to guard the pie dish like a dragon hoarding treasure – even my husband, who claims he "doesn't really like chocolate," managed to eat three slices. Go figure. (Side note: I may have eaten a chunk straight from the fridge at 2am, but let’s keep that between us, yeah?)
Why You’ll Love This (Or At Least Why I Keep Making It)
I make this when I want to impress people but don’t have the patience for fiddly pies – slab pies just feel more casual, more like you can serve a crowd without a fuss. My family goes absolutely bonkers for it (even the ones who say they "aren’t dessert people," which, I mean, who are those people?). And because you make it in a big ol’ pan, it stretches farther, which is handy when your cousin shows up with his new girlfriend – again. The hardest part used to be resisting the urge to eat the filling before I’d even finished the crust, but actually, I find it works better if you sneak a taste at the end so you don’t eat half the mixture, ha!
What You’ll Need (And What You Can Sub In)
- Pie Crust: 1 box refrigerated pie crusts (the kind that comes rolled up, not in a tin) – I’ve totally made this with homemade crust, but honestly, Pillsbury works like a charm and who’s got time for rolling pins on a Tuesday?
- Dark Chocolate: 8 oz good-quality dark chocolate, chopped – One time I used semisweet chips and nobody noticed, so don’t stress.
- Unsalted Butter: 1 cup (that’s two sticks, and yes, real butter does make a difference – but margarine, in a pinch, isn’t the end of the world)
- Granulated Sugar: 1 ¼ cups – My grandmother swore by Domino, but honestly, store brand is fine.
- Vanilla Extract: 2 teaspoons (if you’ve got the real stuff, use it; if not, no shame in the imitation game)
- Eggs: 4 large – I’ve used farm eggs, store eggs, even a random extra-large. All worked. (Just don’t use tiny ones, or it might not set right.)
- Heavy Whipping Cream: 1 ¼ cups (plus a bit more for topping, if you’re feeling extra)
- Powdered Sugar: ⅓ cup
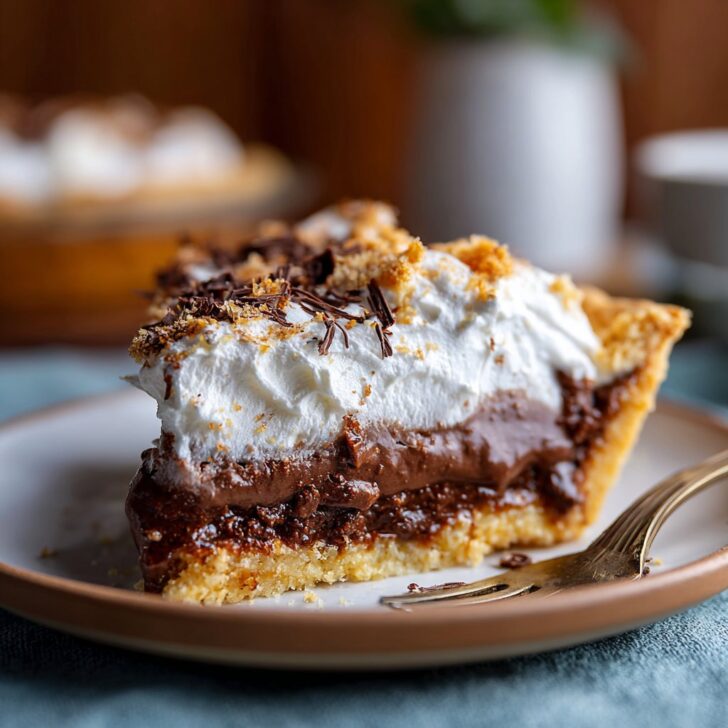
- Chocolate shavings or curls: For garnish. Totally optional, but makes you look like a pro.
Here’s How I Throw It Together
- First, preheat your oven to 425°F (220°C). Roll out the pie crusts and press 'em into a 9x13-inch baking pan (the kind you’d use for brownies). If they tear a bit, just smoosh the edges together; nobody’s looking.
- Prick the crust all over with a fork. Bake for about 12-14 minutes, until it looks golden and smells good. Let it cool completely – seriously, don’t rush this, or the filling will melt and you’ll end up with Silk Soup. (Ask me how I know!)
- Melt the chocolate in a heatproof bowl over simmering water – or toss it in the microwave in 30-second bursts, stirring as you go. It should be totally smooth. Set it aside to cool a bit.
- In a big bowl, beat the butter and granulated sugar together for at least 5 minutes, until it’s pale and fluffy. I used to stop early but trust me, that extra minute or two makes a difference here.
- Beat in the cooled chocolate and vanilla extract. This is where I usually sneak a tiny taste because it smells like heaven.
- Now, add the eggs one at a time, beating for a good 4-5 minutes after each egg (yes, really, each one). By the end, it should look glossy and almost mousse-like. Don’t worry if it looks a bit weird at first – it always comes together.
- In another bowl, whip the cream with powdered sugar until stiff peaks form (like, if you lift the beaters, it holds its shape). Fold about two-thirds into the chocolate mixture, then spread the whole glorious lot over your cooled crust.
- Swirl the rest of the whipped cream on top and scatter chocolate shavings for that fancy-pants touch.
- Pop the slab pie in the fridge for at least 4 hours or overnight if you can stand it. It really does taste better the next day, in my humble opinion.
Stuff I’ve Learned (Mostly From Messing Up)
- If you use warm chocolate, the filling gets weirdly grainy. Let it cool until it’s just slightly warm, not hot.
- I once tried using a graham cracker crust and, honestly, it was way too sweet for me – but, hey, you might love it.
- Overmixing the cream makes it go from fluffy to butter in, like, a split second. So, don’t wander off (learned that the hard way).
Variations I’ve Tried (And One I’d Skip)
- Nutty: I added toasted hazelnuts to the crust once – pretty tasty!
- Mocha: Stir a spoonful of instant espresso into the melted chocolate. Grown-ups love it. Kids, not so much (or maybe that’s just mine?).
- Salted: Sprinkle a flake or two of sea salt on top for that fancy bakery vibe. Did this for a dinner party and people thought I was a genius.
- Don’t Do This: I tried using coconut cream instead of dairy once and, well, let’s just say it wasn’t my finest hour. The texture went all wrong. Maybe someone more patient than me could make it work?
What You’ll Need Gear-wise (Or Not)
- 9x13-inch pan (if you only have a slightly smaller one, it’s fine – just don’t try to cram it in a tiny Pyrex!)
- Electric mixer or a whisk and beefy forearms (I once did it by hand, regretted it halfway through – but hey, it’s possible)
- Mixing bowls
- Spatula (though, honestly, a big spoon works in a pinch)


How To Store (But Good Luck With Leftovers)
Keep your slab pie covered in the fridge – it’ll last about 3 days, though honestly, in my house it never lasts more than a day! If you’re somewhere super hot and humid, you might want to gobble it up faster – the cream topping gets a little sad after too long.
How I Like To Serve This (Totally Optional)
We usually cut big, slightly wonky squares and eat them straight from the pan. For parties, I sometimes add a dollop of whipped cream on each piece, and if it’s a special occasion, maybe a raspberry or two. (On birthdays, my dad insists on candles, even though he’s 64. So there’s that.)
If I Could Give You Just A Few Pro Tips...
- I once tried rushing the chilling step and regretted it because the filling was a sad puddle. Just wait it out, trust me.
- Don’t skip pricking the crust with a fork, or it’ll bubble up like a soufflé and you’ll have to smoosh it down. Not fun.
- Use a long, thin knife to cut squares – it helps keep the layers neat, but honestly, if they’re messy, nobody’s going to mind.
FAQ – Real Questions (And My Honest Answers)
- Can I make this ahead? Yes! I actually think it tastes better the next day, so make it the night before if you can.
- What if I don’t have a mixer? You can totally whisk it by hand, but brace yourself for a workout. Maybe rope in a helper?
- Is it safe to use raw eggs? This one comes up a lot. I use pasteurized eggs if I’m worried, or you can check out this handy food safety temp guide. Or, hop over to Serious Eats for more about egg safety in pies like this.
- Can I freeze it? Eh, I wouldn’t. The texture gets weirdly icy and watery when it thaws. If you do try, let me know how it goes!
- What’s the difference between French Silk and chocolate cream pie? So, French Silk is all about that rich, mousse-like filling with loads of butter and eggs; chocolate cream pie usually has a cooked custard base. Both are delicious, but French Silk feels like the fancy cousin. (Just my opinion!)
And if you make this, tell me how it went – or if you found a new twist that’s even better. I’m always looking for ways to mess with tradition (or just eat more chocolate). Cheers!


Ingredients
- 1 sheet refrigerated pie crust
- 1 cup unsalted butter, softened
- 1 ½ cups granulated sugar
- 4 ounces bittersweet chocolate, melted and cooled
- 2 teaspoons vanilla extract
- 4 large eggs
- 2 cups heavy whipping cream
- 2 tablespoons powdered sugar
- Chocolate shavings, for garnish
Instructions
-
1Preheat oven to 400°F (200°C). Roll out the pie crust and fit it into a 9x13-inch baking pan. Trim and flute the edges as desired.
-
2Prick the crust with a fork and bake for 12-15 minutes or until golden brown. Let cool completely.
-
3In a large bowl, beat the butter and sugar together until light and fluffy. Blend in the melted chocolate and vanilla extract.
-
4Add eggs one at a time, beating on high speed for 3-4 minutes after each addition, until the mixture is silky and smooth.
-
5Spread the chocolate filling evenly over the cooled crust. Refrigerate for at least 4 hours or until set.
-
6Whip the heavy cream with powdered sugar until stiff peaks form. Spread over the chilled pie and garnish with chocolate shavings before serving.
Approximate Information for One Serving
Nutrition Disclaimers
Number of total servings shown is approximate. Actual number of servings will depend on your preferred portion sizes.
Nutritional values shown are general guidelines and reflect information for 1 serving using the ingredients listed, not including any optional ingredients. Actual macros may vary slightly depending on specific brands and types of ingredients used.
To determine the weight of one serving, prepare the recipe as instructed. Weigh the finished recipe, then divide the weight of the finished recipe (not including the weight of the container the food is in) by the desired number of servings. Result will be the weight of one serving.
Did you make this recipe?
Please consider Pinning it!!