
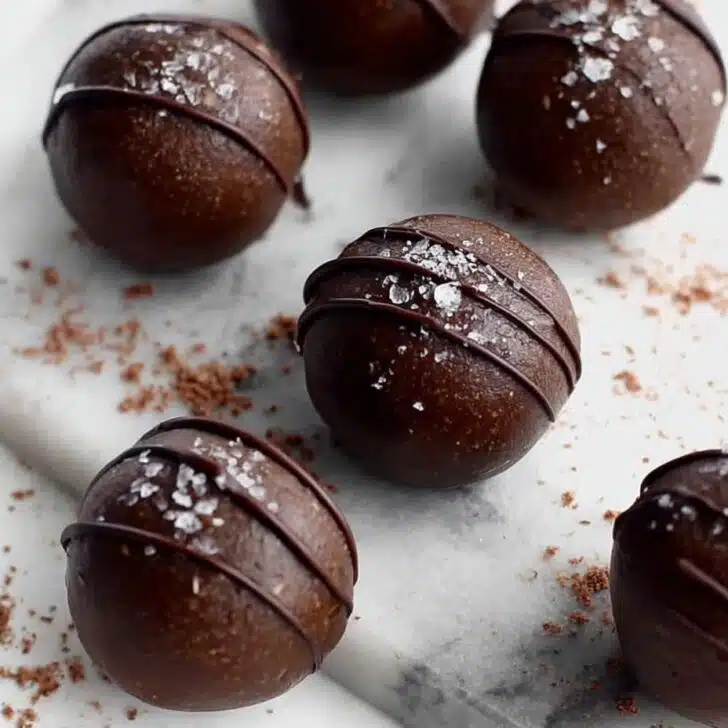
Let Me Tell You About These Dark Chocolate Protein Balls…
Alright, so let's just say I've made (and eaten, obviously) more Protein Balls than anyone probably should. These dark chocolate protein balls are sort of my trusty old companion—like that friend who never judges when you've just come home tired, hungry, and, honestly, a bit hangry. I remember the first time I made them: my food processor basically whined at me and sprayed oat dust all over the bench. But once I actually got everything figured out, oof, they became a weekly staple. Sometimes, I'll even hide them at the back of the fridge behind last week's questionable yogurt—out of sight, out of mind, you know?


Anyway, I tinker with this recipe a lot (sometimes to the dismay of my family, who act personally attacked when I swap out peanut butter for almond butter), but this is the version everyone is happiest with. And if I'm honest, there's just something about dark chocolate that makes me feel classy—even if I'm eating these in my pajamas at 2pm.
Why You'll Love These (Well, I Certainly Do!)
I make this when I've totally run out of granola bars, or when my sweet tooth is acting up but I want to pretend I'm being healthy. My best mate Jamie says they're like a fudgy snack that's just barely on the right side of 'responsible adult' food. My niece tried to sneak these into her lunchbox last week (her teachers still messaged me asking for the recipe, which tickled me more than it probably should—cheers, Miss Carter!). If you're into the whole meal prep thing, these also survive a week in the fridge, but let's be real: unless you have far more willpower than me, they're gone in a couple days. I used to get annoyed at the mess from rolling the dough, but now I just embrace sticky chocolatey hands—fingers are the original kitchen tools, right?
What You’ll Need—And a Few Things You Can Swap
- 1 cup rolled oats (I’ve used quick oats when it’s all I had—works fine)
- ⅓ cup chocolate protein powder (whey, plant-based, honestly whatever you like—I’m not picky)
- 2 tablespoons unsweetened cocoa powder (Dutch processed if you want it rich; honestly, I just grab what’s in the tin)
- ½ cup nut butter (peanut is my default, but almond or even sunflower seed butter gets the job done—my grandmother would swear by Skippy, but hey, live a little)
- ¼ cup honey (maple syrup if you’re vegan, or that weirdly thick rice syrup I bought once by mistake—didn’t hate it)
- ¼ cup dark chocolate chips (or chop up a bar if that’s what’s in the cupboard)
- ¼ teaspoon sea salt (I sometimes forget this, and it’s fine—but it does help cut the sweetness)
- 2-3 tablespoons milk (dairy or non-dairy, whatever is lurking in the fridge)
- Optional: 1 tablespoon chia seeds (makes me feel righteous, but honestly, only if I remember)
How to Make 'Em (with a Few Tangents Along the Way)
- First off, chuck the oats into a food processor and blitz them until they look a bit like flour. Don’t panic if it’s still a bit coarse! Sometimes I just leave it a little chunky for texture.
- Add the protein powder, cocoa powder, and sea salt. Give it just a couple pulses—it’s not rocket science, just mix it up roughly.
- Stir in your nut butter and honey (or syrup). Now, this is where you want to roll up your sleeves, ‘cause things get sticky. I use a spoon at first, then just go in with my hands—makes it come together better anyway.
- Pour in the milk, start with 2 tablespoons, and mix again. If it’s dry or falls apart, drizzle a bit more milk in. Don’t worry if it looks a bit odd at this stage—it always does!
- Time for the chocolate chips. Fold them in, and if you’re in a generous mood, toss in those chia seeds here too. This is where I usually sneak a taste (for quality control, obviously).
- Scoop out small bits (about a tablespoon each) and roll into balls between your hands. Side note: I always end up with different sizes. The universe will survive.
- Pop them onto a baking sheet (or plate, or whatever’s clean) and chuck them in the fridge for at least 30 minutes so they firm up. Or the freezer if you’re impatient and want them even fudgier—guilty here.


The Things Nobody Tells You (My Oddball Notes)
- If your hands get too sticky when rolling, wet them a smidge—that helps way more than gloves (which just make a mess, in my opinion).
- Once, I mixed in a bit of espresso powder—wow, did not expect it to taste that good. Try it if you like coffee.
- This dough can get stubbornly crumbly depending on your protein powder brand. Actually, I find it works better if you go heavier with the nut butter on those days.
- Oh, and don’t bother meticulously forming perfect spheres—wonky is charming. At least, that’s my story and I’m sticking to it.
Variations I’ve Experimented With (and a Fail!)
So, I’ve tried them with white chocolate chips—too sweet for my taste, but maybe that’s just me.
Adding coconut flakes gives a nice texture, though it does make things a bit trickier to roll (messy hands again, sigh). Cinnamon is a fun twist if you’re in an autumn mood. Once, I tried adding mashed banana… let’s just say it was a bit too, er, squishy for my liking—straight up mush. Lesson learned!


Equipment You’ll Need (or Don’t Sweat It If You Don’t Have…)
- A food processor or blender is ideal—it chops the oats and mixes faster. But honestly, I’ve just bashed the oats in a zip-lock bag with a rolling pin before (bit of an arm workout, just warning you).
- Mixing bowl
- Spoon or spatula (or just use your hands, like the kitchen rebel you are)
- Baking tray or plate for chilling
How to Store (Not That They’ll Last Long!)
Keep them in an airtight container in the fridge, where they’ll last about a week. Or so I’m told—honestly, in my house, I’m lucky if there’s one left after 48 hours. They freeze well too, just in case you’re feeling organized (teach me your ways?).
Serving Suggestions—How We Do It at My Place
I like to grab one with my afternoon coffee, but they’re also a hit popped into lunchboxes (even for grown-ups). My cousin crumbles them onto yogurt for breakfast, which—okay, I admit, is genius. Also, once I stacked them in a bowl at a party and told everyone they were 'energy truffles'. No one questioned it!
Pro Tips Form My (Occasional) Mistakes
I once tried rushing the chilling step and ended up with a melty situation. Just, take your time—even 20 minutes makes a difference. Don’t overdo the milk; I did that once and got stickier dough than playdough (not fun to eat!). And actually, I find it works better if you let the mixture rest for a few minutes before rolling—that way the oats soak up a bit of moisture, making things easier. On second thought, patience is an ingredient here.
Frequently Asked Questions (Yes, I’ve Heard These All Before)
- Can I skip the protein powder? Yeah, you can, but then they’re more like oat balls. Still tasty though; just bulk out the oats.
- Do I have to use dark chocolate? You do you—I just love the richness, but milk chocolate is fine. White is a bit much though (see above for my failed experiment!)
- Can I make these nut-free? Yes, swap in sunflower seed butter or even tahini, but tahini does add a pronounced flavor—so be prepared for a grown-up twist.
- Mine won’t roll, what’s up? It’s probably a bit dry—add a splash more milk or an extra spoon of nut butter. Happens to me all the time, especially with different protein powders.
- Do they need to stay in the fridge? Nope, but they stay fresher longer—plus, I like ‘em best cold anyway.
And there you have it! If you make them, let me know if you run into any weird texture issues—or if you, like my uncle, insist on eating half the batch before they even hit the fridge. No judgment here.
Ingredients
- 1 cup rolled oats (I’ve used quick oats when it’s all I had—works fine)
- ⅓ cup chocolate protein powder (whey, plant-based, honestly whatever you like—I’m not picky)
- 2 tablespoons unsweetened cocoa powder (Dutch processed if you want it rich; honestly, I just grab what’s in the tin)
- ½ cup nut butter (peanut is my default, but almond or even sunflower seed butter gets the job done—my grandmother would swear by Skippy, but hey, live a little)
- ¼ cup honey (maple syrup if you’re vegan, or that weirdly thick rice syrup I bought once by mistake—didn’t hate it)
- ¼ cup dark chocolate chips (or chop up a bar if that’s what’s in the cupboard)
- ¼ teaspoon sea salt (I sometimes forget this, and it’s fine—but it does help cut the sweetness)
- 2-3 tablespoons milk (dairy or non-dairy, whatever is lurking in the fridge)
- Optional: 1 tablespoon chia seeds (makes me feel righteous, but honestly, only if I remember)
Instructions
-
1First off, chuck the oats into a food processor and blitz them until they look a bit like flour. Don’t panic if it’s still a bit coarse! Sometimes I just leave it a little chunky for texture.
-
2Add the protein powder, cocoa powder, and sea salt. Give it just a couple pulses—it’s not rocket science, just mix it up roughly.
-
3Stir in your nut butter and honey (or syrup). Now, this is where you want to roll up your sleeves, ‘cause things get sticky. I use a spoon at first, then just go in with my hands—makes it come together better anyway.
-
4Pour in the milk, start with 2 tablespoons, and mix again. If it’s dry or falls apart, drizzle a bit more milk in. Don’t worry if it looks a bit odd at this stage—it always does!
-
5Time for the chocolate chips. Fold them in, and if you’re in a generous mood, toss in those chia seeds here too. This is where I usually sneak a taste (for quality control, obviously).
-
6Scoop out small bits (about a tablespoon each) and roll into balls between your hands. Side note: I always end up with different sizes. The universe will survive.
-
7Pop them onto a baking sheet (or plate, or whatever’s clean) and chuck them in the fridge for at least 30 minutes so they firm up. Or the freezer if you’re impatient and want them even fudgier—guilty here.
Approximate Information for One Serving
Nutrition Disclaimers
Number of total servings shown is approximate. Actual number of servings will depend on your preferred portion sizes.
Nutritional values shown are general guidelines and reflect information for 1 serving using the ingredients listed, not including any optional ingredients. Actual macros may vary slightly depending on specific brands and types of ingredients used.
To determine the weight of one serving, prepare the recipe as instructed. Weigh the finished recipe, then divide the weight of the finished recipe (not including the weight of the container the food is in) by the desired number of servings. Result will be the weight of one serving.
Did you make this recipe?
Please consider Pinning it!