
Let Me Tell You About These Pancakes
Alright, friend, so about these chocolate chip pancakes—I’ve been making them for years, probably since the era when flip phones were cutting edge and I thought powdered sugar was just for fancy restaurants. The first time I made these for my nieces, I’ll never forget it: the chips went everywhere (even the cat was interested), but the smiles around the table were absolutely worth cleaning melted chocolate off the back of the remote control. These pancakes are my weekend ace-in-the-hole, especially when I need to guarantee happy faces before noon. Plus, nothing beats the smell of melting chocolate in the kitchen—honestly, it should be bottled as perfume.
Why You'll Be Into These (Or At Least, That's How It Goes at My House)
I pull out this recipe when I want breakfast to feel like a holiday. My family goes a bit bonkers for them—my youngest literally calls them “chocolate party cakes” (I mean, same, kid). Actually, when I'm too lazy for an elaborate brunch but don’t want cereal stares, these get the job done. And hey, if you’ve ever had pancakes come out mysteriously chewy or a bit too brown, same here. This recipe is forgiving. I even like sneaking a few extra chips into the last batch (let’s just say—not everyone plays fair in my kitchen).
Alright—Here’s What You’ll Need (Substitutions Welcome)
- 1 cup all-purpose flour (sometimes, I’ll sneak half whole wheat in—no one notices, unless you tell them)
- 2 tablespoons sugar (brown sugar’s good if you like things rich, though my old neighbor swears by honey…but it’s a pain to measure)
- 2 teaspoons baking powder (please don’t use the stuff that’s older than your teabags, learned the hard way)
- ½ teaspoon salt (skip if you’re using salted butter later)
- 1 cup milk (whole is best, but I use oat milk when my cousin’s over...she’s all about that plant-based life)
- 1 large egg
- 2 tablespoons melted butter (honestly, oil works in a bind—my grandma always said “whatever’s closest”)
- 1 teaspoon vanilla extract (optional, but it makes them feel special)
- ½ to ¾ cup chocolate chips (milk, dark, mini, whatever—just don’t skimp)
How to Make Chocolate Chip Pancakes (With a Few Detours)
- Mix the Dry Stuff: In a decent-sized bowl, toss in your flour, sugar, baking powder, and salt. Give it a good whisk (or, if you’re me, a quick stir with a fork because the whisk is always missing).
- Get the Wet Stuff Together: Crack the egg right into your measuring cup if you can’t be bothered with another bowl—add milk, melted butter, vanilla, and mix it up. I once forgot the butter till the end and, actually, it still turned out okay.
- Combine Dry and Wet: Pour the wet ingredients into the bowl of dry. Stir until *just* combined—lumps are good! If you overmix, the pancakes tend to get tough; and nobody wants that. (This is the stage it always looks weird—it’s fine!)
- Fold in the Chocolate Chips: Gently mix in those chips. If you want them extra melty, throw in a few more (or eat some straight form the bag...I won’t judge).
- Let the Batter Sit: Sometimes, I walk away for 5-10 minutes—let things relax. Not totally essential, but I think it helps the fluff factor.
- Cook ‘Em: Heat up a nonstick skillet or griddle over medium heat. A dab of butter or a quick swipe of oil, then scoop out small mounds of batter—about ¼ cup a go. Cook until you see bubbles and the edges look like they mean business (2-3 minutes). Flip. Lower the heat if they brown too fast—been there!
- Eat the Ugly Ones First: I always, always burn my first pancake. That one’s for you, chef’s snack priviledge.
Little Notes I Wish Someone Had Told Me
- The batter shouldn’t be as runny as milk, nor as thick as glue. If it is, just add a splash more milk—or toss in a little flour if it’s too loose. No one’s judging.
- Warming up the chocolate chips a bit beforehand makes them extra gooey. But don’t microwave them by accident (speaking from a chocolatey spill disaster here).
- If you double the recipe, don’t just double the salt—I did that last Christmas and let's just say, we started craving water more than seconds.
Variations I've Tried for Fun (Yes, Some Were Weird)
- Add a handful of blueberries with the chips—fruity and fabulous.
- Swap half the flour for ground oats for something heartier. It tastes, well, earthy but kids still ate it up.
- Once, I used white chocolate chips and chopped walnuts. Maybe too sweet, but my neighbor loved it. On second thought—I’m not sure someone with a nut allergy would thank me.
- I tried putting caramel bits in. Disaster. They stuck like glue and burned. Would not repeat.
What If You Don't Have a Skillet?
Honestly, any frying pan works—I once made these in a wok while camping. Just takes a little longer. If you’re really in a pinch, nonstick baking sheets under a broiler (watch carefully!) kind of works. Sort of.


Storing—If You Have Any Left
Stick ‘em in an airtight container, they'll keep in the fridge for a couple days. Or toss them in the freezer between bits of parchment. Though honestly, in my house they never last more than a day!
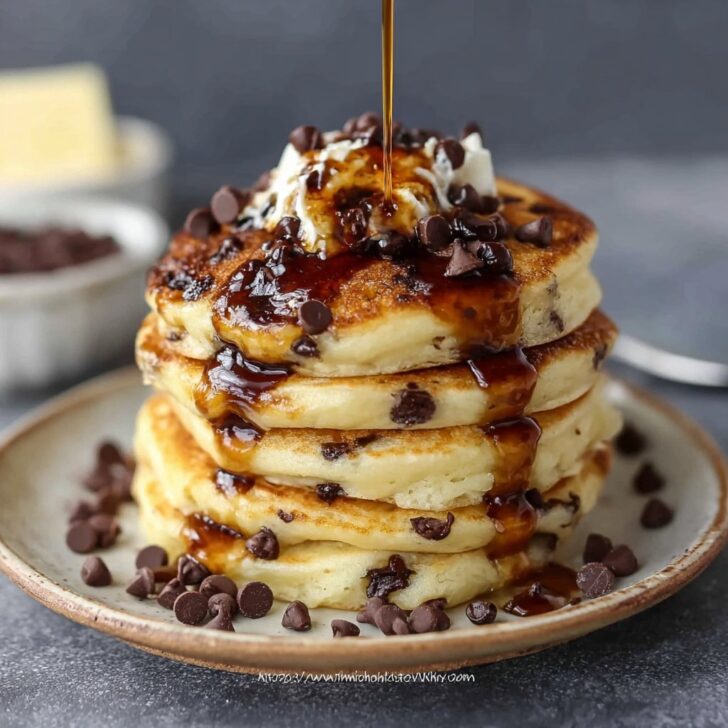
How We Like to Serve Ours (You Do You!)
Maple syrup is the classic, but sometimes I go rogue with whipped cream and berries. My uncle loves a bit of salted butter on top—claims it’s the “grown-up” way. At birthday breakfasts, we’ve even sprinkled on rainbow sprinkles (because why not?). Chocolate syrup is probably overkill, but I’m not here to judge.
Stuff I Wish I’d Known (Pro Tips, Kinda)
- Let your pan heat up, but not too hot! I once tried to rush it—the pancakes were black on the outside and raw inside. Not my best work.
- Don’t flip too soon. Give them a minute (patience, grasshopper). They actually tell you when they're ready if you listen—or, more accurately, watch for those bubbles.
- Use a flexible fish spatula if you have one. Makes flipping a breeze; but honestly a sturdy dinner fork does fine in a pinch.
FAQ—These are Real Questions, Promise!
- Can I make this gluten-free? Yep! Just sub in your fave gluten-free blend. They might turn out a tad more crumbly—no worries.
- Do I need to rest the batter? You don't have to, but I think it makes them fluffier (sometimes impatience wins, though).
- What kind of chocolate chips do you use? Whatever’s lurking in the cupboard! Mini, milk, dark—it all works. There’s some deal on bulk chocolate chips at Bob’s Red Mill that I like using, if you’re curious.
- Any tips for making a big batch for a crowd? Use the oven! Set it to 200°F and keep the finished pancakes warm on a baking tray while you fry up the rest. Oh! And if you're looking for other big breakfast ideas, Smitten Kitchen’s pancake tips are a lifesaver.
- Can I make these in advance? Sort of. They reheat okay (microwave or toaster), but honestly, I think this tastes better fresh. Although, cold pancake sandwiches with peanut butter aren't half bad.
So there you go—my best shot at chocolate chip pancakes, with a few detours and “oops” moments along the way. Make a batch, eat some now, and try not to burn the first one. Happy flipping!


Ingredients
- 1 ½ cups all-purpose flour
- 3 tablespoons granulated sugar
- 1 tablespoon baking powder
- ½ teaspoon salt
- 1 ¼ cups milk
- 1 large egg
- 3 tablespoons unsalted butter, melted
- ½ cup chocolate chips
- 1 teaspoon vanilla extract
- Butter or oil for cooking
Instructions
-
1In a large bowl, whisk together the flour, sugar, baking powder, and salt.
-
2In another bowl, whisk together the milk, egg, melted butter, and vanilla extract.
-
3Pour the wet ingredients into the dry ingredients and stir until just combined. Do not overmix. Fold in the chocolate chips.
-
4Heat a non-stick skillet or griddle over medium heat and lightly grease with butter or oil.
-
5Pour ¼ cup of batter onto the skillet for each pancake. Cook until bubbles form on the surface, then flip and cook the other side until golden brown.
-
6Serve warm with your favorite syrup or toppings.
Approximate Information for One Serving
Nutrition Disclaimers
Number of total servings shown is approximate. Actual number of servings will depend on your preferred portion sizes.
Nutritional values shown are general guidelines and reflect information for 1 serving using the ingredients listed, not including any optional ingredients. Actual macros may vary slightly depending on specific brands and types of ingredients used.
To determine the weight of one serving, prepare the recipe as instructed. Weigh the finished recipe, then divide the weight of the finished recipe (not including the weight of the container the food is in) by the desired number of servings. Result will be the weight of one serving.
Did you make this recipe?
Please consider Pinning it!!