
So, About This Wisconsin Apple Kringle...
Alright, first off—thanks for stopping by! If you’ve ever spent a cold morning in Wisconsin, you know there’s nothing quite like a slab of apple kringle (and sure, maybe a hot cup of coffee too). I remember my first attempt at making one: flour all over my kitchen, apples rolling off the counter like they were trying to escape, and the dog lurking nearby for any casualties. Classic. Anyway, my grandma always said kringle should be a little messy—otherwise it’s not made with enough love. (She totally had a point; plus, the mess seems to keep it authentic.)
Why You'll Love This (Or Why My Family Does!)
I whip this up pretty much every fall (or anytime someone brings home way too many apples and they're lurking in the fruit bowl, eyeing me accusingly). My family goes bananas for it—well, apples, technically—because it’s not too sweet, nice and flaky, and you can eat it for breakfast or dessert. Actually, it makes a killer midnight snack, though it’s a dangerous habit I've developed. Sometimes I make two if relatives are dropping by. More than once, I've had someone ask if it’s store-bought. (Not sure if that’s a compliment but I’ll take it. Ha!)
Here's What You'll Need to Gather (With a Few Swap Ideas)
- 2 cups all-purpose flour (I’ve swapped half for whole wheat before—tasted fine, just a tad more rustic, you know?)
- 1 tablespoon sugar (use brown sugar if you’re feeling wild)
- ¼ teaspoon salt
- ¾ cup cold butter, diced (I know some folks swear by margarine, but honestly, butter wins every time around here)
- ½ cup sour cream (Greek yogurt totally works in a pinch; tried it once by accident—it was fine)
- 1 egg yolk (save the white for a glaze, or an omelette if you’re hungry)
- 3 medium tart apples, peeled and sliced thin (Granny Smith is the go-to, but whatever’s cheapest or lurking in your fridge is fair game)
- ⅓ cup sugar (for the filling—I’ve accidentally used more; nobody complained)
- 1 teaspoon cinnamon (sometimes I throw in a pinch of nutmeg if I’m feeling fancy)
- 1-2 tablespoons lemon juice (eyeball it if you hate measuring)
- For the glaze: 1 cup powdered sugar, splash of milk, splash of vanilla
How I Actually Make This (Not Always Pretty)
- Mix dry stuff. In a big bowl, toss together the flour, sugar, and salt. Add the cold butter and work it in with your fingers or a pastry cutter (or, you know, two butter knives if that’s what you’ve got) until it’s all crumbly.
- Stir in the wet stuff. Add the sour cream and egg yolk, and mix just until it starts to stick together. Don’t overdo it. If it’s a little shaggy, good! That means it’ll be flaky.
- Chill out. Wrap the dough in cling film (or a clean plastic bag—I’ve done it) and stick it in the fridge for about an hour. I use this time to find where all my apples have rolled off to. Seriously, they scatter like marbles.
- Get the filling going. Mix your apple slices with the sugar, cinnamon, and lemon juice right before rolling out the dough—otherwise, they’ll leak everywhere (ask me how I know).
- Roll & fill. Preheat the oven to 400°F (about 200°C). Roll out the dough on a floured surface into a long rectangle. It always looks a little lopsided but that’s fine. Spoon the apple mixture down the center, but leave enough dough on the sides to fold over. This is where I usually sneak a slice or two of apple. Hopefully nobody is watching.
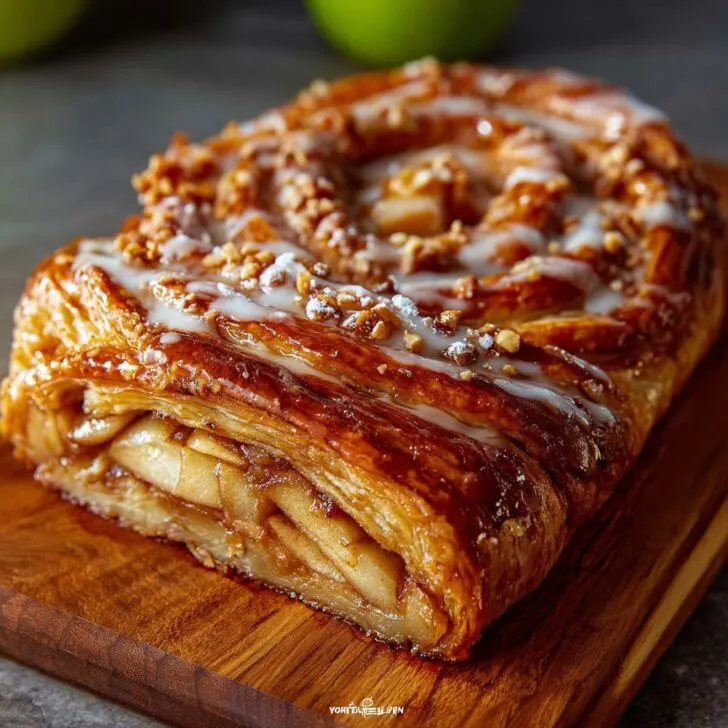
- Shape it up. Fold both sides over the apples and pinch the edges shut—if some filling is peeking out, it'll caramelize in the oven, which I call a feature not a bug. Transfer (awkwardly!) to a parchment-lined baking tray. You can shape it like a log or sort of twist it into an oval or horseshoe. Don’t stress the looks; it all tastes the same in the end.
- Bake. Pop in the oven for 25-30 minutes. By then your kitchen will smell so good you'll probably get random family members lurking. If the dough is golden and the apples are bubbling a bit, you’re golden. Let it cool for a few min, unless you enjoy burning your tongue like I occasionally do.
- Glaze it. Stir together powdered sugar, milk, and vanilla until it’s pourable (not too runny). Drizzle over the warm but not hot kringle. Try to let it set before cutting in, but you do you.
Notes (AKA, What I've Messed Up Before)
- If you skip chilling the dough, it’ll spread out into something that looks like an awkward pancake. Still tasty, but not kringle.
- I sometimes add a handful of chopped walnuts—just depends if I find any lurking in the pantry.
- Don’t panic if the filling leaks while baking. The crispy, caramelized edges are honestly the best bites.
- I find it tastes even better the next day—if you can wait that long.
Variations I've Experimented With (Some Good, Some... Eh)
- Pear & ginger instead of apple—nice little zing!
- Leftover cranberry compote smeared on the dough before adding apples. A touch tart and festive.
- Once tried cherry pie filling (just to see)—was too gloopy, but not inedible. Pick your battles.
Equipment (and a Few Cheeky Substitutions)
- Rolling pin—or a wine bottle if you’re in a pinch (don’t ask how I know)
- Baking sheet
- Mixing bowls (any old bowl, really)
- Parchment paper—or just grease the pan a bit more if you run out, no biggie
- Pastry cutter—though honestly, forks or hands work fine too


How to Store It (Just in Case There's Leftovers... Never Happens Here)
Wrap any extras in foil or stick in an airtight container. Should keep well for two to three days at room temp. Refrigerate if you want, but it’s less flaky after. Though honestly, in my house this thing rarely sees sunrise the next day. More on keeping baked goods fresh.
Serving It Up—My Favorite Ways
I’m partial to a big slice with coffee on chilly mornings. Or with ice cream for dessert (try this homemade vanilla ice cream). My cousin swears by a drizzle of caramel sauce. We slice ours kinda thick, though some folks cut dainty pieces—suit yourself!
Pro Tips (Mostly Things I Messed Up and Fixed)
- Once, I tried rushing the dough and skipped chilling—it melded into a buttery puddle. Actually, chilling is key.
- It’s tempting to overpack apples for a super fruity bite, but too many and you risk a leaky disaster.
- If the glaze is too thick, add milk a few drops at a time; too thin, just keep adding sugar. Don’t overthink it, it’ll work out.
Frequently Asked (and Sometimes Funny) Questions
- Do I really have to chill the dough?
- Yep. I’ve skipped it when I was impatient—it just doesn’t turn out as flaky. Trust me (I mean, it’s edible, but... it’s not kringle-level good).
- Can I use store-bought pie crust?
- Sure, if you must! The flavor’s a bit different, but it still scratches that kringle itch. Maybe call it a cheater’s kringle?
- What's the best kind of apple to use?
- I like Granny Smith. But honestly, any apple except the weird mealy ones works. Just don’t stress about it.
- Can I make this gluten-free?
- I once tried a 1:1 GF flour blend. Not exactly the same texture, but still yummy. Adjust the rolling—GF dough is cranky sometimes.
- Does it freeze well?
- Absolutely! Pop slices in a zip bag, squeeze out extra air, and freeze. Defrost and reheat for a few mins—still pretty great.
By the way, if you’re an apple fanatic, check out Wisconsin’s apple guide here—I found it last year and there’s a bunch of interesting apple tidbits. Okay, that’s enough rambling; go get baking and let me know if your kringle disappears as fast as mine tends to!


Ingredients
- 2 cups all-purpose flour
- ½ teaspoon salt
- 1 cup cold unsalted butter, cubed
- ½ cup sour cream
- 2 large apples, peeled, cored, and thinly sliced
- ⅓ cup granulated sugar
- 1 teaspoon ground cinnamon
- ½ cup powdered sugar
- 1-2 tablespoons milk
- ½ teaspoon vanilla extract
Instructions
-
1In a large bowl, combine the flour and salt. Cut in cold butter until the mixture resembles coarse crumbs.
-
2Stir in the sour cream until the dough comes together. Divide into two portions, flatten into discs, wrap, and chill for 30 minutes.
-
3Preheat oven to 375°F (190°C). On a floured surface, roll out one dough disc into a rectangle. Transfer to a parchment-lined baking sheet.
-
4Toss sliced apples with granulated sugar and cinnamon. Spread apple mixture down the center of the dough, leaving a border.
-
5Fold dough over the filling and pinch edges to seal. Repeat with the second disc. Bake for 30 minutes or until golden brown. Cool slightly.
-
6Mix powdered sugar, milk, and vanilla extract to make a glaze. Drizzle over the cooled kringle before serving.
Approximate Information for One Serving
Nutrition Disclaimers
Number of total servings shown is approximate. Actual number of servings will depend on your preferred portion sizes.
Nutritional values shown are general guidelines and reflect information for 1 serving using the ingredients listed, not including any optional ingredients. Actual macros may vary slightly depending on specific brands and types of ingredients used.
To determine the weight of one serving, prepare the recipe as instructed. Weigh the finished recipe, then divide the weight of the finished recipe (not including the weight of the container the food is in) by the desired number of servings. Result will be the weight of one serving.
Did you make this recipe?
Please consider Pinning it!!