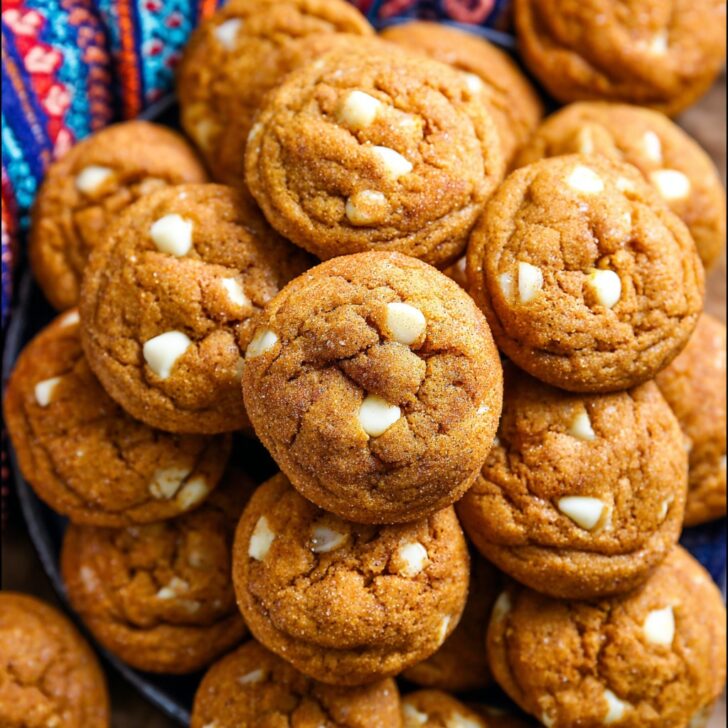

Let Me Tell You About These White Chocolate Pumpkin Snickerdoodles
Alright, friend, pull up a chair because I've got a story (wait—don’t click away, it’s got cookies at the end!). The very first time I made these White Chocolate Pumpkin Snickerdoodles, I had this tiny can of pumpkin puree leftover from Thanksgiving, and, to be honest, I was desperate to get rid of it before it grew legs. My cousin Becky was over, and we had just barely made it through the Black Friday chaos, so why not bake cookies, right? Anyway, our first batch looked... well, let’s just say ‘rustic’ (and that's being generous). But after some fiddling (and a few burned bottoms, thanks to my ancient cookie sheets), we landed on this recipe that I now trot out every fall. Fair warning: if you’re expecting perfectly shaped, dainty little cookies, eh, brace yourself for some quirky, delicious blobs of autumn flavor. But isn’t that half the fun?
Why You’ll Love This (or At Least Crave It Once You Try)
I seriously bake these whenever I've got people coming over—even when I haven’t got the energy for a big fuss—because they look adorable and taste like a cozy hug. My nephew once inhaled five in 10 minutes (kids, am I right?). And the pumpkin with the white chocolate? For some reason, people get all wide-eyed, like it’s some kind of sorcery. Little do they know, it’s just me rummaging through the pantry again. Plus, if you’re the type who gets annoyed by cookies that flatten out too much (me, every time before this recipe), well, relax. These puppies stay nice and fluffy. Usually. Although I once tried to skip chilling the dough because I was in a hurry—big mistake, just don’t. Trust me on that one.
What's Actually in These Cookies?
- 2 and ¾ cups all-purpose flour (I run out and use half bread flour sometimes—works fine)
- 1 and ½ teaspoons cream of tartar (my grandma swears by the McCormick brand, but apparently any'll do)
- ½ teaspoon baking soda
- ½ teaspoon salt (a tiny bit more if you love salty-sweet combos)
- 1 and ½ teaspoons ground cinnamon
- ½ teaspoon ground nutmeg (sometimes I skip this if I’m out)
- ½ cup unsalted butter, at room temp (honestly? I’ve melted it in a heatwave and the cookies were fine—just a bit chewier)
- ¼ cup pumpkin puree (Libby’s is popular, but hey, use a local brand if you can!)
- ¾ cup light brown sugar, packed
- ½ cup granulated sugar (demerara works in a pinch—gives a slightly caramel-y crunch)
- 1 large egg
- 2 teaspoons vanilla extract (King Arthur has a good one, but real or not, no one’s checking)
- 1 and ½ cups white chocolate chips (I've chopped up a leftover baking bar too; or try dark chocolate, though it’s not quite so magical)
- For rolling: ¼ cup granulated sugar + 2 teaspoons cinnamon
Making the Cookies – Don’t Overthink It
- Whisk your dry stuff. Grab a biggish bowl and toss in flour, cream of tartar, baking soda, salt, cinnamon, nutmeg. Give it a whisk for good measure (This bowl is where I always forget the nutmeg; go figure).
- Mix the wet stuff. In a separate, slightly larger bowl, if you’ve got one, beat together your butter, pumpkin puree, brown sugar, and granulated sugar until kind of creamy (I usually use an old hand mixer, but a wooden spoon + elbow grease does the trick if you’re determined). Add in the egg and vanilla, beat some more until it looks light and fluffy-ish. Okay, maybe not fluffy; just mixed well.
- Combine them. Slowly mix those dry bits into your wet stuff. It’ll seem like there’s way too much flour for a hot minute, but it all comes together. If you see streaks, don’t panic; just keep folding.
- Stir in the white chocolate chips. This is where I usually sneak a few for myself (only fair, right?).
- Chill out (the dough, not you—well, both actually). Cover the bowl with plastic wrap and stash it in the fridge for at least an hour. Overnight if you want maximum fluff (but honestly, who's got time?).
- Preheat your oven to 350°F (180°C). While you wait, mix that rolling sugar and cinnamon in a shallow dish.
- Shape and roll. Scoop out tablespoons of dough (I usually make them golf ball sized, but my cousin makes monster cookies) and roll each in cinnamon sugar. Place on a lined baking sheet, giving them a couple inches to spread (they don’t go wild, but better safe than sorry).
- Bake. Pop the cookies in the oven for about 10-12 minutes, or until the edges look just set but the centers look like they need another minute. Take ‘em out anyway—trust me, they finish cooking on the tray. If you leave them in too long, they get kind of dry, so don’t overthink it.
- Let them sit on the pan for 5ish minutes before moving to a rack (or, if you're like me, eat one hot and regret the tongue burn).
What I’ve Learned So Far (a.k.a. Notes)
- If your dough is sticky—a little more flour, like a tablespoon at a time, works. But if it’s super dry, just add a drizzle of milk (accidentally discovered this when my kitchen was Sahara-level dry).
- Cookies flatten if you skip chilling; yes, I know, but I always try at least once a season.
- Parchment paper changed my life (well, my cookies’ lives). But if you’re out, greasing the pan works. Not as tidy, but hey—do what you gotta do.
- If you find little chunks of unmixed flour—just mash ‘em into the next dough ball. Problem solved.
Variations That Worked—or Flopped
- I once swapped half the white chocolate for dried cranberries; it was actually amazing (especially if you like things a bit tart-sweet).
- Tried pumpkin pie spice mix instead of just cinnamon and nutmeg; honestly, a bit overwhelming, but maybe it’s just me.
- My neighbor popped some pecans in there once. Good crunch, but I'm kind of a purist I guess.
- One time I tried coconut flakes—yeah, don’t do that. The texture went pretty weird…
Stuff You’ll Need—or Can Fake It
- Mixing bowls (big and medium—I’ve used salad bowls in a pinch, it’s fine)
- Hand mixer or stand mixer (but spoon plus sturdy arms does work—eventually)
- Baking sheets (Epicurious recommends some if you’re curious)
- Parchment paper or just grease the pans if that’s what you’ve got
- Cooling rack (or flip a muffin tin upside down—my makeshift method when everything else is ‘dirty’)


How To Store (Though, Let’s Be Real…)
Keep ‘em in an airtight container at room temp for about 3 days. But honestly, in my house, they rarely last past the second day. Every year I tell myself I’ll freeze a few for later, and every year they ‘mysteriously’ disappear. If you do freeze them (good on you), I’d thaw at room temperature—microwave just makes them go kinda rubbery.
Here’s How I Serve Them
I like them with a giant mug of milky coffee, and my sister says they’re unbeatable dunked in chai. At Christmas, I pile them up and sprinkle a tiny bit more cinnamon sugar on top—just because. My uncle once put vanilla ice cream between two—messy but so good.
If I Could Go Back—Pro Tips I Wish I Knew
- Don’t rush chilling the dough. I tried that and… well, pancakes. Delicious pancakes, but not cookies.
- Measure your flour by spooning, not scooping. Once ended up with dough you could mortar bricks with. Live and learn, eh?
- Taste the dough before rolling. I once forgot the vanilla. Got a very bland batch (still edible though, with extra cinnamon sugar rescue).
FAQ (aka Questions My Friends Actually Ask Me)
- Can I use fresh pumpkin? Sure, if you want. Just roast and mash it first—and beware it’s a bit wetter, so maybe go easy on other liquids.
- Why is my dough so sticky? Oh, that’s normal. Pumpkin’s got more moisture than you’d think. If you can’t roll it, chill it more. Or add a spoonful more flour.
- Can I skip the cream of tartar? You can… but they’ll taste more like regular cookies than true snickerdoodles. Up to you!
- Is the dough safe to eat? Well, there’s egg so technically it’s not, but I always taste it (don’t tell anyone). Or find a good recipe for eggless edible cookie dough over at Sally's Baking Addiction if you're worried.
- Can I double the recipe? Absolutely. Then you can stash some dough balls in the freezer—if you have more self-control than me.
- Why are my cookies dry? Mighta baked them a minute too long; next time take them out when they still look a little soft in the middle. They'll finish on the pan.
- What if I don’t have white chocolate chips? Improvise! Any chopped chocolate will do, or just skip them for a plainer version—still tasty, promise.
One last thing—these make the kitchen smell like autumn in the best possible way, even if there is a pile of laundry next to the oven. Happy baking, mate! If you make them, let me know how your batch turns out and what your accidental twist was.


Ingredients
- 2 ¾ cups all-purpose flour
- 1 ½ teaspoons ground cinnamon
- 1 teaspoon baking soda
- ½ teaspoon cream of tartar
- ½ teaspoon salt
- 1 cup unsalted butter, softened
- ¾ cup granulated sugar
- ½ cup packed light brown sugar
- ½ cup pumpkin puree
- 1 large egg
- 2 teaspoons vanilla extract
- 1 ½ cups white chocolate chips
- ¼ cup granulated sugar (for coating)
- 1 tablespoon ground cinnamon (for coating)
Instructions
-
1Preheat oven to 350°F (175°C). Line baking sheets with parchment paper.
-
2In a medium bowl, whisk together the flour, 1 ½ teaspoons cinnamon, baking soda, cream of tartar, and salt.
-
3In a large bowl, beat the softened butter, granulated sugar, and brown sugar until creamy. Mix in the pumpkin puree, egg, and vanilla extract until well combined.
-
4Gradually add the dry ingredients to the wet mixture, mixing until just combined. Fold in the white chocolate chips.
-
5In a small bowl, combine ¼ cup granulated sugar with 1 tablespoon cinnamon. Scoop dough into tablespoon-sized balls and roll each in the cinnamon-sugar mixture.
-
6Arrange dough balls on prepared baking sheets. Bake for 11-13 minutes or until edges are set. Cool on baking sheets for 5 minutes before transferring to wire racks to cool completely.
Approximate Information for One Serving
Nutrition Disclaimers
Number of total servings shown is approximate. Actual number of servings will depend on your preferred portion sizes.
Nutritional values shown are general guidelines and reflect information for 1 serving using the ingredients listed, not including any optional ingredients. Actual macros may vary slightly depending on specific brands and types of ingredients used.
To determine the weight of one serving, prepare the recipe as instructed. Weigh the finished recipe, then divide the weight of the finished recipe (not including the weight of the container the food is in) by the desired number of servings. Result will be the weight of one serving.
Did you make this recipe?
Please consider Pinning it!!