
Alright, let's get into Twix Truffle Brownies. First off: these are the decadent kind you secretly hope your family doesn’t find, so you can stash a few away for later. I started making these after a chaotic bake sale (kids running around, sugar everywhere), where my classic brownies weren’t quite cutting it. Enter the missing bag of Halloween candy, specifically a mountain of mini Twix bars. The rest, as they say, is dessert destiny. I’d tell you this is a special-occasion thing, but, you know, Tuesday counts.
Why I Always Reach for This Recipe
I make these when someone needs a pick-me-up or honestly when I have something to celebrate (like finding matching socks, let’s be real). My husband attempts to call dibs on the corners, but my daughter claims the center is better (she says it’s the ultimate soft spot—can’t really argue). And these are a lifesaver when you’ve had that "I bought too many candy bars again" moment. The truffle layer? Actually inspired by a recipe flop where my caramel seized up, but now it’s sort of the best mistake I keep making.
What You’ll Need (And What You Can Swap Out)
- 1 box fudge brownie mix (or, if you’re fancy, your own homemade brownie batter—my sister swears by Ghirardelli, but Aldi's works fine for me)
- Ingredients as listed on your boxed mix (usually an egg, water, and oil, or whatever it says—honestly, I often just eyeball the oil)
- 2 handfuls of mini Twix bars (about 20, or just however many managed to survive on top of the fridge—Snickers actually work here in a pinch, though it’s a little messier)
- 200g chocolate chips (dark, milk, whatever’s leftover from making cookies last weekend)
- ½ cup heavy cream (but I’ve used evaporated milk that one desperate time, and it was fine, just thinner)
- Sprinkle of sea salt (my gran insisted on Maldon; I use regular flaky salt because that’s what I have)
Let’s Get These Brownies Going
- Preheat your oven to 350°F (or 180°C for the other side of the pond) and grease an 8x8 baking pan. I’ve used a 9-inch round in a pinch—makes for weirdly shaped slices, but it works.
- Mix up your brownie batter. If you’re using a box, just toss everything in a big bowl. For homemade, I usually go with the basics: cocoa, sugar, flour, eggs, and butter. Stir until it’s just combined; don’t overthink it. (I used to worry about lumps. Turns out, they disappear in the oven.)
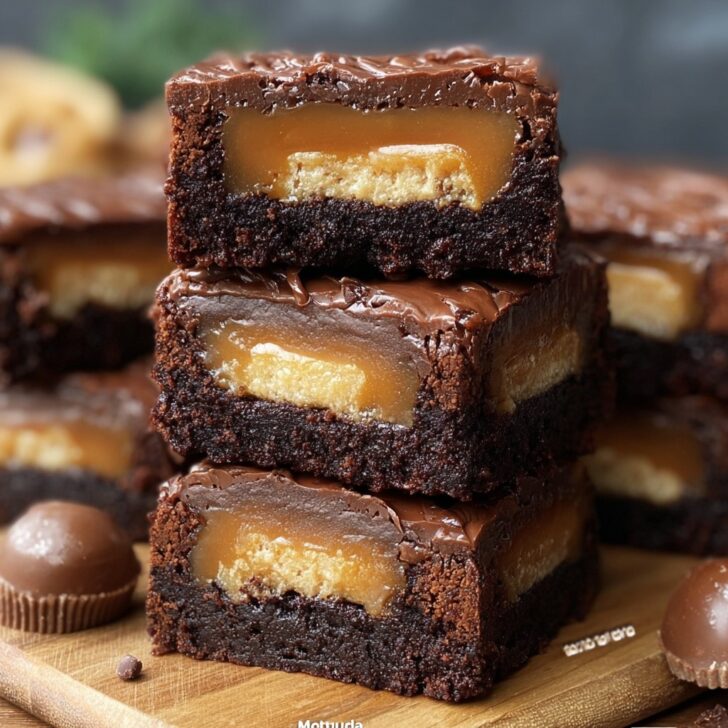
- Chop your Twix bars into bite-sized bits—don’t fuss over it. Scatter half over the bottom of your greased pan, pour in half the brownie batter, then the rest of the Twix, then finish with more brownie mix. On second thought, sometimes I mix all the Twix into the batter—one less thing to layer. Nobody’s ever noticed.
- Bake for 22-26 minutes, but keep an eye on them after 20. A toothpick should come out with a little fudge (not bone dry). This is where I usually sneak a corner with the spatula, just to check.
- While that’s baking, toss your chocolate chips and cream into a microwave-safe bowl. Heat in 20-second bursts, stirring each time. It’ll look odd at first—like it’s not coming together. But with a good stir, it’ll turn glossy. Add that pinch of salt (you can skip it, but it brings out the caramel-y bits from the Twix).
- When the brownies are out (resist the urge to cut in), pour the ganache over and nudge it around with a spoon. Let cool—though I’ll admit, we’ve eaten it warm with ice cream and no regrets there.
Little Notes I Found The Hard Way
- If you underbake slightly, the brownies are gooier after chilling—so much better, in my opinion.
- Wait for them to cool before slicing, unless you just like the epic mess that comes with melting chocolate—sometimes, I do.
- I once forgot the salt and actually, it wasn't the end of the world.
Variations I’ve Tried (And a Flop)
I’ve swapped the Twix for Reese’s Cups. Tasted awesome, but strangely, the peanut butter got lost in all that chocolate (still good, just not the same). Tried adding chopped pecans once—my cousin claims it’s better, but I was not convinced. Oh, and one time I tried swirling in raspberry jam—looked gorgeous, but the flavors fought each other like distant relatives at a wedding.
Gear You’ll Use (And If You Don’t Have It)
- 8x8 pan—or whatever’s closest. A cast iron skillet even worked one time, but edges crisp fast.
- Mixing bowl. Well, I once used a giant soup pot. Worked fine, bit unwieldy.
- Microwave for ganache, but double boiler if you’re feeling patient (I rarely am, to be honest).
- Spatula, unless you’re a wooden spoon loyalist—or "just a fork," as my kid did once.


How to Store ‘Em (But Good Luck)
Supposedly, these keep in an airtight tin for up to 4 days, but honestly, in my house, it never lasts more than a day; two if I hide them behind the cereal boxes. If you do have any left, I actually think they taste better chilled. Oh, and you can freeze them individually wrapped, kind of like a secret stash.
How We Like to Serve These Brownies
I love them with a scoop of vanilla ice cream and a strong coffee—my neighbor says it’s the “ultimate treat” (and she knows her desserts). My partner prefers them plain, cold, straight from the fridge. Sometimes we share a plate on movie nights, but honestly, I’m not much of a sharer.
What I’ve Learned (Usually the Hard Way)
- Patience! I once tried to slice them while hot, and all I got was chocolate soup. Very tasty, but not exactly photogenic.
- Using proper parchment makes it easier, but one time I skipped it and just greased real well—came out fine if you’re careful with a spatula.
- Taste your ganache before pouring. I forgot this once and realized too late it was bland without the salt.
Your Questions, Answered
- Can I use full-sized Twix bars? Absolutely! Chop ‘em up—sizes don’t have to match. Just chuck them in.
- Is the ganache really necessary? Short answer: nah, but it’s like having a cuppa without a biscuit. I’d miss it.
- Can I double this in a 9x13 pan? Yep—but watch the edges, and maybe give it a couple extra minutes. Or not. Depends how gooey you like ‘em.
- What’s the best way to cut these? Cold and with a sharp knife; though, to be honest, I sometimes just go at it with the pizza cutter.
- Are these super sweet? Oh, 100%. Not for the faint of heart. Pair with coffee or, as my aunt says, "a brisk walk after."
Oh—and if you’re looking for more ways to use up odd candy, Serious Eats has some wild ideas. Or if you want to upgrade your brownie basics, Sally’s tutorial is a game-changer. Now, if you’ll excuse me, I think there’s a lone brownie calling my name (or maybe it’s just the cat—hard to tell these days).


Ingredients
- 1 cup unsalted butter, melted
- 1 ½ cups granulated sugar
- 3 large eggs
- 1 cup all-purpose flour
- ¾ cup unsweetened cocoa powder
- ½ teaspoon salt
- 1 (14 oz) package caramel candies, unwrapped
- 3 tablespoons heavy cream
- 10 shortbread cookies, crushed
- 1 cup semisweet chocolate chips
Instructions
-
1Preheat the oven to 350°F (175°C) and line a 9x13-inch baking pan with parchment paper.
-
2In a large bowl, whisk together melted butter and sugar. Add eggs one at a time, mixing well after each addition.
-
3Sift in flour, cocoa powder, and salt. Stir until just combined. Pour the batter into the prepared pan and smooth the top.
-
4Bake for 25-30 minutes or until a toothpick inserted into the center comes out with a few moist crumbs. Cool completely.
-
5Melt caramel candies with heavy cream in a microwave or saucepan until smooth. Stir in crushed shortbread cookies. Spread caramel mixture evenly over cooled brownies.
-
6Melt chocolate chips and pour over the caramel layer. Spread evenly and let set before slicing into bars. Enjoy!
Approximate Information for One Serving
Nutrition Disclaimers
Number of total servings shown is approximate. Actual number of servings will depend on your preferred portion sizes.
Nutritional values shown are general guidelines and reflect information for 1 serving using the ingredients listed, not including any optional ingredients. Actual macros may vary slightly depending on specific brands and types of ingredients used.
To determine the weight of one serving, prepare the recipe as instructed. Weigh the finished recipe, then divide the weight of the finished recipe (not including the weight of the container the food is in) by the desired number of servings. Result will be the weight of one serving.
Did you make this recipe?
Please consider Pinning it!!