
Okay, friend, so let’s cut to the chase — I’ve battled my fair share of dry cupcakes over the years. In fact, there’s a sad photo floating around of my son’s 6th birthday cake, where everyone is holding a cup of milk as if they’re bracing for something. (Honestly, that whole thing still haunts me; who knew a cupcake could soak up *that* much liquid?) Everything changed when I stumbled onto the combination in this recipe… Now, I make these Never-Dry Chocolate Cupcakes for just about every bake sale, birthday, random Tuesday. Sometimes I think I see my neighbor scanning my recycling for empty cocoa boxes when I put them out on the curb. Anyway, you’re gonna love this.
Why I Keep Making These Every Time
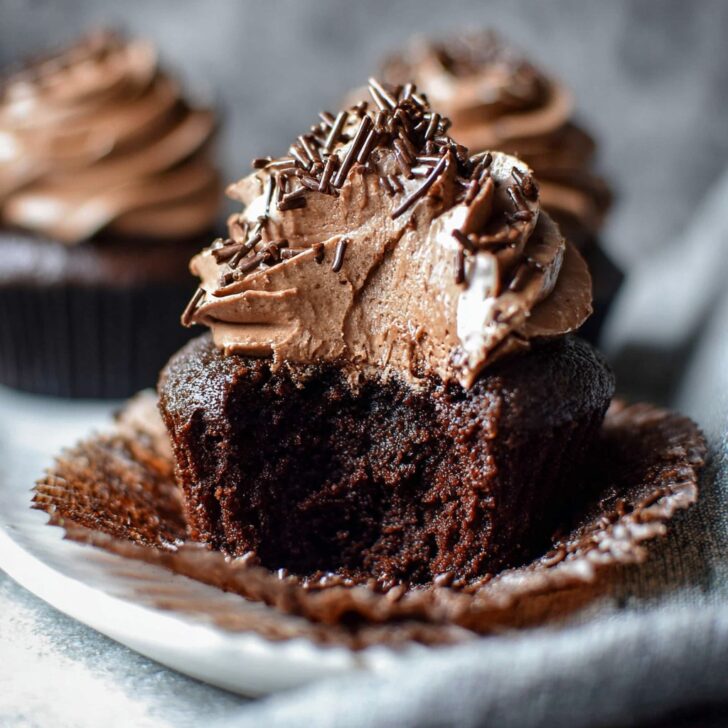
I whip these up whenever I catch myself daydreaming about chocolate (which is to say, fairly often). My family goes absolutely wild for these, partly because they have that soft, fudgey middle that never gets dry — even if you forget to wrap them up right away, which, look: I’ve done, more than once! (No shame, life’s busy; let’s move on.)
If I’m totally honest, I tried a lot of too-sweet, too-complicated recipes before finding this groove. I stick with the basics here — but I guess my secret is the bit with the hot coffee. More on that soon.
What You Need (and a Few Swaps that Actually Work)
- 1 cup (120g) all-purpose flour – I’ve used self-raising flour in a pinch; you just might want to halve the baking powder.
- ¾ cup (75g) unsweetened cocoa powder (I use Dutch-process but regular works; my gran used to say the darker the better, but honestly I’ll use whatever’s on offer!)
- 1 teaspoon baking powder
- ½ teaspoon baking soda
- a good pinch of salt – flaky or regular, life goes on
- 1 cup (200g) white sugar – I cut it by a third on days where I’m feeling virtuous
- 2 large eggs (room temp if I remember, fridge-cold if I forget)
- ⅓ cup (80ml) flavorless oil (canola or sunflower; once I used olive oil, and it made them a bit, well, peppery)
- 2 teaspoons vanilla – I honestly just glug it in sometimes
- ½ cup (125g) sour cream OR plain Greek yogurt (I’ve even used crème fraîche by accident and nobody noticed!)
- ½ cup (120ml) hot coffee (decaf is fine; tea once in a panic — not as good, not recommended)
- Optional: ½ cup chocolate chips (dark, milk, or whatever’s not already snacked on)
How I Throw These Together (You Can Too!)
- Preheat your oven to 350°F/180°C. Line a 12-cup muffin pan. If you don’t have liners, just grease well — they might stick a bit, but you can pry them loose (with love and a butter knife); trust me.
- Sift together the flour, cocoa, baking powder, soda, and salt in a big-ish bowl. Or just whisk with a fork; the sieve sometimes stays in the drawer for this, and everything’s been fine so far.
- Bounce over to a separate bowl and whisk the eggs, sugar, oil, and vanilla until it looks kind of creamy. This is often where I pause to make sure nobody’s about to climb on my kitchen counter.
- Stir in the sour cream (or whatever creamy thing you’re using). Healthy skepticism is fine here — it really does make them super moist.
- Add half your dry mix into the wet stuff; gently combine (I once panicked and beat like mad, and got dense cakes — be chill).
- Pour in the hot coffee, then toss in the remaining dry mix. Stir until just combined (don’t worry if it’s a bit lumpy; trust the process). Fold in your chocolate chips now, if you’re feeling it.
- Fill your cases about ¾ full. I use an old ice cream scoop for this, but spoons work, too; just try to be vaguely even, or some cupcakes will rise like volcanoes.
- Bake for 16-19 minutes. Tops should bounce back if you touch them, or a skewer should come out with just a crumb or two (here’s where I sneak a tester-mini one, for science). Let them cool a bit before removing from the pan, if you can resist.
Stuff I’ve Learned (A.K.A. Notes I Write on the Recipe Card)
- If you use foil liners, they don’t sweat the way paper ones do. No idea why. They just don’t.
- Forgot to bring eggs to room temp? Set them in a bowl of warm water – or, honestly, just use them cold. I haven’t noticed a huge difference, though the pros say otherwise.
- Sometimes the batter feels runny; actually, I find it works better if you leave it just as it is and resist the urge to add more flour.
Things I’ve Tried (Some Genius, Some... Eh)
- Mini cupcakes: Just lower bake time by a few mins. Kids love these, adults eat a dozen (don’t ask me how I know).
- Adding orange zest – subtle, and kinda makes it taste like a Terry’s Chocolate Orange, if you’re into that.
- Trying to make these gluten free by swapping all the flour with almond flour? That one flopped. Texture went from cupcake to, uh, mudpie.
- Double chips: mixing half white, half dark chocolate. Looks a bit like a bakery special.
What You’ll Need (Or, How to Improvise When a Gadget’s Missing)
- Muffin pan (I’ve seen people use silicone molds on a baking sheet — works, just a little floppy.)
- Mixing bowls (A giant soup pot in a pinch. My mother-in-law still does this; who am I to judge?)
- Whisk or handheld mixer, or honestly just a fork and some elbow grease.
- Ice cream scoop, if you have one (but two spoons do just fine, even if they get messy.)


How Long Do These Stay, You Know... Not Dry?
Honestly? In my house, these cupcakes are gone within a day, maybe two if I’m lucky. But if you’re superhuman and they manage to last, you can store them in an airtight box at room temp for 3 days — or pop in the fridge, but bring them back to room temp before serving so they’re not chilly and dense. (Can freeze too, though I tend to forget about them after a month; label them so you don’t think they’re meatballs or something.)
If You Want to Dress Them Up...
We sometimes serve these with a small mountain of whipped cream — or just a dollop of store-bought vanilla ice cream. Occasionally, I dust with powdered sugar; never as pretty as Pinterest, but who cares?
Oh, and for birthdays, my kids demand rainbow sprinkles, but secretly I prefer them with just a slick of Nutella. Little treat for mum.
What I’ve Learned Not To Do (Heed My Warnings!)
- Don’t rush adding the hot coffee. Once, I thought I could just dump it all in and blitz — batter everywhere. Add slowly; trust me.
- Skip overfilling the cupcake liners. If you don’t, you get muffin-top-overflow, and while funny looking, can get hard as rocks.
- I once left them in the oven “just a bit longer for good luck.” Turns out luck prefers a timer. Set one!
Stuff People Have Actually Asked Me (Frequently, at This Point)
- Can I skip the coffee? Sure! Use just hot water — flavor’s milder, but surprisingly tasty still. Decaf too, if you’re caffeine-wary.
- What’s the best cocoa? To be honest, whatever you can find! I’ve used the fancier Dutch ones and the big red supermarket tub — both work. Check out Serious Eats’ cocoa explainer if you’re nerdy about cocoa like I am.
- How do I get them extra moist? Don’t overbake. Pull them out when they *just* bounce back.
- Can I double this recipe? Yup, just use a massive bowl (or that soup pot!). Mixing times don’t really change, just try not to lose your spoon in the batter, like I did once. You’ll need a longer music playlist though; it’s a bit of an arm workout.
- Where do you get your liners? Nowhere fancy, just order them off King Arthur Baking Co. or pick up at the local shop. Sometimes I grab festive ones on Etsy for birthdays—just for fun.
Anyway, if you give these Never-Dry Chocolate Cupcakes a try, tell me how it goes—or, just eat them all yourself. I won’t judge. Actually, if you do end up with a new tweak or disaster story, send it my way! Either way, I promise: no more sawdust cupcakes in your kitchen. That’s a win, right?


Ingredients
- 1 cup all-purpose flour
- 1 cup granulated sugar
- ⅓ cup unsweetened cocoa powder
- 1 teaspoon baking powder
- ½ teaspoon baking soda
- ¼ teaspoon salt
- ½ cup whole milk
- ⅓ cup vegetable oil
- 2 large eggs, room temperature
- 1 teaspoon vanilla extract
- ½ cup hot water
Instructions
-
1Preheat the oven to 350°F (175°C) and line a 12-cup muffin tin with cupcake liners.
-
2In a large bowl, whisk together flour, sugar, cocoa powder, baking powder, baking soda, and salt.
-
3Add milk, oil, eggs, and vanilla extract to the dry ingredients. Mix until just combined.
-
4Gradually stir in the hot water until the batter is smooth and slightly thin.
-
5Divide batter evenly among cupcake liners, filling each about ⅔ full.
-
6Bake for 16-18 minutes, or until a toothpick inserted into the center comes out clean. Cool in the pan for 5 minutes, then transfer to a wire rack to cool completely before serving.
Approximate Information for One Serving
Nutrition Disclaimers
Number of total servings shown is approximate. Actual number of servings will depend on your preferred portion sizes.
Nutritional values shown are general guidelines and reflect information for 1 serving using the ingredients listed, not including any optional ingredients. Actual macros may vary slightly depending on specific brands and types of ingredients used.
To determine the weight of one serving, prepare the recipe as instructed. Weigh the finished recipe, then divide the weight of the finished recipe (not including the weight of the container the food is in) by the desired number of servings. Result will be the weight of one serving.
Did you make this recipe?
Please consider Pinning it!!