
Let Me Tell You About My Mars Bar Slice Obsession
Alright, so here’s the thing: I’ve been making this Mars Bar slice since before I could reach the top shelf (and believe me, I’m still not exactly winning any height records). My mum used to whip this up for every birthday, bake sale, or any day she fancied something sweet but didn’t want to turn the oven on. I swear, the smell alone makes me feel like I’m six again, sneaking into the kitchen to steal just one more piece (as if she didn’t notice the lopsided tray—mum radar is real, by the way). Anyway, now it’s my go-to when I want to impress friends but also not fuss around too much. Oh, and if you’re a chocolate lover, prepare yourself. This is proper treat-yourself fare.
Why You’ll Love Making This (And Eating It!)
I make this when I need to bring something to a get-together but don’t want to show up with the same box of cookies as everyone else (no shade to cookies, but you know what I mean). My family goes absolutely bonkers for it—actually, sometimes I have to hide a few slices at the back of the fridge for myself, otherwise they’re gone faster than you can say ‘just one more piece’. I used to get annoyed when the topping got all melty on warm days; now I just call it ‘rustic’ and everyone’s happy. Plus, it’s the sort of recipe that forgives a bit of chaos in the kitchen (which is great, because mine is usually half chaos, half dog underfoot).
Here’s What You’ll Need (Plus Some Swaps)
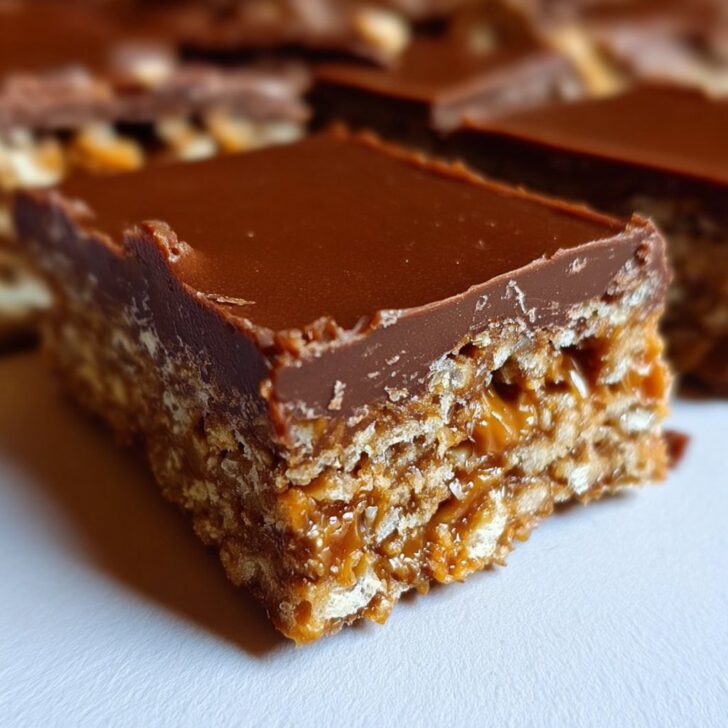
- 3 full-size Mars Bars (or 4 if you’re heavy-handed like me; my gran always insisted on Cadbury Mars, but honestly, whatever’s on special is fine)
- 90g unsalted butter (I’ve used salted before when that’s all I had—no one noticed)
- 3 cups Rice Bubbles (if you’re not in Australia, these are just Rice Krispies—snap, crackle, pop, all the same)
- 200g milk chocolate for the topping (sometimes I use dark chocolate if I want to feel a bit fancy; white chocolate didn’t really work for me, but you do you!)
- 2 tablespoons golden syrup (you can use honey if you can’t find golden syrup, but I reckon it changes the taste just a little)
How to Make It (Don’t Panic if It Looks Weird)
- Line a slice tin (mine’s about 18x28cm, but honestly, last Christmas I used a bread tin because my proper tray was AWOL) with baking paper. Give yourself plenty of overhang for easy removal. Trust me.
- Chop up the Mars Bars (I just hack them into rough chunks; there’s no need for precision). Toss them in a saucepan with the butter and golden syrup. Melt over low heat, stirring patiently. If it looks a bit split or lumpy, don’t stress—it always comes together. This is where I usually sneak a spoonful. Quality control, right?
- Once melted, pour the gooey mixture over your rice bubbles in a large bowl. Stir until every bit is coated. You might need to dig in with your hands if you’re feeling brave (or just can’t find a spoon...it happens more often than I’d like to admit).
- Tip the lot into your lined tray and press down firmly. A spatula works well, but sometimes I use the back of a measuring cup. Or just my hands (give them a rinse first, obviously!).
- Melt your chocolate (microwave is easiest, but a bowl over simmering water works if you’re feeling retro). Pour over the base, spread it out, and try not to eat it straight away.
- Pop the whole thing in the fridge for at least an hour. Or until you just can’t wait anymore.
- Lift out, slice into squares, and marvel at your handiwork. Or just start eating.
Notes from My Own Kitchen Fails
- Once I tried using puffed brown rice to make it ‘healthier’—don’t bother, it just made everything weirdly chewy and not in a good way.
- If your chocolate topping cracks when you cut it, run your knife under hot water first. Or just embrace the rustic look, which is what I usually do.
- I used to think the slice needed to be rock hard from the fridge, but actually, I find it tastes better the next day after it’s softened up a bit.
Things I’ve Tried (And a Few That Flopped)
- Chopped up Maltesers on top—delicious! Adds a nice crunch.
- I once stirred in some chopped dried apricots (don’t ask why)—honestly, wouldn’t recommend. Fruit and Mars Bars just don’t get along.
- Mixing in some peanut butter with the Mars Bar layer does make it extra rich, if you’re a peanut butter fiend.
What You Need (Plus My Makeshift Tricks)
- Slice tin (or a loaf pan, brownie tin, whatever’s closest)
- Baking paper
- Saucepan
- Mixing bowl
- Spatula or the back of a spoon (or honestly, clean hands work fine if all else fails)
If you’re short on bowls, I’ve mixed it all right in the saucepan before. Bit messy, but it worked!
")
")
How to Store It (Like It’s Going to Last Long)
Stash your Mars Bar slice in an airtight container in the fridge. It’ll keep for up to a week, apparently, though honestly, in my house it never lasts more than a day or two. It’s one of those things people (me) keep coming back for every time they walk past the fridge. If you want it a bit softer, just leave it on the bench for 10 minutes. Taste.com.au has a similar take (honestly, their photos are gorgeous), but I think mine is gooier.
How I Like to Serve It (Or Not)
We usually just eat it straight form the tray, but if you’re feeling proper, cut it into neat squares and serve with a cuppa. My neighbour swears by having it with vanilla ice cream, which is a bit decadent, but actually, pretty good on a warm day. Sometimes I chuck a couple of pieces in the kids’ lunchboxes (wrapped up, or it gets everywhere). Want more slice ideas? RecipeTin Eats is a great place to browse for inspiration.
Lessons I’ve Learned (Usually the Hard Way)
- Don’t rush melting the Mars Bars—if you crank the heat, it goes grainy and sad. I once tried microwaving the whole lot to save time, and…well, let’s just say it wasn’t pretty.
- Press the base down firmly! If you don’t, it’ll crumble when you slice it (guilty as charged).
- Don’t pour the chocolate topping until the base is cool, or you’ll end up with a swirly mess. Actually, on second thought, swirls aren’t so bad.
Real Questions People Have Asked Me
- Can I freeze Mars Bar slice? Yep, you can, but I find it gets a bit weird in texture. Still edible, though.
- What if I can’t find Mars Bars? Any chewy caramel chocolate bar will work (Milky Way, maybe? But it’s just not the same in my opinion).
- Is this gluten-free? Not unless you use gluten-free rice bubbles—always check the packs.
- Can I use margarine instead of butter? You probably can, though I haven’t tried it myself. Butter just gives it that rich taste.
- Why did my slice go hard as a rock? Might’ve been overcooked, or too much chocolate on top. Or maybe your fridge is set to Antarctic mode (mine’s a bit temperamental, too).
Oh! And one last thing—if you ever find yourself eating the last bit straight from the tray at midnight, you’re in good company. Happy slicing!
")
")
Ingredients
- 4 Mars Bars (47g each), chopped
- 100g unsalted butter, cubed
- 3 cups puffed rice cereal
- 200g milk chocolate, chopped
- 1 tablespoon golden syrup
- ½ cup sweetened condensed milk
- ½ teaspoon vanilla extract
- Pinch of salt
Instructions
-
1Line a 20cm square baking tin with baking paper, allowing the sides to overhang.
-
2In a saucepan over low heat, melt the chopped Mars Bars, butter, and golden syrup, stirring until smooth and combined.
-
3Remove from heat and stir in the vanilla extract, salt, and sweetened condensed milk until well mixed.
-
4Add the puffed rice cereal and mix until evenly coated.
-
5Press the mixture firmly into the prepared tin and smooth the top with a spatula.
-
6Melt the milk chocolate in a microwave or over a double boiler, then pour over the slice and spread evenly. Refrigerate for at least 2 hours or until set before slicing.
Approximate Information for One Serving
Nutrition Disclaimers
Number of total servings shown is approximate. Actual number of servings will depend on your preferred portion sizes.
Nutritional values shown are general guidelines and reflect information for 1 serving using the ingredients listed, not including any optional ingredients. Actual macros may vary slightly depending on specific brands and types of ingredients used.
To determine the weight of one serving, prepare the recipe as instructed. Weigh the finished recipe, then divide the weight of the finished recipe (not including the weight of the container the food is in) by the desired number of servings. Result will be the weight of one serving.
Did you make this recipe?
Please consider Pinning it!!