
Let Me Tell You About *the* Banana Cake
This cake recipe? Oh, it’s been through a lot—bad ovens, forgotten birthdays, even that time my dog nearly stole the cooling rack (true story, but I’ll get to that). If I could bottle the bittersweet smell of ripening bananas sitting on my windowsill, I would. My family’s always known when I’m fighting off a rainy day slump—I make this banana cake. The best banana cake I’ve ever tried, if you ask me (and probably my neighbor Pete who keeps dropping by “coincidentally” on baking days). Actually, I used to hate banana-flavored things as a kid, but this cake changed my mind. Or maybe it was just the heaps of cream cheese frosting?
Why I Keep Coming Back to This Cake
I make this cake when I want something that’s still easy enough for a weeknight, but feels like a treat. My family goes bananas (sorry, I had to) for it—especially since it’s the only cake my daughter will eat without picking off the icing and running off to the garden. If I’m honest, I’ve ruined plenty of banana cakes in my life. (Who hasn’t?) But this one forgives you for overripe bananas, mismatched measuring cups, or the time you accidentally swap baking soda for baking powder (it happens). It’s comfort food through and through, and when I serve it warm with a cuppa tea on a Sunday afternoon, there’s usually not a crumb left. Except that one time I forgot to grease the pan… but that’s a story for another day.
What You’ll Need (Don’t Sweat the Small Stuff)
- 3 large ripe bananas (brown freckly ones are perfect; in a pinch, I use frozen bananas that I thaw and squeeze—gets a bit messy, but works a treat)
- ½ cup unsalted butter, softened (my gran swears by Kerrygold; personally, anything that’s not rock hard will do)
- 1 cup sugar (honestly, sometimes I use half brown, half white if that’s what’s left in my jar)
- 2 eggs
- 1 ½ cups all-purpose flour (for a nuttier taste, try half wholewheat, though it comes out a bit denser)
- 1 teaspoon baking soda (not powder—I’ve made this mistake, don’t be like me)
- ¼ teaspoon salt
- ½ cup sour cream (Greek yogurt works, but it tastes a smidge tangier)
- 1 teaspoon vanilla extract
Baking This Banana Cake (With Messy Fingers)
- Preheat your oven to 350°F (that’s about 180°C for my fellow metric folks) and grease a 9-inch round cake tin. Don’t bother being too precise—it still comes out great in a square pan.
- In a big bowl, mash your bananas. Sometimes I miss a chunk or two; actually, it gives the cake a nice bite.
- Cream your softened butter and sugar together. I used to do this by hand but now I let my mixer do the heavy lifting (until it’s light and sort of fluffy—good enough).
- Beat in the eggs, one at a time. The mixture can look a bit curdled—don’t freak out, it always evens out after the dry stuff goes in.
- Mix in mashed bananas, sour cream, and vanilla. This is where I sneak a little taste. So good already.
- In another bowl (or use your measuring jug; no shame), whisk flour, baking soda, and salt together. Add to wet mix all at once. Stir until just combined—or stop when there’s only a few floury streaks left. Over-mixing is enemy number one here.
- Scrape the batter into your greased tin, smoothing the top. Or don’t. It’ll even out as it bakes.
- Bake for 28-33 minutes until a skewer comes out with just a few moist crumbs. I usually check ~30 min, because my oven runs a bit hot (old house problems).
- Let cool a bit before frosting—if you’re feeling fancy—or dive in warm with no regrets. Honestly, either way is grand.
I Learned (the Messy Way): Notes
- Cake tastes even better on day two. Assuming you don’t demolish it immediately.
- If your bananas aren’t ripe enough, you can microwave them for 30 seconds or so. They look weird, but it works.
- The cake sinks a tad in the middle if you use too much banana. Resist the urge to add that 4th banana… I learned the hard way!
If You Want to Mix It Up…
- I tried folding in chocolate chips once—delicious, but they all sank. Next time, I’ll toss them in a little flour first.
- Chopped walnuts or pecans add some crunch; the kids aren’t mad about nuts, so I usually leave them out now.
- I attempted a gluten-free version with almond flour. The flavor? Great. The texture? Not so much. Maybe needs more tweaking.
Don’t Have Fancy Kit? No Stress
If you don’t have an electric mixer, a wooden spoon and elbow grease are honestly fine. I once made this entire cake with a fork—wouldn’t recommend if you’re in a hurry, though. Baking paper helps with sticking, but if you’re out, butter and a bit of flour in the pan will do in a pinch.


How to Keep It Fresh (or Just Eat It Now)
This cake keeps well in an airtight container for 2–3 days. In the fridge, maybe a few more, but it tends to dry (pro tip: zap slices in the microwave for 10 seconds and they’re like new). But honestly, in my house it rarely sees day two. I do sometimes freeze slices, double-wrapped, and they’re great for sneaky treats later.
How I Love to Serve Banana Cake
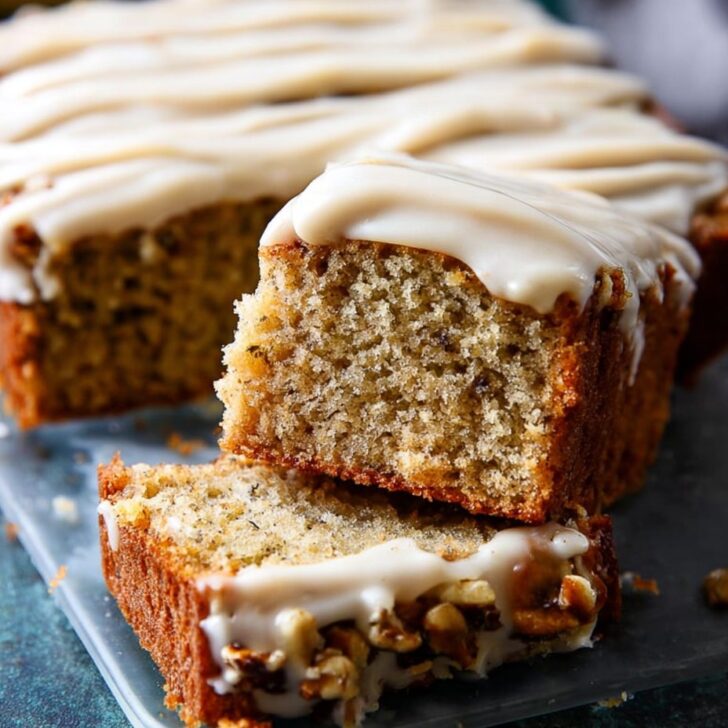
Warm, with a big mug of Earl Grey, is my kind of heaven. My kids insist on cream cheese icing (I shamelessly use the Sally’s Baking Addiction recipe every single time). Sometimes, if I’m not fussed, I’ll just dust with icing sugar and call it a day. Oh—my partner likes it with peanut butter as a midnight snack. To each their own, I suppose!
Things I Wish I’d Known (Banana Cake Edition)
- Let the cake cool at least 10 minutes before turning it out of the pan. I once tried rushing this step—oops, the whole bottom stuck. Lesson learned.
- Don’t skimp on the vanilla (I use Nielsen-Massey—it’s not cheap, but it brings the flavor). Trust me, it’s worth it.
- Actually, I find it works better if you mash the bananas until almost smooth, but leave a little chunk here and there for texture.
Questions I Get All the Time
Q: Can I make this vegan?
Sort of? I tried once, swapping eggs for flax eggs and butter for coconut oil. The flavor’s good but it’s a bit denser. Not bad, just different. Oh, try this vegan banana bread if you want a dead-easy one.
Q: What if I don’t have sour cream?
No worries—thick Greek yogurt works fine, or even buttermilk if you thin it with a splash of milk. One time I used regular yogurt and it was a bit runny, but no disaster.
Q: Can I bake this as muffins?
Absolutely, though they need only about 18-20 minutes in the oven (don’t wander off and forget—guilty here, more than once!).
Q: Why isn’t my cake fluffy?
Might be the bananas were too big or the batter got over-mixed. Try stopping when there’s just a streak or two of flour left—looks messy but comes out perfect.
Oh, and a quick sidetrack: If you’re ever in need of a great cake stand, I recommend checking local thrift stores. Some of the best ones I own in my cupboard came form charity shops—cheap as chips, and always with a bit of history. Who knew banana cake could lead you to treasure?


Ingredients
- 2 cups all-purpose flour
- 1 ½ cups ripe bananas, mashed (about 3 large bananas)
- 1 cup granulated sugar
- ½ cup unsalted butter, softened
- 2 large eggs
- ½ cup sour cream
- 1 teaspoon vanilla extract
- 1 teaspoon baking soda
- ½ teaspoon salt
- For frosting: 8 oz cream cheese, ¼ cup unsalted butter, 2 cups powdered sugar, 1 teaspoon vanilla extract
Instructions
-
1Preheat oven to 350°F (175°C). Grease and flour a 9x13-inch baking pan.
-
2In a large bowl, cream together butter and sugar until light and fluffy. Beat in eggs, then stir in mashed bananas, sour cream, and vanilla extract.
-
3In a separate bowl, whisk together flour, baking soda, and salt. Gradually add the dry ingredients to the banana mixture, mixing until just combined.
-
4Pour batter evenly into the prepared pan. Bake for 35-40 minutes, or until a toothpick inserted into the center comes out clean. Allow the cake to cool completely.
-
5For the frosting, beat together softened cream cheese and butter until smooth. Gradually add powdered sugar and vanilla extract, beating until creamy. Spread the frosting over the cooled cake.
Approximate Information for One Serving
Nutrition Disclaimers
Number of total servings shown is approximate. Actual number of servings will depend on your preferred portion sizes.
Nutritional values shown are general guidelines and reflect information for 1 serving using the ingredients listed, not including any optional ingredients. Actual macros may vary slightly depending on specific brands and types of ingredients used.
To determine the weight of one serving, prepare the recipe as instructed. Weigh the finished recipe, then divide the weight of the finished recipe (not including the weight of the container the food is in) by the desired number of servings. Result will be the weight of one serving.
Did you make this recipe?
Please consider Pinning it!!