
Alright, this is how I do Texas Toast with Melted Cheese
So, I have to tell you—Texas Toast with Melted Cheese is one of those last-minute lifesaver recipes for me. We all have those days, right? For me, it’s usually when I’ve had about enough of adulting and can’t face another question about what’s for dinner. The first time I made this, I was actually trying to impress my college roommate (who claimed to be a "toast connoisseur," which is apparently a thing). I ended up burning the first batch... but honestly, the second round was glorious, and now I hardly ever mess it up (though every now and then, one gets a little too crispy at the edges—nobody’s perfect!).
Why You'll Probably Love This Too
I make this when I want something fast and everyone’s grumbling about being hungry—my kids go nuts for the gooey cheese, and my partner usually sneaks two slices before we’ve even sat down. Sometimes I throw it under the broiler just for the drama. (Confession: I used to stress about getting the cheese perfectly melted, but as it turns out, slightly uneven cheese is a sign of homemade charm.) Plus, if you’re the kind of person who likes a midnight snack, this is one of those things that just hits the spot. And it’s way cheaper than ordering delivery. Win-win!
What You'll Need (and a few swaps if you must)
- 1 loaf of thick-sliced bread: Texas Toast bread is ideal (duh), but I’ve used sliced sourdough or even leftover hamburger buns in a pinch—my grandmother always claimed Wonder Bread was the gold standard but honestly, anything sturdy will work.
- ½ cup (or a big handful) unsalted butter, softened: If you only have salted, just skip adding extra salt later.
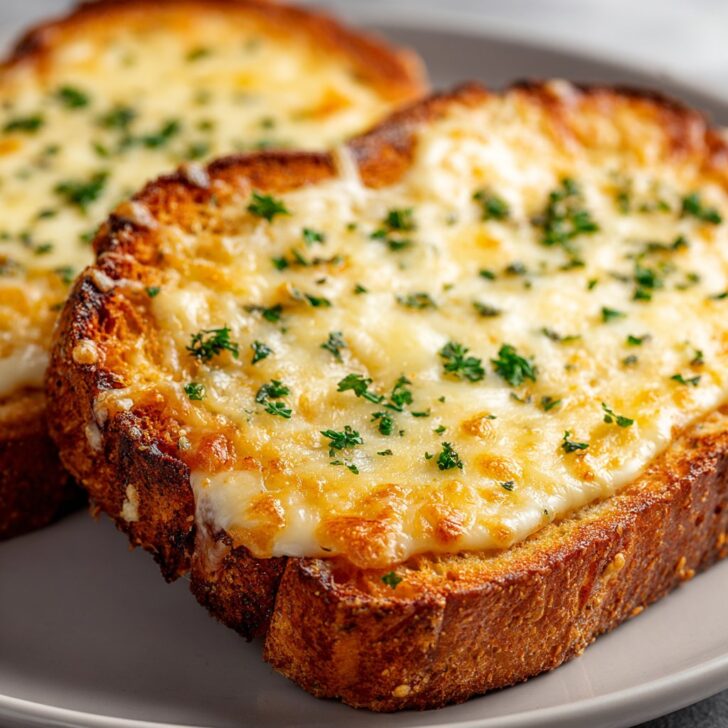
- 3–4 cups shredded cheese: Mozzarella and cheddar are my go-tos. Sometimes I toss in a bit of Monterey Jack if I’m feeling wild. Pre-shredded is fine, but the block stuff melts nicer. No cheese snobbery here though.
- 2-3 cloves garlic, minced: Garlic powder will totally work if you’re short on time, or patience.
- 1 tablespoon fresh parsley, chopped (optional): Dried parsley is fine, or skip it. No guilt.
- Salt and pepper to taste
- Pinch of paprika (optional): Gives it a little smoky vibe, but I only remember to use this half the time.
How I Throw This Together
- Crank your oven up to 425°F (220°C). Yes, it needs to be hot. Preheat while you hunt for that misplaced cheese grater.
- Mix up the butter, garlic, parsley, and a sprinkle of salt/pepper in a bowl. I use a fork, but once I just used my hands because everything else was dirty. Worked fine. Spread this good stuff pretty generously on one side of each bread slice. (This is where I usually sneak a taste—no shame at all.)
- Line up your bread slices on a baking tray. If you have parchment paper, great. If not, I just put them straight on the tray, and yes, cleaning is a pain but not the end of the world.
- Layer on the cheese like it’s going out of style. Don’t be shy. If you’re thinking “that’s too much cheese”... honestly, add a bit more.
- Bake for about 8-10 minutes. Sometimes mine are done in 7, sometimes 11. Keep an eye out—when the cheese is bubbly and the edges are going golden, you’re in the clear. If you want that dramatic browned top, pop it under the broiler for a minute or two (but stay close—burned cheese is a heartbreak I’ve known all too well).
- Cool for a minute, then dig in. I sometimes cut them into strips for dipping—makes me feel like a kid again.
Notes from Many, Many Toast Attempts
- If the butter’s still cold, microwave it for a few seconds. Just don’t let it totally liquefy or you’ll end up with soggy bread (been there, not fun).
- I’ve tried using light cheese before—honestly, it just doesn’t melt the same. Full-fat is where it’s at, but hey, do what you gotta do.
- Sometimes the cheese slides off in the oven. I usually just scoop it back on with a spatula and pretend it never happened.
Variations I’ve Experimented With
Once I tried adding crumbled bacon on top (it was amazing, but the tray was a nightmare to clean). Another time, I sprinkled on some everything bagel seasoning—kind of wild, actually, but not bad. Tried a vegan cheese once for my cousin—didn’t melt at all, tasted like rubber. Stick with the real thing if you can.
Do You Need Fancy Tools?
Honestly, a basic baking tray is all you need. If you’re missing parchment, just use foil or even nothing (I’ve done it on a clean oven rack in desperation—not my proudest moment, but it worked). Broiler is nice for the extra crunch, but if you don’t have one, just leave the bread in an extra minute or so.


How I Store Leftovers (Not That I Usually Have Any)
I pop any extras in a zip-top bag in the fridge, but honestly, in my house it never lasts more than a day! I think it tastes even better for breakfast the day after—like cold pizza, but cheesier. If you want it hot again, 5 minutes in the oven and it’s back to life (microwave gets it a bit chewy, but hey, it’s still cheese and bread).
What to Serve With This Toast (According to My Family)
We love dunking it in tomato soup (especially homemade roasted tomato soup—go check Smitten Kitchen for a killer recipe). Sometimes I’ll call it dinner if I add a big salad on the side. My youngest insists on ketchup for dipping, which I don’t totally get, but I respect her hustle.
Hard-won Pro Tips (Or: What I Messed Up So You Don’t Have To)
- Don’t try to rush the preheating. I once shoved the tray in too soon and the bread went soggy in the middle. Not my best move.
- If you use too much garlic (been there), it can get a bit spicy. Actually, I find it works better if you go a little lighter and add more cheese instead.
- For extra crispy edges, let the bread sit out for about 10 minutes before baking. Or don’t—sometimes I forget and it’s still good.
Answering a Few Real-life Questions I’ve Gotten
- Can I use regular sliced bread? – Yep, just watch it close, because thinner bread burns fast. I’d crank the oven down 25 degrees, maybe.
- Is it okay to use margarine? – I mean, you can, but it’s not quite the same. Butter just brings that rich flavor, you know?
- What’s the best cheese combo? – Ooh, tough one! Honestly, whatever you have, but mozzarella and cheddar together are pretty classic. Pepper jack is a fun twist if you like spice.
- Does it freeze well? – I’ve tried, but when you reheat, it can get a bit rubbery. Fresh is best, but leftovers the next day are totally fine.
- Got any good resources for learning more about cheesy toast? – Oh, for sure! Serious Eats has an awesome deep dive on Texas toast if you’re feeling nerdy about it.
And, since we’re here—I once tried using leftover garlic knots for this recipe... it was, uh, too much garlic even for me. Wouldn’t recommend, but hey, that’s how you learn. If you have any wild toast tricks, let me know! I’m always up for trying something new, as long as it involves cheese and maybe a little less cleaning.


Ingredients
- 8 slices thick-cut white bread (Texas toast style)
- 4 tablespoons unsalted butter, softened
- 2 cloves garlic, minced
- 1 cup shredded mozzarella cheese
- 1 cup shredded cheddar cheese
- 2 tablespoons chopped fresh parsley
- ½ teaspoon dried Italian seasoning
- ¼ teaspoon salt
Instructions
-
1Preheat your oven to 400°F (200°C) and line a baking sheet with parchment paper.
-
2In a small bowl, mix the softened butter with minced garlic, Italian seasoning, and salt until well combined.
-
3Spread the garlic butter mixture evenly over one side of each slice of bread.
-
4Arrange the bread slices, buttered side up, on the prepared baking sheet. Sprinkle mozzarella and cheddar cheese evenly over each slice.
-
5Bake in the preheated oven for 10-12 minutes, or until the cheese is melted and bubbly and the edges of the bread are golden brown.
-
6Remove from the oven, sprinkle with chopped parsley, and serve hot.
Approximate Information for One Serving
Nutrition Disclaimers
Number of total servings shown is approximate. Actual number of servings will depend on your preferred portion sizes.
Nutritional values shown are general guidelines and reflect information for 1 serving using the ingredients listed, not including any optional ingredients. Actual macros may vary slightly depending on specific brands and types of ingredients used.
To determine the weight of one serving, prepare the recipe as instructed. Weigh the finished recipe, then divide the weight of the finished recipe (not including the weight of the container the food is in) by the desired number of servings. Result will be the weight of one serving.
Did you make this recipe?
Please consider Pinning it!!