
If you’ve ever wanted cake for breakfast—and let’s be honest, who hasn’t at some point?—then you’re in for a treat with this Sugar Free Yogurt Cake. I first threw this together late one Sunday morning, after realizing we were totally out of sugar (again; honestly, it’s a running joke around here). Instead of giving up and making yet another round of toast, I scavenged the fridge and found a tub of Greek yogurt, some eggs, and a lemon looking a bit sorry for itself. The result? The fluffiest, perk-you-up cake ever. I still remember my nephew taking a bite and saying, “Wait, there’s no sugar in this?” in that slightly skeptical, testing-his-luck way kids have.


Why You'll Love This Yogurt Cake (even if you don’t like yogurt!)
I make this when I’m craving something soft and not-guilt-inducing, or when my friend Karen drops by unannounced hoping for something “tea time-ish.” Actually, my family goes a bit mad for it because it’s simple, not too sweet, and—bonus—doesn’t wreck your blood sugar if you sneak a second slice (or third...I won’t tell!). Plus, cleanup’s a breeze. Now, full disclosure, sometimes it sinks a little bit in the middle but honestly, that’s where I pile on the berries, so who cares?
What Goes In (And Some Swaps I’ve Tried)
- 1½ cups (about 375g) plain Greek yogurt (sometimes I use low-fat, but full-fat is creamiest – my grandma was fiercely loyal to FAGE, but truly any yogurt works in a pinch)
- 2 cups (240g) all-purpose flour (I confess, I once used spelt flour and it was a bit too earthy for me, but you do you)
- 3 large eggs
- ⅓ cup (80ml) light olive oil (you can swap in melted butter, but the olive oil gives it a kind of Mediterranean vibe)
- 1 tablespoon baking powder (yes, really – don’t skimp or you’ll get a pancake, not a cake!)
- 1 teaspoon vanilla extract (okay, sometimes I double it)
- Finely grated zest of 1 lemon (or orange if that’s what’s rolling around your fruit bowl)
- Pinch of salt (not strictly necessary but it does wake up the flavors)
- ¼ cup granulated sweetener of choice (I usually use erythritol; monkfruit is nice too – tried stevia once and it was a bit odd, honestly)
How To Make This Cake Without Losing Your Sanity
- Preheat your oven to 350°F (180°C). Grab a 9-inch round cake pan and line it with parchment, or just butter it generously if you like a little risk.
- In a biggish bowl, whisk together the yogurt, eggs, olive oil, vanilla extract, and lemon zest until smooth. This is where I usually sneak a taste – chef’s rights!
- In another bowl, stir together the flour, baking powder, sweetener, and the (optional) pinch of salt. Try not to wear half the flour.
- Dump the dry stuff onto the wet and stir with a spatula until just combined – don’t overmix! It’ll look a bit lumpy and that’s fine. Actually, I find it works better if you go gentle here.
- Spoon or pour the batter into your prepped pan. Smooth the top a bit, but don’t get obsessive.
- Bake for about 30-35 minutes, or until a toothpick or thin knife poked into the center comes out mostly clean. If it wobbles like jelly, it needs another five minutes.
- Let cool in the pan for at least 10 minutes (hardest part, I know), then run a knife around the edge and turn out onto a rack. It might crack, but honestly, it just adds character.


Notes (a.k.a. What I Learned the Hard Way)
- If you skip the parchment, sometimes the bottom sticks, so don’t feel fancy—just use it.
- This cake actually tastes even better the next morning, especially if you leave it out on the counter and “forget” to cover it. Don’t ask me why, but it’s true.
- If you use stevia, use less than you think you need, or you’ll get a faint aftertaste. Happened to me once and, well, I won’t do that again.
Variations and Freewheeling Attempts
- Swapped lemon zest for orange—delightful, though possibly a bit sweet if you let it go overboard.
- I tried folding in blueberries once—everyone loved it, except me, since the berries all sank to the bottom (maybe toss them in flour first?).
- Once, I used coconut yogurt. The texture got a bit...wobbly? But my vegan friend was into it. Win some, lose some.


Do You Actually Need Special Equipment?
A mixer is nice, but a regular whisk and a bowl do the trick (I’ve even used a fork in a pinch—takes longer, but it works out). I always reach for my trusty offset spatula, but honestly, the back of a spoon will do.
How Does This Cake Keep? (Spoiler: Not For Long!)
You can store this cake in an airtight container at room temp for up to 3 days, though honestly, in my house it never lasts more than a day! Fridge works too, if you want it super moist, but I find it dries the crumb a bit—up to you.
Serving Up Something Special
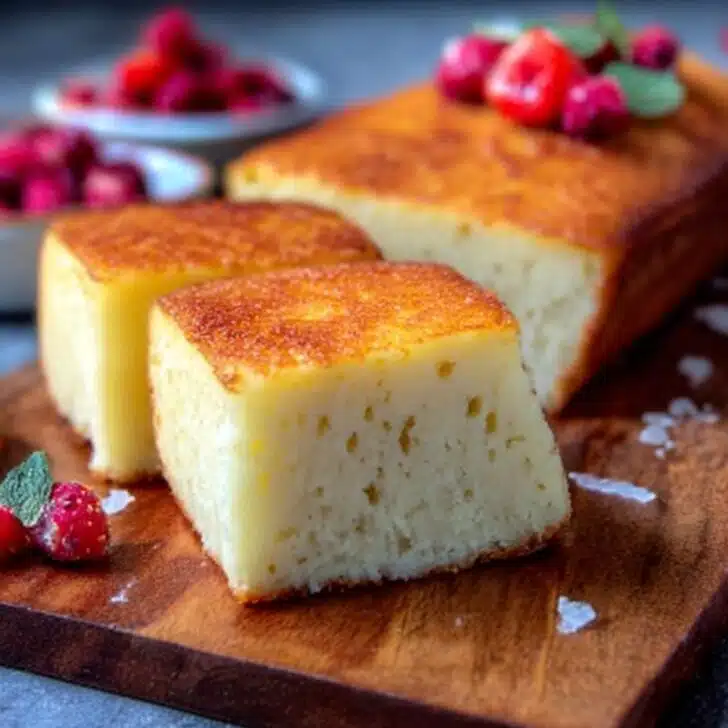
We usually slice it thick and pile on whatever fruit we have—strawberries, raspberries, sometimes even a handful of grapes (controversial, I know). And if you’re feeling extra, a dollop of yogurt or a little unsweetened whipped cream is heaven. I sometimes toast a slice and eat it with my morning coffee—don’t judge.
Things I Learned (The Hard Way!)
- I once tried to bake it at 400°F to make it “go faster”—yeah, don’t. The outside goes brown and the inside’s a gooey swamp.
- Don’t overmix – it gets tough (like, chewing-bubblegum tough).
- Leaving it too long in the pan can mean the bottom sogs out. 10 minutes, no more!
Real Questions I’ve gotten (Or Yelled to Myself While Baking)
- Can I use flavored yogurt? Sure! Just remember, if it’s already sweet, cut back or skip the sweetener. I once used vanilla yogurt and it was a hit.
- Is it okay to use regular sugar? Of course! It’s just not sugar free at that point, but hey, cake is cake. No judgment here.
- Why did my cake sink in the middle? Sometimes mine does too—usually if the oven door gets opened too soon, or if there’s just a lot of yogurt. It’ll still taste lovely, promise.
- Can I freeze it? Yep! Wrap slices really well, pop them in the freezer, and defrost on the counter. Not quite as fresh but still good for a quick snack when you forget to grocery shop (guilty).
- Can I make this gluten-free? Probably, with a decent GF flour blend. I haven't tried it myself, but let me know if you do!
Oh, before I forget—last time I made this, I dropped a lemon zest curl behind the counter. It’s probably still there. Some things in the kitchen just have a life of their own, don’t they?
Ingredients
- 1½ cups (about 375g) plain Greek yogurt (sometimes I use low-fat, but full-fat is creamiest – my grandma was fiercely loyal to FAGE, but truly any yogurt works in a pinch)
- 2 cups (240g) all-purpose flour (I confess, I once used spelt flour and it was a bit too earthy for me, but you do you)
- 3 large eggs
- ⅓ cup (80ml) light olive oil (you can swap in melted butter, but the olive oil gives it a kind of Mediterranean vibe)
- 1 tablespoon baking powder (yes, really – don’t skimp or you’ll get a pancake, not a cake!)
- 1 teaspoon vanilla extract (okay, sometimes I double it)
- Finely grated zest of 1 lemon (or orange if that’s what’s rolling around your fruit bowl)
- Pinch of salt (not strictly necessary but it does wake up the flavors)
- ¼ cup granulated sweetener of choice (I usually use erythritol; monkfruit is nice too – tried stevia once and it was a bit odd, honestly)
Instructions
-
1Preheat your oven to 350°F (180°C). Grab a 9-inch round cake pan and line it with parchment, or just butter it generously if you like a little risk.
-
2In a biggish bowl, whisk together the yogurt, eggs, olive oil, vanilla extract, and lemon zest until smooth. This is where I usually sneak a taste – chef’s rights!
-
3In another bowl, stir together the flour, baking powder, sweetener, and the (optional) pinch of salt. Try not to wear half the flour.
-
4Dump the dry stuff onto the wet and stir with a spatula until just combined – don’t overmix! It’ll look a bit lumpy and that’s fine. Actually, I find it works better if you go gentle here.
-
5Spoon or pour the batter into your prepped pan. Smooth the top a bit, but don’t get obsessive.
-
6Bake for about 30-35 minutes, or until a toothpick or thin knife poked into the center comes out mostly clean. If it wobbles like jelly, it needs another five minutes.
-
7Let cool in the pan for at least 10 minutes (hardest part, I know), then run a knife around the edge and turn out onto a rack. It might crack, but honestly, it just adds character.
Approximate Information for One Serving
Nutrition Disclaimers
Number of total servings shown is approximate. Actual number of servings will depend on your preferred portion sizes.
Nutritional values shown are general guidelines and reflect information for 1 serving using the ingredients listed, not including any optional ingredients. Actual macros may vary slightly depending on specific brands and types of ingredients used.
To determine the weight of one serving, prepare the recipe as instructed. Weigh the finished recipe, then divide the weight of the finished recipe (not including the weight of the container the food is in) by the desired number of servings. Result will be the weight of one serving.
Did you make this recipe?
Please consider Pinning it!