
Let Me Tell You About My Strawberry Cheesecake Dip Habit
I have a bit of a confession: I started making this strawberry cheesecake dip because I was too impatient (okay, and too warm!) to bake a proper cheesecake one summer. And you know what? No one in my family ever complained. Actually, I think they like it better this way — and my cousin once ate half the bowl before anyone else even noticed. The point is, this stuff is dangerously easy and gets demolished at every party. Plus, it’s no bake, which means less time sweating over the oven and more time catching up with friends. Or, you know, chasing my dog away from the kitchen. Again.
Why I Keep Making This (And Why You Might, Too)
I make this when I’m not in the mood to fuss with graham cracker crusts or worry about cracks on top of a fancy cheesecake. My family goes crazy for it because it tastes like summer in a bowl — and (tiny rant) it’s way less stressful than any baked dessert. All the flavor, none of the drama. Honest confession: the first time I tried to swirl jam into this, I made an absolute mess, but somehow it still tasted amazing. And if you’re the type to snack while cooking, you’ll appreciate that it’s basically a spoonable cheesecake. Dangerous, but so worth it.
What You’ll Need (Don’t Stress the Brands)
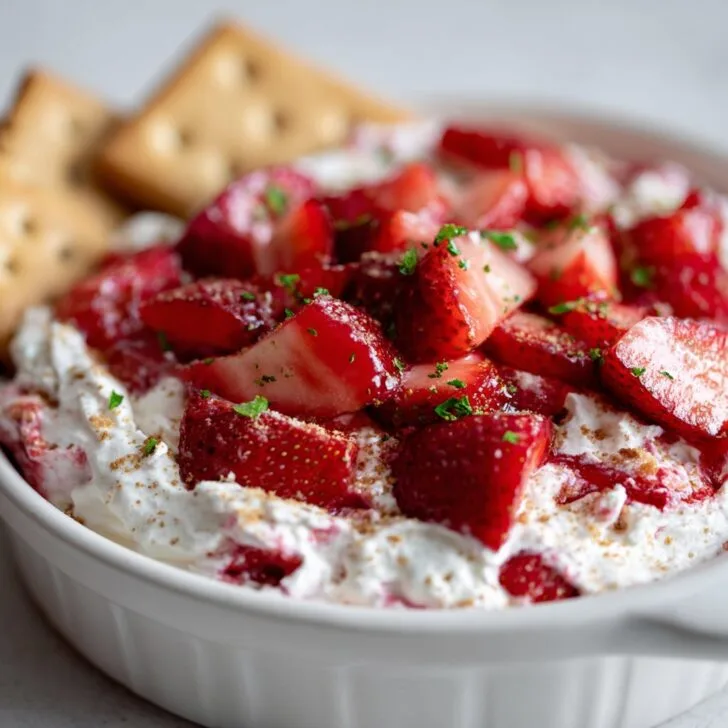
- 1 (8 oz) block cream cheese, softened (Full-fat is best but I’ve used the light stuff in a pinch. My friend swears by the spreadable tubs, but I find them a bit too salty, to be honest.)
- 1 cup powdered sugar (I’ve accidentally used granulated — the dip was just a little gritty but still devoured.)
- 1 cup heavy whipping cream (Or just use one of those pre-whipped tubs if you’re really in a rush, but homemade is tastier.)
- 1 teaspoon vanilla extract (My grandmother always insisted on Nielsen-Massey, but honestly, store brand works fine unless you’re feeling fancy!)
- 1 cup fresh strawberries, finely chopped (No fresh berries? Frozen work—just thaw and drain well or things get runny.)
- 1 tablespoon strawberry jam (Optional, but I like a little swirl for good looks. You could use raspberry if you’re feeling rebellious.)
- Graham crackers, vanilla wafers, apple slices, or whatever you like for dipping.
How I Actually Make It
- First, beat the softened cream cheese in a mixing bowl until it’s fluffy. This is where I usually sneak a taste—no shame. If you’re using a hand mixer, lucky you. If not, a wooden spoon and elbow grease work, just takes longer.
- Mix in the powdered sugar and vanilla. Don’t worry if it looks a bit weird at first; it smooths out after a minute or two of mixing.
- In a separate bowl (or not, sometimes I just go for it in the same bowl), whip the heavy cream until you get soft peaks. On second thought, you can fold in Cool Whip if you’re tired. Actually, it’s still tasty.
- Gently fold the whipped cream into the cream cheese mixture. Don’t overmix — it gets weirdly dense if you do. Or maybe that’s just me being picky.
- Stir in the chopped strawberries. Swirl in the jam with a butter knife if you’re feeling artsy, or just blob it on top. Either way, tasty.
- Chill for at least 30 minutes, but honestly, it’s still good if you eat it right away. (I’ve done both. Oops.)
Things I’ve Learned (Sometimes the Hard Way)
- This dip thickens up the longer it chills. I think it tastes better the next day, but my kids never let it last that long.
- Using frozen berries is fine, but let them drain on a paper towel first or the whole thing gets soupy. Learned that the hard way — strawberry soup, anyone?
- If you want it sweeter, add more powdered sugar; if it’s too sweet, add a squeeze of lemon juice. That’s it. No drama.
Variations I’ve Tried (and a Few I Regret)
- Blueberries instead of strawberries — more subtle, but still yum.
- Swapped in Greek yogurt for half the cream cheese once. It was tangier, almost like a cheesecake smoothie. Kinda nice, just not as decadent.
- One time I tried swirling in melted chocolate. It looked cool but overpowered the berries. (Maybe better as a drizzle on top.)
- Peanut butter swirl? Don’t. It was just... odd. Like, what was I thinking?
What You Need (And Workarounds)
- Hand mixer or stand mixer — makes life easier, but I’ve used a regular whisk; just takes longer and your arm will get a workout.
- Medium mixing bowl — any old bowl really, as long as it’s big enough for enthusiastic stirring.
- Spatula (or a big spoon, whatever’s clean).
If you don’t have a fancy mixer, just use a bit of muscle. Or recruit a helpful bystander — kids seem to love mixing things, at least for a minute or two before wandering off.


How to (Try To) Store It
Pop it in the fridge, covered, and it’ll be good for up to two days. Though honestly, in my house it never lasts more than a day! If it does separate a bit, just give it a quick stir before serving.
Serving It Up, Family-Style
We usually serve this straight from the bowl with graham crackers and apple slices, though my aunt insists it’s best with pretzels for that salty-sweet thing. Up to you! Sometimes I scatter extra chopped strawberries on top to make it look like I tried a little harder.
Tips I Had to Learn the Hard Way
- Don’t try to rush the chilling step. I once served it right away and it was a bit runny, kind of like a dip-slash-smoothie. Not my best look.
- Softening the cream cheese makes a big difference — I microwaved it once and it turned a little too soft, so now I just leave it on the counter for 30 minutes. Much safer (unless the cat finds it).
Questions I Actually Get (Or Wish I Did)
- Can I use frozen strawberries?
Absolutely! Just thaw and drain them well first. Otherwise, your dip will be more like a milkshake (not in a good way, trust me). - Is this okay to make ahead?
Yes, probably even better the next day! Just keep it covered in the fridge. If it separates, give it a stir — no biggie. - Can I make it dairy free?
Mmm, I haven’t tried, but I’ve heard you can use vegan cream cheese and coconut whipped cream. If you try it, let me know because I’d love to hear how it goes. - What’s the best thing to dip?
I like graham crackers, but my mate Sarah swears by shortbread. Apples are good too, or just a big spoon — no judgment. - How long will this keep?
Officially? Two days in the fridge. Unofficially? Good luck making it last that long!
Oh, and if you want to see a wild variation of this, check out Sally’s Baking Addiction — she adds lemon and it’s kind of brilliant. For a homemade vanilla extract, I followed these tips from King Arthur Baking – game changer if you’ve got patience (which I usually don’t!).
Anyway, enough chatting — go whip this up already. And if it’s a little messy or imperfect, all the better. That’s what makes it yours. Enjoy!


Ingredients
- 8 oz (225 g) cream cheese, softened
- 1 cup (120 g) powdered sugar
- 1 cup (240 ml) heavy whipping cream or whipped topping
- 1 teaspoon vanilla extract
- 1 cup (150 g) fresh strawberries, diced
- ¼ cup (60 g) strawberry jam
- 1 tablespoon lemon juice
- Graham crackers, cookies, or fresh fruit for serving
Instructions
-
1In a large mixing bowl, beat the softened cream cheese until smooth and creamy.
-
2Add powdered sugar and vanilla extract to the cream cheese and mix until well combined.
-
3Fold in the whipped cream or whipped topping gently until the mixture is light and fluffy.
-
4In a separate bowl, combine diced strawberries, strawberry jam, and lemon juice. Mix well.
-
5Gently swirl the strawberry mixture into the cheesecake dip, creating a marbled effect.
-
6Transfer to a serving bowl and chill for at least 30 minutes before serving with graham crackers, cookies, or fresh fruit.
Approximate Information for One Serving
Nutrition Disclaimers
Number of total servings shown is approximate. Actual number of servings will depend on your preferred portion sizes.
Nutritional values shown are general guidelines and reflect information for 1 serving using the ingredients listed, not including any optional ingredients. Actual macros may vary slightly depending on specific brands and types of ingredients used.
To determine the weight of one serving, prepare the recipe as instructed. Weigh the finished recipe, then divide the weight of the finished recipe (not including the weight of the container the food is in) by the desired number of servings. Result will be the weight of one serving.
Did you make this recipe?
Please consider Pinning it!!