
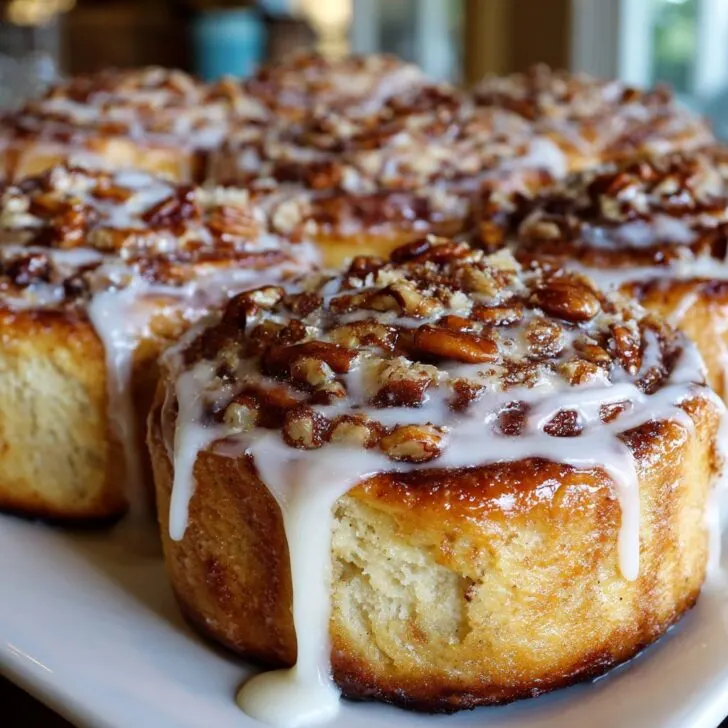
The Aroma That Brings Everyone to the Kitchen
So, last winter (or maybe it was two winters ago—time's a blur when you're elbow-deep in flour), I decided to whip up these sticky cinnamon buns with cream glaze for a lazy Saturday breakfast. You know that feeling when you wake up to the smell of sweet, yeasty dough and cinnamon swirling through the house? Yeah, my family basically came running into the kitchen like I'd won the lottery and breakfast was the prize. I mean, who could blame them? Even the cat was interested—and he doesn't even like sweets.
And honestly, I've made these so many times that the recipe's got a few tea stains and a mysterious flour fingerprint or two. But that's what cooking at home is all about, right? A bit of mess, a lot of love, and maybe a bun that's a little more lopsided than the others. (I claim the wonky one for myself, every single time.)
Why You'll Be Making These on Repeat
I make these sticky cinnamon buns when the weather gets nippy, or when someone's had a rough week, or just because. My family goes a bit bonkers for them—especially when I drizzle on way too much cream glaze (if that's a thing). And here's the thing: I used to kinda dread making anything that involved yeast (is it rising? did I kill it with hot milk?), but these buns are pretty forgiving. The dough is soft, which means you get those gorgeous pillowy rolls that practically beg to be pulled apart. There's a bit of a wait, sure, but it's the good kind. The anticipation just makes them taste better—like waiting for your favorite song on the radio, only you get cinnamon sugar at the end. Oh, and if you get distracted (which happens in my kitchen more than you'd think), the dough still seems to work out. Magic, I guess.
What You'll Need (Plus a Few Good Swaps)
- 3 cups all-purpose flour (sometimes I swap in a cup of bread flour if I've got it—makes 'em chewier)
- 1 packet (about 2 ¼ tsp) instant yeast (My gran swore by Red Star, but I've used the store brand and honestly, couldn't tell the difference)
- ¼ cup sugar (I've tried brown sugar here; it's not bad, just a tad richer)
- ½ cup whole milk, warmed (skim milk works too, in a pinch—just a bit less rich)
- ¼ cup unsalted butter, melted (No butter? I've even resorted to margarine once. Not ideal, but edible!)
- 2 eggs, at room temp (I usually forget and use 'em straight from the fridge. It's fine.)
- ½ teaspoon salt
- For the filling: ½ cup soft butter, 1 cup brown sugar, 2 tablespoon cinnamon (can you have too much? I say no), pinch of nutmeg (optional; my kids claim they can taste it, but I think they're bluffing)
- For the cream glaze: 1 cup powdered sugar, 2-3 tablespoon heavy cream (or just plain milk; cream is fancier, but milk totally works), 1 teaspoon vanilla extract (or a splash more if you lost track pouring—no judgment)
How I Actually Make These (With a Few Detours)
- Make the dough: In a big bowl, toss together flour, sugar, yeast, and salt. Mix. Pour in the warm milk, melted butter, and crack in those eggs. Stir it until it looks like a shaggy mess; that's normal. Once it's sticking together, turn it out on a floured counter and knead for about 5-7 minutes. Or until your wrists complain. (You want it smooth and springy, but honestly, a little roughness is fine. My dough always looks a bit patchy and it still rises!)
- Let it rise: Pop your dough ball into a greased bowl, cover with a clean towel (I use an old tea towel with a cartoon dog on it; highly recommend), and let it rise somewhere warm. About an hour, or until doubled. Sometimes I'll just set it on top of my preheating oven. If it's slow, I make tea. Or get distracted online. Both work.
- Roll and fill: Punch down the dough (it's weirdly satisfying) and roll it out into a rectangle—roughly 10x15 inches, but I never measure. Slather with soft butter, then sprinkle on the sugar, cinnamon, and nutmeg if you're feeling fancy. Roll up tight (from the longer edge), pinch the seam, then use a serrated knife (or dental floss! Real trick) to slice into about 12 buns. Sometimes I get 13, which feels lucky?
- Second rise: Arrange the buns cut-side up in a greased 9x13 pan. Cover and let them puff up for another 30-40 mins. (If your kitchen is chilly, sometimes I stick them near a sunny window. Does that help? Who knows, but I like the view.)
- Bake: Heat oven to 350°F (that’s 180°C for my metric mates), and bake for about 25-30 minutes. They should be golden brown and your house will smell like a bakery, honestly. If the tops start looking too dark, I loosely drape foil on top. Or sometimes I forget, and they come out extra toasty—not a tragedy.
- Glaze: While the buns cool a bit, whisk together the powdered sugar, cream, and vanilla. Drizzle all over—don't be shy. This is where I always sneak a taste, you know, just to make sure the glaze is, um, edible. Quality control!
Notes on a Few Odd Discoveries
- If your dough isn’t rising, don’t panic; give it more time or check if your yeast is expired (yep, I've used ancient yeast before—almost turned these into hockey pucks).
- The glaze is super forgiving. Too thick? Add a splash more milk. Too runny? More sugar. Sometimes I just eyeball it, honestly.
- And if your buns are a bit wonky-shaped, join the club. No one’s ever complained (except maybe my cousin Mike, but he complains about everything, so...)
Buns, But Make Them Yours
I've played around a lot (maybe too much) with this recipe. Tried chopped pecans—delicious. Raisins—controversial in my house, but I like 'em. Once I attempted a chocolate swirl, and it sort of turned into a sticky mess (tasted alright, but not Instagram-worthy). If you want to go wild, try orange zest in the glaze—surprisingly fresh.
About the Gear (and What to Do If You Don’t Have It)
- Mixing bowls: Any will do. I once used a salad bowl. Worked fine.
- Rolling pin: If you don’t have one, use a wine bottle. Seriously. Just clean it first.
- 9x13 baking dish: Or whatever you’ve got. Just squish the buns closer together if the pan’s smaller. They’ll rise up, not out. (I learned this form a baking blog I love: Sally's Baking Addiction.)
- Serrated knife or dental floss for slicing—sounds odd but it works way better for neat swirl.


Keeping Them Fresh (Ha!)
In theory, cover leftover buns and they’ll keep soft for a couple days on the counter. Or pop in the fridge. But honestly, these have never lasted more than a day at my place. If you do manage leftovers, try reheating for 10 seconds in the microwave—softens them right back up.
How I Love to Serve Them
We’re a pour-while-warm house when it comes to glaze. I like them with a strong mug of coffee (or a builder’s tea if it’s Sunday), and sometimes a blob of whipped cream on top if I’m feeling extra. Once, we served these for Christmas morning—felt downright fancy, even though I was still in my slippers. My friend swears by a scoop of vanilla ice cream on the side—bit mad, but I tried it. Not bad!
Learned the Hard Way: My Top Bun Lessons
- Don’t rush the rise. I once tried to speed it up by sticking the bowl in a warm oven, and it half-cooked the dough on the bottom (whoops). Just wait.
- If your glaze seizes up, don’t panic. Just microwave it for a couple seconds and stir again.
- Don’t overbake, even if you’re worried they’re too soft. They keep cooking a bit out of the oven.
Wait, What If... (FAQs I Actually Get)
- Can I make these ahead?
- Yep! Assemble buns and pop 'em in the fridge overnight (covered). Next morning, let 'em sit out while the oven heats up and bake as usual. They sometimes rise a bit slower this way, but that’s okay.
- No stand mixer—can I still make these?
- Absolutely, I usually knead by hand anyway. Bit of a workout, but worth it for the soft dough. Or, check out King Arthur Baking for hand-kneading tips.
- Can I freeze them?
- Sort of! Bake, cool completely, then freeze. Defrost and warm up, then glaze. Fresh is best, but it works.
- Milk allergy—any swaps?
- I’ve tried oat milk; buns were still fluffy, maybe a tad less rich. For the glaze, water & a dash of vanilla works in a pinch (not quite the same, but still sweet).
- Do I have to use cream in the glaze?
- Nope, milk or even non-dairy milk works. Cream just makes it extra thick and, well, creamy.
- Why are my buns doughy in the middle?
- This happens if they’re packed too tightly, or underbaked. Next time, check for golden brown edges and maybe leave them in for a couple extra minutes. Or, just embrace the gooey middles—I won’t judge!
So that's my not-so-perfect, but always delicious, sticky cinnamon buns with cream glaze recipe. If you make it, let me know how it turns out! Or if you find a better trick for slicing them, drop me a line. Happy baking (and don't forget to lick the spoon)!


Ingredients
- 2 ¼ cups all-purpose flour
- ¼ cup granulated sugar
- 2 ¼ teaspoon active dry yeast
- ½ cup warm milk
- ¼ cup unsalted butter, melted
- 1 large egg
- ½ teaspoon salt
- ½ cup brown sugar, packed
- 2 teaspoon ground cinnamon
- ¼ cup unsalted butter, softened (for filling)
- ¾ cup powdered sugar
- 2 tablespoon heavy cream
- ½ teaspoon vanilla extract
Instructions
-
1In a large bowl, combine warm milk, yeast, and a pinch of sugar. Let sit for 5 minutes until foamy.
-
2Add melted butter, granulated sugar, egg, and salt to the yeast mixture. Gradually mix in flour until a soft dough forms.
-
3Knead the dough on a floured surface for 5-7 minutes. Place in a greased bowl, cover, and let rise for 45 minutes or until doubled in size.
-
4Roll out the dough into a rectangle. Spread softened butter over the surface, then sprinkle with brown sugar and cinnamon.
-
5Roll up the dough tightly and slice into 8 pieces. Arrange in a greased baking dish, cover, and let rise for 20 minutes. Bake at 350°F (175°C) for 25 minutes or until golden brown.
-
6Whisk together powdered sugar, heavy cream, and vanilla extract to make the glaze. Drizzle over warm buns before serving.
Approximate Information for One Serving
Nutrition Disclaimers
Number of total servings shown is approximate. Actual number of servings will depend on your preferred portion sizes.
Nutritional values shown are general guidelines and reflect information for 1 serving using the ingredients listed, not including any optional ingredients. Actual macros may vary slightly depending on specific brands and types of ingredients used.
To determine the weight of one serving, prepare the recipe as instructed. Weigh the finished recipe, then divide the weight of the finished recipe (not including the weight of the container the food is in) by the desired number of servings. Result will be the weight of one serving.
Did you make this recipe?
Please consider Pinning it!!