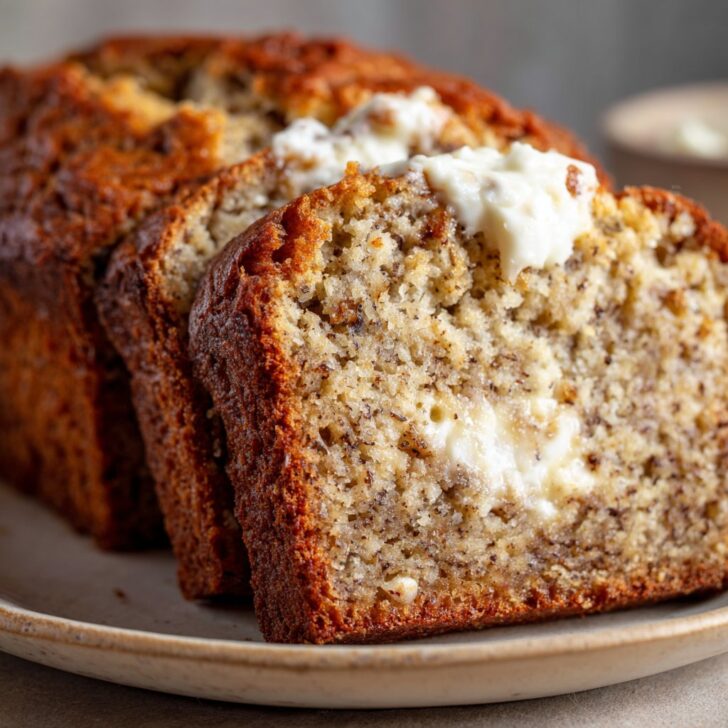

Let Me Tell You About My Favorite Banana Bread (It's a Whole Thing)
Okay, so banana bread is one of those things you just keep coming back to, right? For me, it's like a warm hug form the oven. First time I made this Sour‑Cream Banana Bread, I was trying to impress my mother-in-law (which, honestly, is a lost cause, but the bread worked). The smell alone had my dog glued to the kitchen door, and by the time it cooled, there was a small crowd waiting. Oh! Once, I even forgot to grease the pan and had to scrape the crusty bits with a spoon—still tasted great. If banana bread had a fan club, I'd be president.
Why You'll Love This (Or At Least, Why I Do)
I make this when I've got sad bananas on the counter (which is often), or when someone texts they're “just popping by” and my fridge is a little bare. My family goes nuts for this—especially my son who claims it's almost cake. The sour cream makes it, I'm telling you. Moist, but not in a weird way. And—confession—I used to hate how banana bread always dried out too soon. This version stays soft for days (well, it's supposed to, but see the storage note below for my reality check).
Here's What Goes In (With a Few Sidetracks)
- 3 or 4 large ripe bananas (the browner the better; I sometimes freeze them ahead—super convenient)
- 1 cup sugar (granulated is classic, but coconut sugar works in a pinch—it just gives a darker loaf)
- ½ cup unsalted butter, melted (I've tried olive oil once—interesting, but a bit odd. Don't recommend unless you like surprises.)
- 2 eggs (room temp if you remember, but cold is fine—I'm not judgy)
- 1 cup sour cream (Greek yogurt swaps in okay; my grandma swore by Daisy brand, but honestly, anything thick-ish does the trick)
- 2 teaspoons vanilla extract
- 2 cups all-purpose flour (I tried a 50/50 blend with whole wheat flour once. It was... hearty. Not my favorite, but you do you)
- 1 teaspoon baking soda
- ½ teaspoon salt (just a regular pinch if you're not feeling precise)
- ½ cup chopped walnuts or pecans—optional, but I love the crunch (my kid hates them, so sometimes I do half and half. Life's too short to argue over nuts)
- Pinch of cinnamon (optional, but smells like autumn)
How I Actually Make It (A Little Messy, Always Delicious)
- Preheat your oven to 350°F (180°C). Grease a 9x5 inch loaf pan—or line it with parchment if you’re also on Team Lazy Cleanup.
- Mash the bananas in a big bowl. I use a fork, but a potato masher works if you like less chunk. Don’t worry if it’s lumpy—a little texture is good here.
- Stir in the sugar, melted butter, eggs, sour cream, and vanilla. At this point, I usually sneak a tiny taste (eggs are in there, so live on the edge).
- In another bowl, whisk together flour, baking soda, salt, and cinnamon if you’re using it. Actually, sometimes I just dump the dry right in—one less bowl to wash, and it’s always turned out fine for me.
- Gently fold the dry ingredients into the wet. Don’t overmix it! Some streaks of flour are okay—if you go wild here, you’ll get tough bread. Learned that the hard way.
- Scatter in your nuts if you want, or leave ‘em out for picky eaters.
- Pour the batter into the pan. I like to tap it on the counter to pop air bubbles (and annoy the downstairs neighbor—sorry, Mike).
- Bake for 55–65 minutes. Mine's usually done at 60, but every oven's got its quirks. A skewer should come out with just a few moist crumbs. If it’s gooey, give it another five minutes.
- Let it cool in the pan for about 10 minutes (or longer if you forget about it like I do), then turn onto a rack. Try not to dig in too soon—it slices better when it’s cool, but who am I kidding? Tear off the end and enjoy.
Notes from My Messy Kitchen
- If you use frozen bananas, let them thaw fully and pour off the extra liquid (unless you like super-dense bread; I learned this after a very pudding-like loaf.)
- Sometimes I run out of sour cream and just use yogurt—works in a pinch, but the tang is a little less pronounced. Still tasty though.
- The walnuts can burn if you sprinkle them on top before baking. Fold them in instead; trust me on this one.
If You Want to Change Things Up (Or Just Feel Adventurous)
I’ve swapped the nuts for chocolate chips (delicious, but not as breakfast-y). Swirled in a tablespoon of peanut butter once—made a mess, but the flavor was great if you’re into that kind of thing. Tried adding blueberries. Did not recommend. Maybe it was just a bad batch, but the bread kind of fell apart. Live and learn!
The Gear I Use (But You Can Improvise)
- 9x5 inch loaf pan—though, I once split the batter into two mini pans and just baked for less time. Worked, sort of. If you only have a square cake tin, it’ll bake faster, so keep an eye out.
- Mixing bowls—any will do. I’ve even used a soup pot in a pinch.
- Fork or potato masher for bananas (or just squish with your hands if you fancy, it’s oddly satisfying)
- Wire rack for cooling—though a chopping board works just fine


How to Store This (If You Have Any Left)
Wrap it well (foil, beeswax wrap, whatever’s handy) and it’ll last 2–3 days at room temp. In theory. But honestly, it’s usually gone in 24 hours at my house. You can freeze slices, too—just wrap individually. Defrost in the microwave or toaster. If you forget it in the freezer for, like, a month, it’ll dry out a bit but still makes decent French toast. Just saying.
How I Like to Serve It (And What My Family Does)
Thick slice, warm, with a bit of salted butter melting on top—perfection. My husband toasts his. My kid dunks it in milk (questionable, but everyone’s got a thing). Sometimes, if I’m feeling fancy, I’ll make a quick glaze with powdered sugar and lemon juice—totally optional, but looks pretty for company.
Pro Tips (Or, Mistakes I Don’t Recommend)
- Don’t rush the baking. I tried pulling it out early once (impatience got the better of me); it was raw in the middle and my family still brings it up. Sigh.
- Actually, I find it works better if you let it cool all the way before slicing. But, sometimes I just can’t wait—crumbs everywhere, but worth it.
- If your bananas are barely ripe, microwave them (skin on) for 30 seconds. Not perfect, but does the trick in a pinch.
FAQ (You Really Asked, So Here Goes)
- Can I make this gluten-free? Yes, I’ve had luck with Bob’s Red Mill 1-to-1 flour (here’s the guide I used). Texture’s a little different, but still good. Just don’t overmix.
- Can I use low-fat sour cream? You can, but the loaf isn’t as rich. I’d rather use whole milk yogurt if I’m out of the real stuff, honestly.
- Do I have to add nuts? Nope! Skip ‘em, or use chocolate chips, or nothing at all. I did a batch once with crushed pretzels—don’t ask me why. Interesting, but not a repeat.
- How do I know when it’s done? A toothpick or skewer poked right in the middle should come out with just a few moist crumbs. If there’s wet batter, bake a bit longer. Annoyingly, my old oven always needed an extra ten minutes.
- What if I don’t have sour cream? I’ve used thick Greek yogurt, as mentioned. Or check out Sally’s recipe—hers is great, too, and uses buttermilk instead.
There you have it—my favorite Sour‑Cream Banana Bread, messy notes and all. If you end up with a loaf that looks a little... not like the picture, don’t sweat it. It’ll taste good anyway. Oh, and if you figure out how to make it last more than a day, let me know your secret!


Ingredients
- 2 cups all-purpose flour
- 1 teaspoon baking soda
- ½ teaspoon salt
- ½ cup unsalted butter, softened
- 1 cup granulated sugar
- 2 large eggs
- 1 cup mashed ripe bananas (about 2-3 bananas)
- ½ cup sour cream
- 1 teaspoon vanilla extract
Instructions
-
1Preheat the oven to 350°F (175°C). Grease a 9x5-inch loaf pan.
-
2In a medium bowl, whisk together the flour, baking soda, and salt.
-
3In a large bowl, cream the butter and sugar until light and fluffy. Beat in the eggs one at a time.
-
4Mix in the mashed bananas, sour cream, and vanilla extract until well combined.
-
5Gradually add the dry ingredients to the wet ingredients, mixing just until incorporated.
-
6Pour the batter into the prepared loaf pan and bake for 50-55 minutes, or until a toothpick inserted into the center comes out clean. Cool in the pan for 10 minutes, then transfer to a wire rack to cool completely.
Approximate Information for One Serving
Nutrition Disclaimers
Number of total servings shown is approximate. Actual number of servings will depend on your preferred portion sizes.
Nutritional values shown are general guidelines and reflect information for 1 serving using the ingredients listed, not including any optional ingredients. Actual macros may vary slightly depending on specific brands and types of ingredients used.
To determine the weight of one serving, prepare the recipe as instructed. Weigh the finished recipe, then divide the weight of the finished recipe (not including the weight of the container the food is in) by the desired number of servings. Result will be the weight of one serving.
Did you make this recipe?
Please consider Pinning it!!