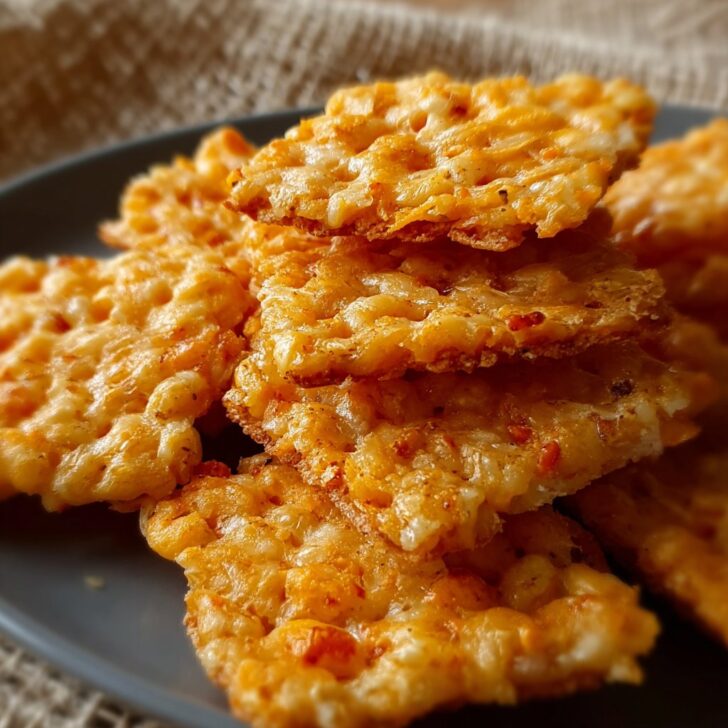

So, You Want to Make Rice Krispie Cheddar Crackers?
Okay, straight up—if you had asked me five years back if Rice Krispies belonged anywhere near cheddar, I'd probably have looked at you sideways. Then I stumbled onto a version of these crackers at a church potluck (shoutout to Carol, wherever you are), and now they're basically my “oh-you-came-over-unannounced-huh?” snack. I’ve made them for road trips, Super Bowls I only sorta watched, and even tried sneaking a few into the cinema—never again, the crunch is just too loud!
One time, my cousin Jimmy tried to microwave them to warm them up and, well, let’s just say I wouldn’t recommend that unless you like cheese glue.
Why You'll Love These Weird But Wonderful Crackers
I make these when I want that "something savory, but not another bowl of chips" feeling (or let’s be honest, when I peek in the pantry and that’s pretty much all I can scrape together). My family goes nuts for these—my kid called them "cheesy breakfast cookies" once, which, honestly, isn’t totally wrong. Sometimes the dough just wants to stick to your hands, which used to drive me mad, but then I started flouring my palms like a grandma and problem solved (well, mostly).
Here's What You'll Need (I Swear It's Easy)
- 1 cup shredded sharp cheddar cheese (I love extra-sharp, but mild works if you’re feeling mellow; my aunt swears by pre-shredded but I, eh, do whatever’s on hand)
- 1 stick unsalted butter, softened (I once used salted butter in a pinch—just skip adding extra salt)
- 1 cup all-purpose flour (if you really want to experiment, whole wheat is okay, but don’t blame me for the density)
- ½ teaspoon smoked paprika (sometimes I do regular paprika, or none, depending what's lurking in the spice drawer)
- ¼ teaspoon salt
- 1 ½ cups Rice Krispies cereal (or, if you live somewhere where they don't carry them, I tried with cornflakes once, but... not my favorite)
How I Throw These Crackers Together
- First, crank your oven up to 350°F (about 175°C). No need to fuss with parchment unless you're feeling fancy—I often just grease the sheet pretty generously.
- In a medium bowl, mix the butter and cheese together. You want it creamy. Sometimes I use my hands, sometimes a spoon, depends if my mixer is clean (usually not).
- Sprinkle in your flour, paprika, and salt. Just dump it in, no need to sift—unless you really want to.
- Now, fold in those Rice Krispies gently. The key here is not to absolutely destroy them—think "gentle encouragement" not "furious mash." This is where I usually snag a bite of dough; seriously, it's like cheese play-doh.
- Pinch off little bits (about the size of a big marble, or smaller if you like crispy minis) and roll them into balls. Pop them onto your baking tray, then lightly flatten (many a time I’ve squished too hard and ended up with cheese frisbees).
- Bake 12-15 minutes until golden around the edges. Don’t overthink it. I take them out when they smell dangerously good—even if they're a touch pale, they'll finish cooking outside.
Little Notes From the Kitchen Trenches
- If the dough's sticky, shove it in the fridge for ten minutes. Or, add a teeny sprinkle of flour. Works a treat.
- Don’t panic if they spread a bit—mine usually do, but, you know, rustic is in.
- I tried to fancy them up once with black pepper on top. All that did was confuse my nephew. Proceed at your own risk.
The Stuff I’ve Tried (Some of It Even Worked)
- Once swapped in smoked gouda for cheddar—honestly, it kind of rocked.
- Added finely chopped chives one time; that batch? My friend asked me for the recipe. High praise where I come from.
- Tried making them with vegan margarine and dairy-free shreds—it sort of worked, but, eh, I missed the cheesy oomph.
- Herbs? I say go easy. Rosemary turned mine into a Christmas candle situation, which, never again.
What If I Don’t Have the Right Equipment?
No food processor? No worries. A sturdy spoon and some elbow grease will do it. And if you don’t have a baking sheet, honestly, I’ve used a pizza tray before. Just avoid those nonstick tan ones if you can—they tend to brown too fast.


Where Do I Stash 'Em? (If They Survive Long Enough)
Keep these tightly sealed in a container for up to 3 days—but honestly, in my house it never lasts more than a day! They get a bit softer after 24 hours, which isn’t a bad thing, just different. And nope, fridge isn’t necessary (probably makes 'em soggier).
How I Love to Serve Rice Krispie Cheddar Crackers
Call me basic, but I love them with tomato soup—especially when it’s "one of those days." My sister, though, piles them on a cheese board; I tried that once, but then everyone just ate the crackers and ignored my fancy olives (their loss).
Pro Tips... Learned The Hard Way
- I once tried rushing the cooling step—bit into one too soon, scorch marks on the roof of my mouth for days.
- Letting the dough hang out in the fridge makes them way easier to roll. I didn’t believe it until I finally caved and tried—it’s worth the wait.
- Actually, I find that using coarsely shredded cheese makes for gooier pools inside the cracker. If you’re not into that, use the finer stuff.
FAQ (Real Life, Real Answers)
- Can I freeze these crackers?
- Sort of! They freeze decent in a zip-top bag, but honestly, they taste best fresh. The cereal gets a bit, I dunno, chewy after thawing.
- Do I have to use Rice Krispies?
- Technically? No, but then they're not Rice Krispie Cheddar Crackers. Cornflakes are okay if you’re desperate, but the crunch isn’t the same.
- Can I double the recipe?
- Absolutely; just use a bigger bowl, or... split between two (learned after I made a cheesy flood once).
- Are they gluten-free?
- Well, sorta, Rice Krispies aren't always GF—check your labels. Or use GF rice cereal, which works just fine—promise!
- Can I make these without butter?
- You can try margarine or vegan butter, like I mentioned earlier, but in my experience, the flavor isn't quite as rich (still munchable though!).
- What’s a good resource for more snack ideas?
- I’ve picked up some gems from Serious Eats' snack section—worth a scroll!
A Quick Digression Before I Forget
Oh, almost went down a google rabbit hole once trying to find the original 1950's version of these crackers—there are, like, a bazillion slight tweaks. Turns out, everyone’s secretly cheating with their own hacks. No shame in the shortcut game, mate.


Ingredients
- 1 cup (125g) all-purpose flour
- ½ teaspoon baking powder
- ¼ teaspoon salt
- ½ cup (115g) unsalted butter, softened
- 2 cups (200g) shredded sharp cheddar cheese
- ½ teaspoon paprika
- ¼ teaspoon garlic powder
- 1 cup (30g) Rice Krispies cereal
Instructions
-
1Preheat the oven to 350°F (175°C) and line a baking sheet with parchment paper.
-
2In a medium bowl, whisk together the flour, baking powder, salt, paprika, and garlic powder.
-
3In a large bowl, beat the butter until creamy. Mix in the shredded cheddar cheese until well combined.
-
4Gradually add the dry ingredients to the cheese mixture, mixing until just combined. Gently fold in the Rice Krispies cereal.
-
5Scoop tablespoon-sized portions of dough onto the prepared baking sheet, flattening each slightly with your fingers.
-
6Bake for 16–18 minutes until golden and crisp. Let cool on a wire rack before serving.
Approximate Information for One Serving
Nutrition Disclaimers
Number of total servings shown is approximate. Actual number of servings will depend on your preferred portion sizes.
Nutritional values shown are general guidelines and reflect information for 1 serving using the ingredients listed, not including any optional ingredients. Actual macros may vary slightly depending on specific brands and types of ingredients used.
To determine the weight of one serving, prepare the recipe as instructed. Weigh the finished recipe, then divide the weight of the finished recipe (not including the weight of the container the food is in) by the desired number of servings. Result will be the weight of one serving.
Did you make this recipe?
Please consider Pinning it!!