
You Need To Try This Reese’s Peanut Butter Earthquake Cake—Trust Me
So, picture this: it’s raining buckets outside, the house is a mess (story of my life), and I really wanted something kind of ridiculous and fun to bake. Reese’s Peanut Butter Earthquake Cake popped into my brain—no joke—when I noticed the bag of mini peanut butter cups begging for attention in the pantry. My first time making it was with my cousin Cathy; we ended up with chocolate on the lampshade (don’t ask). Ever since, it’s been my go-to when I want dessert and a laugh. If you like the combo of peanut butter and chocolate (I mean, who doesn’t?), you’ll be smitten.
Why I Keep Making This, Honestly
I make this when I need to win someone over (or just bribe my kids into doing chores). My family goes bonkers for the melty, gooey chocolate swirls and peanut butter rivers (my words). It’s the kind of cake you bring to a party and leave with people texting you for the recipe later. And yes, it looks a bit like a Jackson Pollock painting gone rogue, but that’s part of the fun. Actually, I find it works better if you stop fussing over how it looks—embrace the mess!
The Not-So-Strict Ingredients List
- 1 box chocolate cake mix (I usually use Devil’s Food, but fudge cake or even regular chocolate cake mix does the trick. My grandmother swore by Betty Crocker, but store brand hasn’t failed me yet.)
- 3 eggs (large... I think. Sometimes I just grab what’s in the fridge honestly)
- ½ cup vegetable oil (canola’s fine; coconut oil works but gives a hint of coconut, which I don’t mind)
- 1 cup water (though in a pinch, I’ve subbed milk or even coffee for a deeper flavor—try it if you’re feeling daring!)
- ½ cup creamy peanut butter (I’ve used crunchy PB when that’s all I had; it’s a bit chunkier, but who cares?)
- ¼ cup unsalted butter, melted
- 8 ounces cream cheese, softened (I sometimes microwave it for 10 seconds to help)
- 2 cups powdered sugar (give or take; you can go a bit less for a less-sweet experience)
- About 1 and ½ cups mini Reese’s peanut butter cups (or chop up the regular ones—no one will know)
- Optional: a handful of chocolate chips, toasted pecans, or even a little sea salt on top—as I said, it’s not precious.
So Here’s How I Make It (Casual Guidance Inbound)
- Prep your pan and oven: Heat the oven to 350F (180C, for those like me who forget). Grease a 9x13 inch baking pan—or, if you’re out of cooking spray, a good smear of butter works wonders; I sometimes use parchment paper if I’m feeling fancy.
- Mix the chocolate cake layer: Dump the cake mix, eggs, oil, and water (or whatever swap you picked) in a bowl. Stir it by hand if you want an arm workout or grab a mixer. Don’t overmix, just get it smooth-ish. Pour into the pan and spread it around, mostly evenly. This is usually when I sneak a taste—not sorry.
- Creamy peanut butter layer: In another bowl, blend the softened cream cheese, melted butter, peanut butter, and powdered sugar. It’ll look oddly lumpy at first, and that’s fine. Spread this in plops over the cake batter—it’s supposed to look crazy right now.
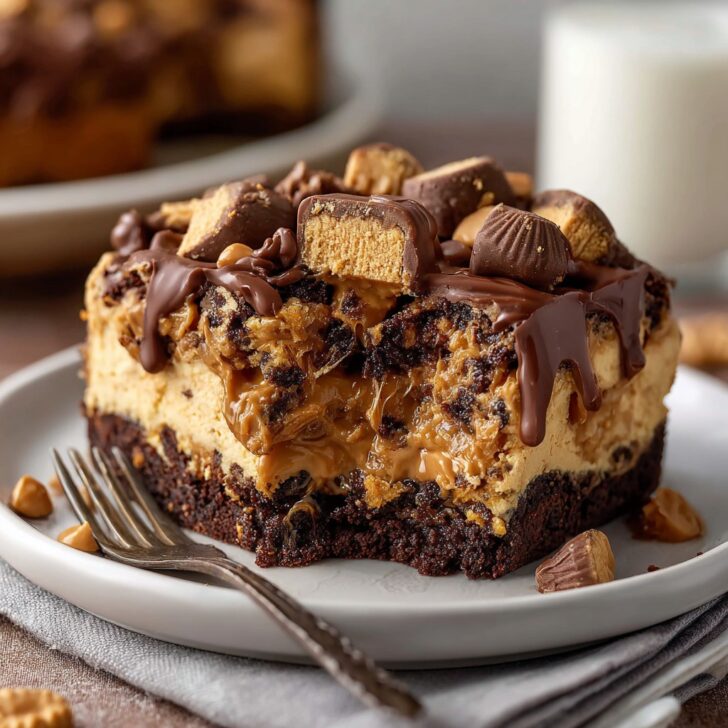
- Add the chaos: Sprinkle peanut butter cups (and chocolate chips if you want) all over. I press some down, some stay poking out. It bakes up like a real earthquake—craggy and unpredictable.
- Swirl a little: Grab a knife or the end of a spoon. Gently swirl the peanut butter/cream cheese mixture around—it doesn’t have to be perfect. (Once I went overboard, and it looked a bit... muddy. Less is more.)
- Bake: Toss it in your preheated oven for 35–40 minutes. It’ll puff, wobble, and sometimes develop weird little craters. Don’t panic. It’s supposed to be a bit underbaked in swirls—the gooey parts are the best.
- Cool a smidge: Let it cool for at least 20–30 minutes so it sets up a bit (if you can wait that long; I rarely do).
Kitchen Notes & Discoveries
- I once tried using natural peanut butter—fair warning, it was a bit oily but still good.
- Best eaten slightly warm, but if you leave it overnight, the flavors kind of meld together. I think it tastes better the next day, but my kids totally disagree.
- I’ve botched this cake by forgetting the cream cheese. Not recommended. Don’t be like me.
Variations I’ve Actually Tried (Some Winners, Some Flops)
- Used white chocolate chips once, and it was a hit with the neighbor’s kids (not so much for the adults).
- Added crushed pretzels for a salty crunch—pretty good, but they got soggy if it sat too long.
- Tried swapping all the chocolate for butterscotch chips; honestly, way too sweet for me.
What If I Don’t Have Fancy Equipment?
You really just need a couple of mixing bowls and a 9x13 inch pan. If you don’t own an electric mixer, a whisk (and some elbow grease) works just fine—maybe consider it your workout for the day. I’ve improvised with a lasagna pan and it turned out great, so don’t stress. Oh, and if you want to check out some affordable bakeware, King Arthur Baking has some sturdy options I like.


How to Store It—But Does It Ever Last That Long?
Cake leftovers will keep covered at room temp for up to 2 days, or pop it in the fridge for up to 5 days (but honestly, in my house it never lasts more than a day—it’s like it evaporates). You can even freeze it in slices if you somehow manage to save some. I rarely do.
Serving This Cake (Our Slightly Odd Traditions)
Scoop out big chunks and serve warm with a scoop of vanilla ice cream or a drizzle of chocolate sauce—my family sometimes plops whipped cream on top and calls it “dinner” if I’m not looking. Once we even ate it for a Saturday breakfast. No shame.
Pro Tips—I Definitely Learned These The Hard Way
- Let the cream cheese get soft enough, or you’ll be wrestling lumps for ages (I once tried to use it straight form the fridge—big mistake).
- Don’t overbake. If you think it’s almost done but not quite set in the middle, take it out. It firms up while cooling.
- Swirl lightly—overzealous swirling just mixes things up too much and you lose those epic pockets of gooey-ness.
FAQ—Because Folks Actually Ask Me
- Can I make it gluten-free? Oh, totally! Just use a GF chocolate cake mix (some like this one) and you’re golden. Just double check those peanut butter cups—you know how labels go.
- Do I have to use the mini peanut butter cups? Nope. I sometimes chop up regular ones, or throw in Reese’s Pieces if I’m out. Whatever makes you happy—it’s not the law or anything.
- What if I’m out of cream cheese? So, I actually tried using Greek yogurt once. Not quite the same but passable in a pinch. It’s a little more tart, so add a bit more sugar.
- Does it really need that much sugar? Probably not! You can shave some off the powdered sugar if you want it less sweet. At least, my husband likes that.
And hey, if you get stuck halfway through or just want some visual inspiration, I found a great walkthrough on AllRecipes. Happy baking—and if you end up with chocolate everywhere, you’re doing it right.


Ingredients
- 1 box chocolate cake mix (about 15.25 oz)
- 1 cup creamy peanut butter
- 8 oz cream cheese, softened
- ½ cup unsalted butter, melted
- 2 cups powdered sugar
- 3 large eggs
- 1 cup milk
- 1 cup Reese’s peanut butter cups, chopped
- ½ cup mini chocolate chips
Instructions
-
1Preheat the oven to 350°F (175°C). Grease a 9x13-inch baking dish.
-
2Prepare the chocolate cake mix according to package instructions using the eggs and milk. Pour the batter into the prepared baking dish.
-
3In a separate bowl, beat together the cream cheese, melted butter, peanut butter, and powdered sugar until smooth.
-
4Drop spoonfuls of the peanut butter mixture evenly over the cake batter. Use a knife to swirl the mixtures together for a marbled effect.
-
5Sprinkle the chopped Reese’s peanut butter cups and mini chocolate chips over the top.
-
6Bake for 35-40 minutes or until the center is set. Let cool slightly before serving.
Approximate Information for One Serving
Nutrition Disclaimers
Number of total servings shown is approximate. Actual number of servings will depend on your preferred portion sizes.
Nutritional values shown are general guidelines and reflect information for 1 serving using the ingredients listed, not including any optional ingredients. Actual macros may vary slightly depending on specific brands and types of ingredients used.
To determine the weight of one serving, prepare the recipe as instructed. Weigh the finished recipe, then divide the weight of the finished recipe (not including the weight of the container the food is in) by the desired number of servings. Result will be the weight of one serving.
Did you make this recipe?
Please consider Pinning it!!