
Let's Have Cake: My Reese’s Chocolate Peanut Butter Cup Earthquake Cake Story
So, you know how sometimes you just need a cake that’s a little bit over-the-top? Like, you see the leftover peanut butter cups from Halloween (if you’re lucky enough to have any left) and you wonder, what if I just… baked them right in? Well, that’s how this Reese’s Chocolate Peanut Butter Cup Earthquake Cake happened in my kitchen. It’s part mad science, part "did I just break the cake rules?" and a whole lot delicious. My dog once watched me eat a slice for breakfast—don’t judge—and I swear she looked personally offended she couldn’t have any. (Dogs and chocolate, not a great combo, in case you’re wondering!)
Why You'll Love This, Trust Me
I make this when I want to win at dessert—like family gatherings, kid sleepovers, or those "just because I’m craving peanut butter and chocolate at the same time" days. My family goes a bit bananas for this, especially my brother who’ll take three slices before anyone’s blinked (fair warning: you might want to hide a piece for yourself). Oh, and if you’ve ever tried to marble cream cheese and it went a little haywire… same here. But honestly, doesn’t matter. It tastes so good nobody cares about the swirls.
Grab These Ingredients (Swaps Welcome, Scout's Honor)
- 1 box chocolate cake mix (honestly, any brand is fine—my grandmother loved Betty Crocker, but I just grab whatever’s on sale)
- ½ cup vegetable oil (I’ve used melted butter in a pinch, kinda richer that way)
- 3 large eggs
- 1 cup water
- 1 cup creamy peanut butter (chunky works, but gets a bit wild—it’s fun, though!)
- 225g cream cheese (softened, or zap it in the microwave for 20 seconds if you forget)
- ½ cup unsalted butter, melted (or margarine, if you prefer—works about the same, really)
- 2 cups powdered sugar (icing sugar, for my UK mates)
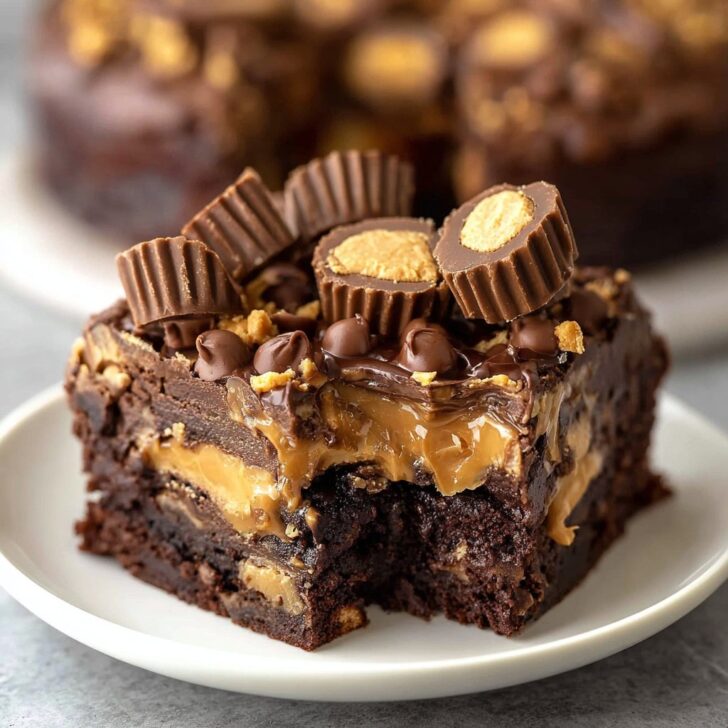
- 1 bag mini Reese’s Peanut Butter Cups (I just chop up roughly 1.5 cups of regular-sized ones if that’s all I’ve got)
- 1 cup semisweet choc chips (milk choc is totally fine if that’s what’s on hand)
How To Make This Earthquake of a Cake
- First up: preheat your oven to 180°C (350°F). Trust me, the smell alone will have neighbors asking what’s up.
- Grab a big 9x13-inch baking tin. Give it a quick coat of nonstick spray—every time I forget, I regret it, so don’t skip.
- In a decent sized bowl, mix up your cake mix, oil, eggs, and water. (Nothing fancy, just follow the box—sometimes I use a whisk, sometimes a fork, whatever’s closer!) Pour that into your tin and spread it out. Don’t worry if it doesn’t sit perfectly flat; gravity does its job.
- Now, for the fun part: Soften the cream cheese, then mix with melted butter and powdered sugar. Gets lumpy at first—just keep mixing—but if it’s a little chunky, eh, it’s rustic, right?
- Drop big ol' spoonfuls of the cream cheese mix onto your cake batter. Then do the same with peanut butter; just sort of plop and spread. Use a butter knife to swirl everything together. (I once got too enthusiastc and just mixed the whole thing together—a total chaos, but it was fine!)
- Scatter on the chopped Reese’s cups and choc chips. This is where I usually sneak a taste—no shame. You can save a handful for the top after baking if you want that "wow" look, but honestly, I’m impatient.
- Bake for about 40-45 minutes, but start checking at 35—my oven is as fickle as a British summer. The edges will puff, the middle might look a bit wobbly, which is cool. Let it mostly cool before slicing or it’ll look more like... well, an earthquake aftermath.
Bits I’ve Learned (Usually the Hard Way)
- The cream cheese mix will never spread perfectly. Don’t sweat it—it’s always a delicious mess.
- If you use chunky peanut butter, you will find peanut chunks hiding in every other bite. Actually kind of fun, unless you’re firmly Team Smooth.
- I once forgot to thaw the cream cheese and used it from the fridge. Turned out just fine, although not silky. Maybe even better?
Some Variations I’ve Actually Tried (Yes, Even the Weird Ones)
- Once swapped out the cake mix for a dark chocolate version. Oh wow—it was super rich, maybe even a bit intense but worth it if you love chocolate like I do.
- Baked it with chopped up Snickers bars instead of peanut butter cups, because, well, that’s what was in the cupboard. Not exactly the same, but I wouldn’t turn it down.
- Tried making it "healthier" with yogurt in the cake batter once. I wouldn't recommend—turned out more "mudslide" than "earthquake." Lesson learned!
Equipment: Use What You Got
You’ll want a 9x13-inch pan, but honestly, I’ve split it into two loaf pans before when the big one was in the dishwasher. Works fine! Electric mixer’s handy for the cream cheese, but a strong arm and a wooden spoon will suffice if that’s all you’ve got.


How To Store (If It Ever Lasts That Long)
Fridge is best—just bung it in a container and it’ll keep for about 4-5 days. It’s probably fine at room temp for a night or two, but I wouldn’t go longer. Though honestly, in my house it never lasts more than a day!
How We Serve It Over Here
I’m partial to some vanilla ice cream on top—melts right in, almost floats the whole cake. My cousin insists on having it with extra peanut butter spooned over each slice (bit over the top, but hey, it’s their cake too). We sometimes sneak a drizzle of this homemade hot fudge sauce on those especially chilly evenings—big win.
Pro Tips I Learned the Tricky Way
- I once tried using cold butter for the cream cheese mix. Regretted it—the lumps stayed. Melted is better, promise.
- Don’t over-swirl. Got carried away once and ended up with a patchy brown cake. These days, I go for "lazy marble."
- Actually, you can line the pan with parchment if you wanna get all fancy, but I usually can’t be bothered, and it’s fine.
FAQ (Because Friends REALLY Ask These Things)
Q: Can I freeze this?
Yeah, works a treat. I just wrap individual slices in clingfilm, then stick them in a freezer bag. It’s not quite as fudgy when defrosted, but still, very solid.
Q: Can I use natural pb?
Sure thing… but it does bake up a bit oilier, so I’d give it a stir first. Maybe pour off a bit of liquid? Not sure it’s essential but you don’t want an oil slick.
Q: What if I don’t have peanut butter cups?
I used chunks of chocolate bars once and tossed in salted peanuts—made for a fun twist. Or try these homemade peanut butter cups—a bit of work, but kinda wild fun to do with kids!
Q: Can I halve the recipe?
Definitely. 8x8 square pan, reduce bake time by about 10ish mins (but keep an eye, ovens are all different—mine likes to throw curveballs).
P.S. Ever left powdered sugar open next to your mixer? Don’t. Been there, sneezed that. Just my two cents!


Ingredients
- 1 box (15.25 oz) chocolate fudge cake mix
- 3 large eggs
- ½ cup vegetable oil
- 1 cup water
- 8 oz cream cheese, softened
- ½ cup unsalted butter, melted
- 2 cups powdered sugar
- ½ cup creamy peanut butter
- 1 cup mini chocolate chips
- 1 ½ cups chopped Reese’s peanut butter cups
Instructions
-
1Preheat oven to 350°F (175°C). Grease a 9x13-inch baking pan.
-
2Prepare the chocolate cake mix according to package instructions using eggs, oil, and water. Spread batter evenly in the prepared pan.
-
3In a medium bowl, beat together cream cheese, melted butter, powdered sugar, and peanut butter until smooth.
-
4Drop spoonfuls of the cream cheese mixture over the cake batter. Use a knife to swirl gently, creating a marbled effect.
-
5Sprinkle mini chocolate chips and chopped Reese’s peanut butter cups over the top.
-
6Bake for 35-40 minutes, or until the center is set and a toothpick inserted comes out mostly clean. Cool before serving.
Approximate Information for One Serving
Nutrition Disclaimers
Number of total servings shown is approximate. Actual number of servings will depend on your preferred portion sizes.
Nutritional values shown are general guidelines and reflect information for 1 serving using the ingredients listed, not including any optional ingredients. Actual macros may vary slightly depending on specific brands and types of ingredients used.
To determine the weight of one serving, prepare the recipe as instructed. Weigh the finished recipe, then divide the weight of the finished recipe (not including the weight of the container the food is in) by the desired number of servings. Result will be the weight of one serving.
Did you make this recipe?
Please consider Pinning it!!