
If you popped by my kitchen on a rainy Saturday, you would probably catch me whisking a pan of Red Velvet Brownies while the kettle burbles and the dog does that hopeful hovering thing near my ankles. I started making these after a friend asked for something red and chocolatey but not a whole layered cake, which was a big ask on a Tuesday. I said sure, then burned the first batch because I started reorganizing the spice drawer mid bake. Classic me. Anyway, this version is the keeper. Tender crumb, little cocoa tang, that cozy vanilla perfume that makes the whole place smell like a hug you can eat.
Why you might find yourself making these a lot
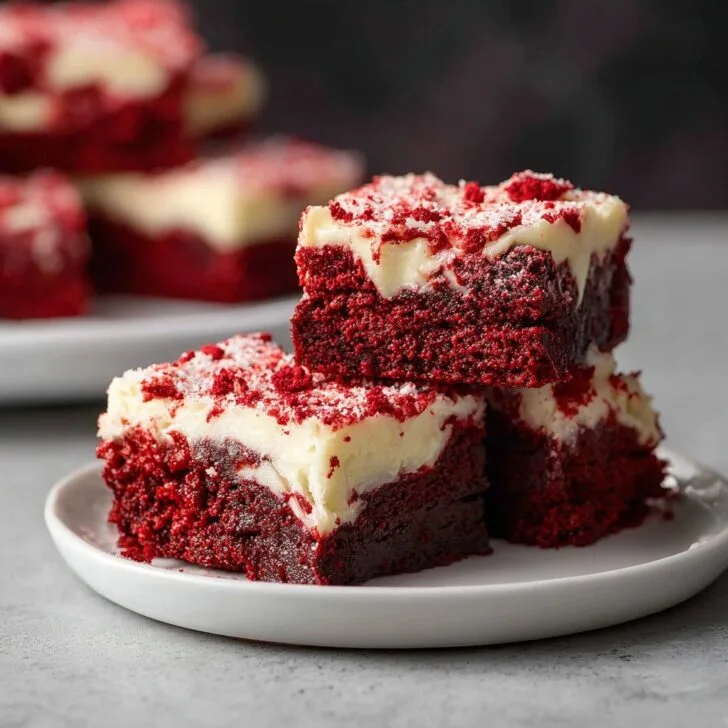
I bake these when I want something special without faffing around with three bowls and a stand mixer. My family goes wild for the corner pieces because they get that chewy edge, but honestly the center squares are the fudgy dream. I used to struggle with getting a good red without turning my fingers into tiny stop signs; gel color fixed that for me, and a wee bit of vinegar brightens everything up like magic. Also, they slice cleanly if you chill them a smidge first, which is helpful if you are gifting a few squares and pretending you did not eat any on the way out the door. I did, to be fair.
What you will need, plus what I actually use
- 140 g all purpose flour, spooned and leveled; about 1 cup
- 2 tablespoons natural cocoa powder; I like natural for a brighter red, but Dutch works too
- 200 g granulated sugar; about 1 cup, and I sometimes swap 2 tablespoons for brown sugar when I want a deeper flavor
- 115 g unsalted butter, melted and slightly cooled; 8 tablespoons. In a hurry I use 90 g butter plus a good glug of neutral oil
- 2 large eggs at room temp if you remember. If not, no stress
- 1 tablespoon vanilla extract; grandmother always insisted on the fancy stuff, but any vanilla works fine
- 1 teaspoon white vinegar for that classic red velvet whisper
- 1 teaspoon red gel food coloring, add more for a brighter shade. Beet powder works in a pinch, color will be softer
- ½ teaspoon baking soda
- ½ teaspoon fine salt
- Optional add ins: a handful of white chocolate chips, or a quick cheesecake swirl
For the optional cheesecake swirl, mix gently in a small bowl:
- 170 g cream cheese, softened
- 2 tablespoons sugar
- 1 egg yolk
- ½ teaspoon vanilla
Oh, and if you are curious about cocoa styles, this quick read is handy: Natural vs Dutch cocoa. For color tips, I like the friendly advice here: Wilton food color guide.
How I actually bake them
- Heat the oven to 350 F or 180 C. Line an 8 x 8 inch pan with parchment, leaving little flaps for lifting. If you are out of parchment, grease the pan well; it is not the end of the world.
- In a medium bowl, whisk melted butter and sugar until glossy and kind of thick. About a minute. This is where I usually sneak a taste and then remember it is just sugar and butter, which is not a crime but also not the full story.
- Whisk in the eggs one at a time until the mixture goes smooth and a bit lighter. Add vanilla and salt.
- Sift in cocoa, then whisk until no cocoa lumps remain. Stir in the gel color and vinegar. It will look dramatic and possibly a bit too red, do not worry, the flour softens it.
- Sprinkle flour and baking soda over the bowl. Switch to a spatula and fold just until there is no dry flour showing. It should be thick but pourable. If it looks stiff, add a tablespoon of milk or water.
- Pour batter into the pan and smooth the top. If you are doing the cheesecake swirl, dollop the cream cheese mix in four or five spots and use a butter knife to make gentle figure eights. Resist the urge to over swirl, two passes is plenty.
- Bake for 22 to 28 minutes. You want the edges set and the center with a slight jiggle. A toothpick should come out with damp crumbs, not wet batter. Mine are usually perfect at 24 minutes, but I always loose track of time when I start washing dishes, so I set a timer now.
- Cool in the pan on a rack for at least 20 minutes. You can slice warm if you must, but they hold their shape better after a chill. I have pulled them straight form the oven and scooped a corner with a spoon. No regrets, only joy.
Little discoveries I did not expect
- Resting the batter for 5 minutes before baking lets bubbles rise and pop. The top bakes a touch shinier.
- It is tempting to add more cocoa. Actually, I find it works better if you keep it to 2 tablespoons so the color stays true and the tang stands out.
- If your kitchen is cool, warm the eggs in a bowl of lukewarm water for 5 minutes. The batter comes together smoother.
- Its crumb tastes even better the next day. I think the flavor just relaxes.
Variations I have tried, for better and for oops
- Cheesecake ripple: The optional swirl above makes these look bakery fancy with minimal effort.
- White chocolate chunk: A handful of chopped white chocolate melts into little puddles. Big yes.
- Raspberry dot: Press fresh raspberries on top before baking. Gorgeous, slightly tart, very brunchy.
- Gluten free: A cup for cup baking blend worked fine for me, add one extra tablespoon of butter to keep things plush.
- Oat flour experiment: Tasted nice, texture went crumbly and refused to slice clean. Would not do that again for brownies, maybe for bars.
Gear that helps, but I have workarounds
- 8 x 8 inch metal pan for even baking. Glass works, add 2 to 3 minutes.
- Large mixing bowl and a whisk. A wooden spoon also does the job if you do not feel like whisking.
- Kitchen scale for reliable results. If you do not have one, gently scoop and level flour. This guide is solid: measuring flour.
- Parchment. If you are out, buttered foil plus a thin dusting of flour works.
Small digression. I once lost a favorite spatula for two months and found it tucked behind a stack of pot lids like a shy turtle. No deeper meaning, I just missed it.


Keeping them fresh
Store sliced brownies in an airtight container at room temp for up to 2 days, or in the fridge for 4 to 5. They freeze well for a month if wrapped snug. Though honestly, in my house it never lasts more than a day.
How we like to serve them
Cold milk is the obvious friend here, but a small scoop of vanilla ice cream turns this into a proper dessert. I also dust with a whisper of powdered sugar and add a few raspberries when I am feeling a bit fancy. For birthdays, we cut heart shapes with a cookie cutter and call the trimmings chef treats. The corner piece is mine by long standing family rule, sorry not sorry.
Things I learned the slightly hard way
- I once tried rushing the cooling step and regretted it because the warm squares smeared instead of cutting. Ten extra minutes made all the difference.
- Overbaking turns the color muddy and the texture dry. Start checking early, the last 3 minutes are where the magic happens.
- Mix the color with vanilla and cocoa before the flour. It disperses better, fewer streaks.
- If you see a few tiny bubbles on top near the end, that is fine; it settles as it cools.
Questions folks actually asked me
Can I use Dutch process cocoa
Yes, you can. Natural cocoa keeps the red brighter and the tang a bit sharper. Dutch gives a deeper chocolate note. Both work, I tend to think natural fits the vibe here.
Do I have to use food coloring
No. The brownies will be a lovely mahogany and taste the same minus the signature look. Beet powder gives a gentle red, beet juice can add too much moisture.
Why are my brownies cakey
Probably too much flour or an extra minute or two in the oven. Scoop and level, or use a scale, and pull them when a toothpick shows damp crumbs.
Can I skip the vinegar
You can, but the vinegar gives that tiny spark of tang that makes red velvet taste like itself. Apple cider vinegar works too in a pinch.
What if I only have a 9 x 9 inch pan
Go for it. Bake a few minutes less since the batter will be thinner. Watch the edges.
How do I make these dairy free
Use oil instead of butter and skip the cream cheese swirl. A neutral oil works, plus an extra pinch of salt for balance.
My hands get stained every time
Stir the gel color into the wet ingredients with a small spatula and keep a paper towel nearby. Or, wear food prep gloves. And do not wear your favorite white tee, ask me how I know.
Can I double the recipe
Yes, use a 9 x 13 inch pan and add a couple minutes to the bake time. Rotate the pan once for even heat.