
So Here’s the Deal With My Pumpkin Banana Bread with Walnuts
If you’ve ever been halfway through baking and realized your bananas were basically walking away on their own, you’ll understand why I started making this pumpkin banana bread ages ago (and by ages, I mean before my cousin told me pumpkin was only for fall—pfft, as if). First time I made this was, honestly, out of desperation. Two sad bananas, half a can of pumpkin lurking form Thanksgiving, and a craving for something that wasn’t cereal for breakfast. Now, it’s kind of a family staple, especially on damp days when you want the house to smell like you’ve actually got your life together. Oh, and don’t ask my brother about the time I forgot the walnuts—that was a dark morning in our house.
Why You’ll Probably End Up Making This More Than Once
I whip this up when I want to bribe my family out of bed on Sunday mornings (works most weekends!). My crew goes nuts for it because it’s moist, not super sweet, and you get that perfect crunch from the walnuts (unless you, uh, forget to add them). Sometimes I try to make it healthy, sometimes I just lean in and add chocolate chips—zero regrets. It’s also pretty forgiving—if you overmix a little or, like me, end up with a bit too much banana, it just turns extra gooey which is, honestly, kind of ideal anyway. Plus, you only need one bowl if you’re lazy like me and don’t want to wash up everything after.
Let’s Talk Ingredients (And My Substitutions, Because Life Happens)
- 2 really ripe bananas (the blacker, the better—unless you’re squeamish; sometimes I freeze them, thaw, and just squeeze them out. Weird, but it works)
- 1 cup canned pumpkin purée (Libby’s is my go-to, but the store brand is fine; one time I used fresh roasted pumpkin, but honestly, it was a faff)
- 2 eggs (large, but I’ve used medium in a pinch)
- ⅓ cup melted butter (or ⅓ cup coconut oil if you’re feeling fancy, but it does taste a bit coconutty)
- ¾ cup brown sugar (sometimes I use half white sugar if I’m low, tastes slightly lighter)
- 1 teaspoon vanilla extract (my gran swore by Nielsen-Massey, but I grab whatever’s handy)
- 1 ¾ cups all-purpose flour (I’ve tried whole wheat—good but a bit more... “rustic”)
- 1 teaspoon baking powder
- ½ teaspoon baking soda
- ½ teaspoon salt
- 1 ½ teaspoon cinnamon (sometimes I throw in a bit of nutmeg or mixed spice—recklessness!)
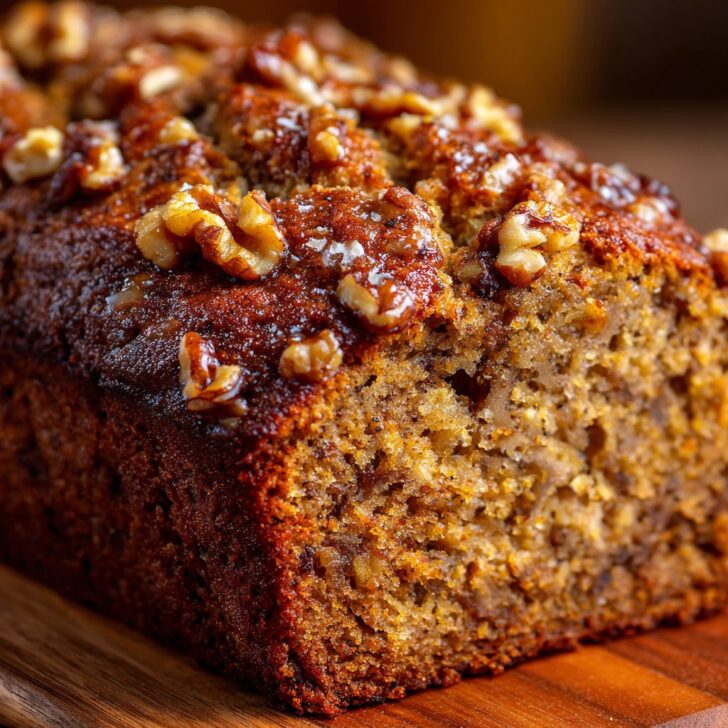
- 1 cup chopped walnuts (pecans work if you’ve run out, or skip for nut-free)
- Optional: chocolate chips, raisins, or even pumpkin seeds if you want a bit of crunch
How I Actually Make It (With Minor Chaos)
- Preheat your oven to 350°F (180°C). Grease a 9x5 loaf pan, or line with parchment if you hate dishwashing. (Sometimes I forget and it sticks, but that’s what knives are for.)
- Mash the bananas in a big bowl till they’re mostly smooth—some lumps are fine. I just use a fork, but a potato masher works too if you’re feeling aggressive.
- Whisk in the pumpkin purée, eggs, melted butter, brown sugar, and vanilla. This is usually where I sneak a taste—just to check, y’know?
- Dump in the flour, baking powder, baking soda, salt, and cinnamon. I don’t bother sifting unless I’m feeling extra proper (rarely). Stir until just combined; the batter will look a little odd—don’t worry.
- Fold in the walnuts (and any extras). I always save a few for sprinkling on top—looks nice, plus you get a crunchy top bit.
- Pour into your loaf pan. Give it a gentle shake to even it out—or just thump it on the counter, let off some steam.
- Bake for 55–65 minutes, until a toothpick or skewer comes out mostly clean (a few moist bits are fine). If it gets too brown, tent some foil over it. The middle always takes longer than you think, so don’t panic.
- Cool in the pan for at least 15 mins. I’m impatient and sometimes tip it out too soon—messy but still tastes good.
A Few Notes Only Experience Teaches You
- If you use super ripe bananas and pumpkin, the bread can look a bit dense—totally normal, promise. Actually, I like it better that way.
- Forgot to buy butter? I’ve used olive oil once—came out a bit fruity but not bad.
- If you overmix it, it might get slightly tough, but with all the moisture, it’s pretty forgiving. (Just don’t use a stand mixer; I learned that the hard way!)
Variations: My Experiments (Some Good, Some... Not)
- Chocolate swirl: Drag a knife through the batter with a few big dollops of Nutella. Kids go mad for it.
- Whole wheat flour: Makes it denser, but the flavor is honestly still spot on. Maybe add a splash more milk.
- Pumpkin spice overload: I tried doubling the spices once—felt like bathing in a candle. Wouldn’t recommend.
- No nuts: Skip ’em for allergies, or do sunflower seeds instead.
Equipment (And What To Do If You Don’t Have It)
- Loaf pan (if you don’t have one, a cake tin works—just keep an eye on the bake time)
- Mixing bowl (I’ve used a big saucepan in a pinch, not proud)
- Fork or masher, whisk, spatula (or a big wooden spoon if you’re old school)


How to Store It (If It Lasts More Than a Day)
Wrap the cooled loaf in cling film or foil; it’ll keep on the counter for 2–3 days (though honestly, in my house, it never lasts more than a day!). You can freeze slices, separated by parchment, if you’re one of those organized people. Thaws pretty quick in the toaster or microwave, which is handy for midnight snacks.
How We Love to Eat It
I like mine slightly warm with a thick swipe of salted butter—sometimes with a cup of strong tea if I’m having a moment. My niece insists on honey drizzled over the top, and my partner dunks theirs in coffee. And for some reason, my dog always tries to make off with the end piece (don’t worry, he’s never succeeded—yet).
Pro Tips (Learned the Hard Way...)
- Let it cool before slicing! I once hacked into it hot and it fell apart (still delicious, but ugly as sin).
- Don’t skimp on the salt; it makes all the flavors pop. I forgot once and it tasted flat, like eating a wet sponge.
- If you’re using frozen bananas, let them really thaw or you get weird icy lumps—ask me how I know.
Questions I Actually Get About This
Can I make it vegan? Yep! Swap eggs for flax eggs (1 tablespoon ground flax + 2.5 tablespoon water per egg), use coconut oil instead of butter. Texture’s slightly different—still good.
Can I use less sugar? Sure thing, but it’ll be a bit less rich—I’ve done half and it was fine, if not as treat-y.
Can I make muffins instead? Totally! Just scoop into muffin tins; bake 20–25 mins (give or take—watch them).
Why does mine sink in the middle? Could be overmixing, or underbaking. Or maybe your baking powder’s a bit old. Try again!
What if I don’t have pumpkin? Honestly, sweet potato or butternut squash puree works. I’ve even used applesauce in desperation, turned out all right.
If you need a good visual, I like Sally’s Baking Addiction for step-by-step pics. Or if you’re a science nerd about baking, check out Serious Eats’ banana bread guide—not exactly my recipe, but learnt a lot from it.
Oh, and if you ever figure out how to stop walnuts from sinking in the batter, let me know. I’ve tried tossing them in flour, but they still do the Titanic.
Hope you enjoy making this as much as I do—messy kitchen and all. Shout if you have questions, or, I mean, just want to vent about forgetting to buy bananas again.


Ingredients
- 1 cup mashed ripe bananas (about 2 large bananas)
- 1 cup pumpkin puree
- 2 large eggs
- ½ cup vegetable oil
- ¾ cup granulated sugar
- 2 cups all-purpose flour
- 1 teaspoon baking soda
- ½ teaspoon ground cinnamon
- ¼ teaspoon ground nutmeg
- ½ teaspoon salt
- ¾ cup chopped walnuts
Instructions
-
1Preheat the oven to 350°F (175°C). Grease a 9x5-inch loaf pan or line with parchment paper.
-
2In a large bowl, whisk together mashed bananas, pumpkin puree, eggs, vegetable oil, and sugar until smooth.
-
3In a separate bowl, combine flour, baking soda, cinnamon, nutmeg, and salt.
-
4Gradually add the dry ingredients to the wet mixture, stirring until just combined. Fold in the chopped walnuts.
-
5Pour the batter into the prepared loaf pan and smooth the top. Bake for 50-55 minutes, or until a toothpick inserted into the center comes out clean.
-
6Allow the bread to cool in the pan for 10 minutes, then transfer to a wire rack to cool completely before slicing.
Approximate Information for One Serving
Nutrition Disclaimers
Number of total servings shown is approximate. Actual number of servings will depend on your preferred portion sizes.
Nutritional values shown are general guidelines and reflect information for 1 serving using the ingredients listed, not including any optional ingredients. Actual macros may vary slightly depending on specific brands and types of ingredients used.
To determine the weight of one serving, prepare the recipe as instructed. Weigh the finished recipe, then divide the weight of the finished recipe (not including the weight of the container the food is in) by the desired number of servings. Result will be the weight of one serving.
Did you make this recipe?
Please consider Pinning it!!