
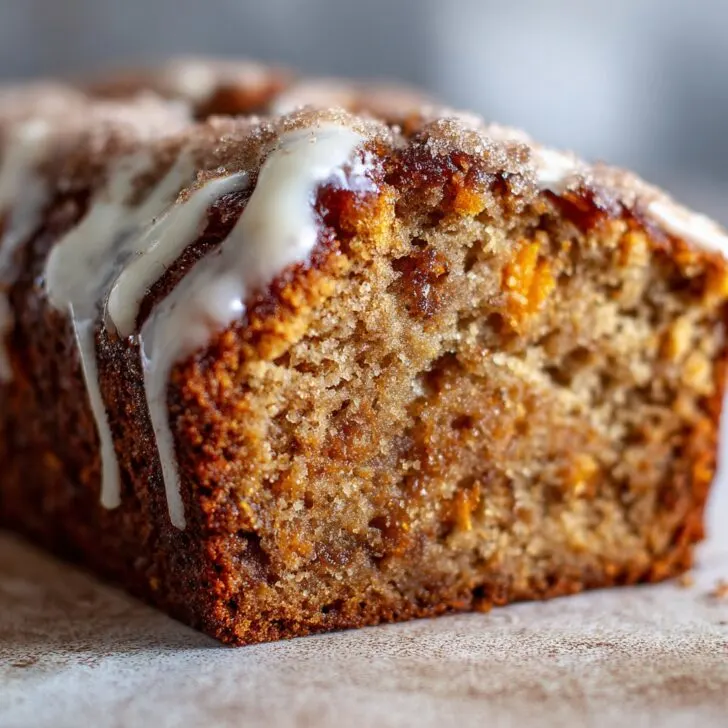
Catching Up Over Persimmon Bread (With Cinnamon, Of Course!)
Hey there! So, funny story—I first made this Persimmon Bread with Cinnamon Spice after a neighbor left a bag of squishy, very orange persimmons on my porch. No note, just fruit. I stared at them for a good ten minutes (wondering, 'Is there a secret persimmon fairy in our neighborhood?') before deciding, 'Alright, let’s see what kind of magic we can bake up.' Honestly, the first loaf was more of a brick, but I’ve tinkered with it since, and now it’s my go-to when it’s chilly or when I want the house to smell like a hug. Also, my dog once tried to swipe a slice—so, you know it must be good.
Why You'll Love This Persimmon Bread
I make this when the weather starts to turn and my family’s craving something a bit different from banana bread (which, let’s be honest, I never seem to have overripe bananas for anyway). My kids go absolutely bonkers for this bread—probably because the cinnamon makes the kitchen smell like a bakery exploded in the best way. (Okay, sometimes I go a little heavy on the spice. No regrets.)
Also, I used to despair at sticky persimmons, but this recipe made me embrace ’em. Trust me, even if you’ve never cooked with persimmons before, you’ll want to do it again. It’s forgiving—some days my batter looks weird and lumpy, but the result’s always fab.
What Goes In (And What Can Sub For What)
- 2 ripe persimmons (about 1 cup purée; I just squish them with a fork, but you could use a blender if you’re feeling fancy)
- 1 and ½ cups all-purpose flour (I sometimes swap half for whole wheat, but it gets a bit dense—just a heads up!)
- ¾ cup sugar (brown sugar makes it a tad richer; my grandmother always insisted on Domino, honestly any works)
- ½ cup vegetable oil (melted coconut oil is good too, or I’ve even used applesauce in a pinch)
- 2 eggs (or flax eggs if you need it vegan—did that once and it was... okay)
- 1 teaspoon ground cinnamon (I dump in a bit extra because why not)
- ½ teaspoon ground nutmeg (optional, but I like the warmth)
- 1 teaspoon baking soda
- ½ teaspoon salt (I just toss in a small pinch, rarely measure to be honest)
- 1 teaspoon vanilla extract (sometimes I skip this step and it’s still tasty)
- ½ cup chopped walnuts or pecans (optional, but I love the crunch. Sunflower seeds work if you’re out of nuts!)
How To Make It (With a Few Tangents)
- First things first: preheat your oven to 350°F (about 180°C if you’re elsewhere). Grease a loaf pan—I use whatever’s clean, honestly. If you only have a cake tin, that works too, but it bakes a bit faster.
- Scoop out the gooey flesh from your persimmons and mash until it’s mostly smooth. (Don’t panic if there’s a few lumps. That’s what makes it homemade!)
- In a biggish bowl, whisk together the flour, sugar, cinnamon, nutmeg, salt, and baking soda. I usually spill a bit. That’s part of the charm.
- In a smaller bowl, mix the persimmon purée, oil, eggs, and vanilla. Sometimes I forget the vanilla—honestly, not the end of the world. Whisk until it’s kind of a sludge. (This is where I sneak a taste—raw eggs be damned, I live dangerously.)
- Pour the wet stuff into the dry stuff. Stir gently until just combined; don’t overmix or it gets tough. It’ll look a bit odd. That’s normal. Then fold in your nuts (or whatever you’ve got).
- Scoop into your pan. Level it out a bit, but don’t fuss. Bake for about 45–55 minutes, until a toothpick comes out mostly clean. (One time I pulled it too early and it was, uh, pudding. Still tasty, though.)
- Let it cool—at least a little. I know, waiting is the hardest part. But the bread needs to set a bit or it'll be a mess cutting it.
A Few Notes (From My Kitchen Fails and Wins)
- Don’t use super firm persimmons. They need to be soft and squishy, otherwise you’ll be wrestling chunks. I’ve tried—no fun.
- If your bread sinks in the middle, it’s probably underbaked. Or perhaps I opened the oven too much. Who knows?
- I think this bread tastes even better the next day, but warm out of the oven is pretty fantastic too. On second thought, it’s good anytime.
Variations (And Experiments That Didn’t Quite Work)
- I once tossed in a handful of dried cranberries—delicious, but a bit chewy. Raisins work too if you like them.
- Chocolate chips? Sure, why not. Makes it more of a dessert, but I’m not complaining.
- Tried making muffins—worked fine, just bake for less time (about 25 minutes).
- I tried using only whole wheat flour once—would not recommend, unless you like brick-shaped bread.
What If You Don’t Have the Right Equipment?
If you don’t have a loaf pan, just use a cake tin or even a bunch of muffin cups. (Actually, I once used a pie dish. Came out kind of odd-looking but tasted great.) No mixer? A good ol’ fork and some elbow grease is enough.


How to Store It (Though It Never Lasts That Long!)
Wrap leftovers in foil or stash in a container, and it’ll keep on the counter for two days or so. Fridge stretches it to four. You can freeze slices—just wrap them in parchment. Though honestly, in my house, it rarely survives more than a day before everyone’s nicked a piece.
Serving Ideas—How We Do It Around Here
I love it warm, thick slice, a pat of butter melting on top. My sister dunks hers in coffee (weird, but she swears by it). For brunch, sometimes I’ll top it with a dollop of Greek yogurt and a drizzle of honey. If you’re feeling wild, try a splash of https://www.bonappetit.com/recipes/slideshow/best-homemade-jams on the side—homemade jam is a win.
Things I Wish I’d Known (aka Pro Tips)
- Don’t rush the cooling. I once tried cutting it hot and, well, it just kind of turned to crumbs. Now I (try to) wait at least 30 minutes.
- Don’t overmix. I tend to get enthusiastic and stir too much, but it really does make it tough. Gentle is key. Actually, less fussing is always better.
- Bake on the middle rack, not the top. I burnt the crust once and had to scrape it off with a cheese grater.
FAQ (Real Questions From Real Folks!)
- Can I use Hachiya or Fuyu persimmons?
- Yeah, but for baking, Hachiya (the squishy type) is way better. Fuyu works in a pinch, but mash them up really well.
- How do I know if my persimmons are ripe?
- If they squish like jelly and look a bit alarming, they’re perfect. If not, leave them on the counter a couple days. Or stick ’em in a paper bag—old trick from my aunt.
- Can I reduce the sugar?
- Sure thing! I’ve dropped it to half a cup before. It’s less sweet but still lovely. You do you.
- Is it better the next day?
- I think so, yes! The flavors meld and it gets even more tender—if you can resist not eating it all immediately.
- What if I don’t have cinnamon?
- Honestly, try pumpkin pie spice or just skip it. Won’t be quite the same, but you’ll still get a tasty loaf.
- Any other resources you recommend?
- Check out Smitten Kitchen’s persimmon guide if you’re new to this fruit, or peruse King Arthur Baking’s recipe index for more cozy baking ideas.
Alright, that’s all form me—well, except if you’ve got any leftover bread, I hear it makes a mean French toast. But that’s another story…


Ingredients
- 2 cups all-purpose flour
- 1 cup ripe persimmon pulp (about 2 large persimmons)
- 1 cup granulated sugar
- ½ cup unsalted butter, melted
- 2 large eggs
- 1 teaspoon ground cinnamon
- ½ teaspoon ground nutmeg
- 1 teaspoon baking soda
- ½ teaspoon salt
- 1 teaspoon vanilla extract
- ½ cup chopped walnuts (optional)
Instructions
-
1Preheat the oven to 350°F (175°C). Grease a 9x5-inch loaf pan and set aside.
-
2In a medium bowl, whisk together the flour, cinnamon, nutmeg, baking soda, and salt.
-
3In a large bowl, combine the persimmon pulp, sugar, melted butter, eggs, and vanilla extract. Mix until smooth.
-
4Gradually add the dry ingredients to the wet ingredients, stirring just until combined. Fold in the chopped walnuts if using.
-
5Pour the batter into the prepared loaf pan and smooth the top. Bake for 50-55 minutes, or until a toothpick inserted into the center comes out clean.
-
6Allow the bread to cool in the pan for 10 minutes, then transfer to a wire rack to cool completely before slicing.
Approximate Information for One Serving
Nutrition Disclaimers
Number of total servings shown is approximate. Actual number of servings will depend on your preferred portion sizes.
Nutritional values shown are general guidelines and reflect information for 1 serving using the ingredients listed, not including any optional ingredients. Actual macros may vary slightly depending on specific brands and types of ingredients used.
To determine the weight of one serving, prepare the recipe as instructed. Weigh the finished recipe, then divide the weight of the finished recipe (not including the weight of the container the food is in) by the desired number of servings. Result will be the weight of one serving.
Did you make this recipe?
Please consider Pinning it!!