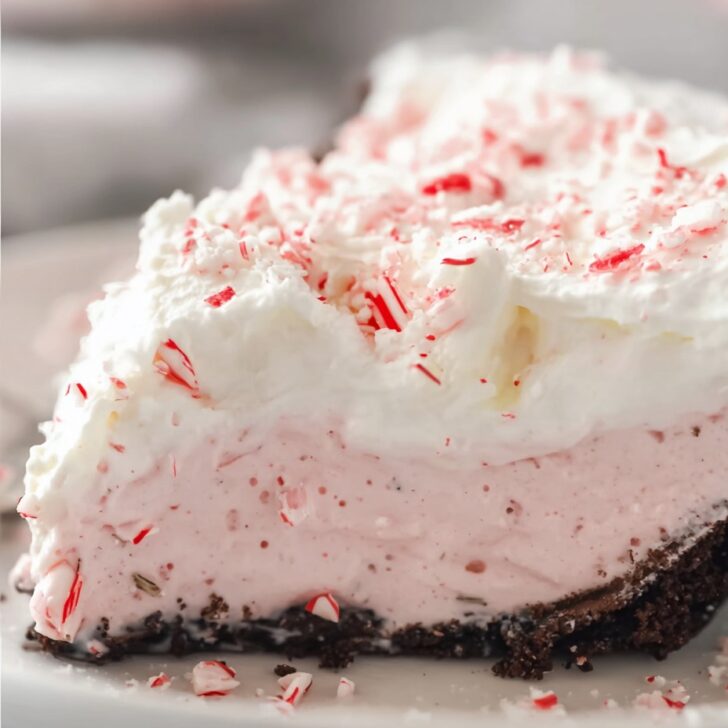

So...This Is How I Make Peppermint Pie (Yes, Every Winter)
Alright, pull up a chair! If you want the kind of Peppermint Pie that shows up in your dreams—probably next to a mug of hot chocolate—then let me tell you how I do it. First time I made this, I was maybe 22, and honestly, the crust was a disaster, but nobody seemed to care because the filling was so good. One year my nephew tried to stick his entire face in the pie. Serious. Anyway, let's get into it; I'll try not to go off on too many tangents (but can't promise I won't mention my neighbor's snowblower—it always seems to rev up just as I'm folding whipped cream!).
Why You’ll Love This (or at least why my family does)
I make this when someone mentions they’re “sort of in the mood for something creamy and fresh,” which, in my house, is code for “where’s the mint stuff?” I usually make it at the first whiff of December, but, actually, last July I made it for a baby shower. Nobody complained, let’s put it that way. The texture’s dreamy-creamy, and if you’re into refreshing desserts that aren’t just chocolate-on-chocolate (don’t get me wrong, I love chocolate too), you’ll probably be all over this.
Full disclosure: At least once, I’ve dropped a bag of mints on the kitchen floor trying to make this, so if you do that, you’re not alone. It still turned out fine. I think everyone forgot about the floor mints by the end. I pretend I got them from a fancy bakery—but it’s really just me, my mixer, and a disorganized pantry.
Here’s What You’ll Need (and what I sometimes swap)
- 1 pre-made chocolate cookie crust (or make your own, but if it’s a Tuesday night—store-bought is just grand)
- 1 cup heavy whipping cream (sometimes I cheat and use the kind in a can, shh...)
- ½ cup powdered sugar (my grandmother: “use caster sugar!” but I don’t always listen)
- 1 package (8 oz) cream cheese, softened (brand snobs exist, but any one will do)
- ½ teaspoon peppermint extract (I’ve accidentally doubled it. Good luck waking up!)
- 1 and ½ cups crushed peppermint candies (or candy canes, or those weird pink mints from weddings—oomph, not my favorite, but possible)
- Optional: few drops red food coloring (for that sweet pink color; sometimes I skip it and the pie’s pale but tastes fine)
- Handful of chocolate shavings for topping, or just toss extra crushed candies on top if you’re done with fancy
Alright, Let’s Make This Pie (my way)
- Make the creamy base:
Whip your heavy cream until soft peaks form (don’t go too wild or you’ll get butter). On occasion, I’ve gotten distracted around here and over-whipped it. Still edible. - In a big bowl:
Beat the cream cheese until it’s smooth (I usually taste it at this point, so sue me). Blend in the powdered sugar and peppermint extract. It’ll look a bit lumpy at first—don’t panic, it sorts itself out once the cream goes in. - Color splash:
If you want that classic pastel pink, add food coloring now. Not too much! It gets intense fast, like when you spill juice on a white shirt—you know what I mean. - Combine forces:
Fold your whipped cream into the cream cheese mix, gently. On second thought, you can use a spatula, not a whisk, it keeps it lighter. - Peppermint confetti:
Stir in the crushed candies (this is where the pie starts to smell like Christmas, honestly—it’s the best part). - Into the crust:
Spoon it all into your chocolate crust, smoothing the top with a butter knife or, if you’re like me, the back of a spoon because you’ve already dirtied too many things. - Chill out:
Let your masterpiece hang out in the fridge at least 4 hours (overnight is even better, though I rarely make it that long without sneaking a slice). - Toppings:
Scatter on chocolate shavings or more peppermint bits. Or go wild and use whipped cream puffs around the edge. Whatever makes you happy.
Notes From My Trial & Error Kitchen
- If your candies are too big, they get tough when chilled—smash 'em fine (try putting them in a ziptop bag and letting off some steam—therapeutic).
- Cream cheese too cold? Your filling turns out lumpy, which is fine, but less dreamy. Give it a little time to soften.
- Once I forgot the powdered sugar—tasted like a salad. Not recommended (unless you’re into that sorta thing!).
Things I've Tried (Some Worked, Some...Not So Much)
- Mint cookie crust: Girl Scout Thin Mints as a crust is elite, but risky since, well, who saves those?
- All-chocolate version: Swapped the peppermint candies for mini chocolate chips. Basically, a different pie. Kids loved it, adults missed the mint.
- Alcohol spike: One year I tried a splash of peppermint schnapps—uh, not my brightest idea. Tasted like mouthwash. Oops.
If You Don’t Have Fancy Stuff (My Equipment Hacks)
- Electric mixer: I claim it's essential, but listen—you can muscle through with a whisk if that’s all you’ve got. It’s a workout, just saying.
- Food processor: For finely crushing candies, but a rolling pin and a baggie have always done the trick for me.


Storing Your Pie—If It Lasts
Stick it in the fridge, covered, and it’ll hold up a couple days (but honestly, in my house it never lasts more than a day, maybe two if people are being polite). It gets a bit firmer on day two and I think it tastes better chilled after an overnight rest.
My Take On Serving (The Ceremony!)
I cut big old slices and sometimes add a swirl of whipped cream. For a festive look, I’ll stick in a whole candy cane on top—kids call dibs immediately. At Christmas we leave one slice (just a small one) for Santa—though I always end up eating it half-asleep at midnight anyway. Old habits die hard, eh?
Pro Tips, Or Stuff I’ve Learned The Hard Way
- Don’t rush the chilling. I tried serving after 2 hours once and it was more of a peppermint flop. Give it time.
- Peppermint extract is powerful. Trust me, under-measure, you can always add more next time.
- Whipped cream in a can is OK in a pinch, but real cream just gives you that cloud-like fluff. Worth the extra five minutes.
FAQ—Yes, People Actually Ask
- Can I make it ahead?
Absolutely, and it’s sort of better that way. Overnight in the fridge lets the flavors snuggle up, if that makes sense. Just don't freeze it—the texture gets strange. Trust me, I tried. - Do I have to use chocolate crust?
Nope! Graham cracker works. I mean, Oreo crust is classic, but I won’t judge if you use vanilla wafers. Do what you want—it’s your kitchen! - What if I don’t have peppermint extract?
You can use a bit more crushed candy, but the flavor won’t be as strong. Or try ordering some online—I’ve had good luck with King Arthur Baking and Spoonabilities. Or just ask a neighbor (I borrowed once from Mrs. Stokes and she’s never let me forget it!). - Why did my filling turn runny?
Did you use the spray whipped cream? It happens. Next time, stick with the real stuff; also, don’t skip chilling it long enough.
Quick Digression: Peppermint Is For Summer Too
Maybe it’s just me (probably is), but I’ve made this June through August during those weird heat waves that make regular pies sweat. The peppermint is so cooling. And yes, I eat it straight from the tin sometimes. Zero regrets.
So, that's my peppermint pie recipe—kind of the only one I make when the holidays roll in and I want people to think I know what I'm doing. If you want to nerd out on more pie history or other weirdly specific FAQs, you can check out Serious Eats' pie roundup. Or just go make the pie. You're here for dessert, not my stories (but thanks for indulging me!).


Ingredients
- 1 ½ cups chocolate cookie crumbs
- 5 tablespoons unsalted butter, melted
- 1 ¼ cups heavy whipping cream
- 8 oz cream cheese, softened
- ¾ cup powdered sugar
- ½ teaspoon peppermint extract
- 5 drops red food coloring (optional)
- 1 cup crushed peppermint candies, divided
- ½ cup mini chocolate chips
- Whipped cream, for garnish
Instructions
-
1Preheat the oven to 350°F (175°C). Mix the chocolate cookie crumbs and melted butter together in a bowl until well combined.
-
2Press the crumb mixture evenly into the bottom and up the sides of a 9-inch pie dish. Bake for 8-10 minutes, then set aside to cool completely.
-
3In a large bowl, beat the cream cheese until smooth. Add powdered sugar and peppermint extract, and mix until incorporated. Add red food coloring if using.
-
4In a separate bowl, whip the heavy cream until stiff peaks form. Gently fold the whipped cream into the cream cheese mixture until combined.
-
5Fold ¾ cup of the crushed peppermint candies and mini chocolate chips into the filling. Spread the filling evenly into the cooled crust.
-
6Refrigerate for at least 3 hours or until set. Before serving, top with whipped cream and sprinkle with the remaining crushed peppermint candies.
Approximate Information for One Serving
Nutrition Disclaimers
Number of total servings shown is approximate. Actual number of servings will depend on your preferred portion sizes.
Nutritional values shown are general guidelines and reflect information for 1 serving using the ingredients listed, not including any optional ingredients. Actual macros may vary slightly depending on specific brands and types of ingredients used.
To determine the weight of one serving, prepare the recipe as instructed. Weigh the finished recipe, then divide the weight of the finished recipe (not including the weight of the container the food is in) by the desired number of servings. Result will be the weight of one serving.
Did you make this recipe?
Please consider Pinning it!!