
Okay, so I have to tell you—every year without fail, someone in my family (usually my cousin Abby, but who's keeping count?) insists I bring my peppermint bark to the Christmas party. Not the store-bought stuff. Nope. The homemade batch. It’s actually one of those recipes that makes you look way fancier than you are in the kitchen. Last year, my youngest nearly ate the whole pan. I swear if it weren’t for those sneaky little peppermint bits getting stuck in her teeth, she would’ve gotten away with it. If you ever want to see grown adults fight over dessert, make this bark and watch the holiday chaos unfold. And hey, sometimes you just need something sweet in July, too—nobody said peppermint bark is only for December. (Don’t let the neighbors catch you, though.)
Why You'll Love Making This Peppermint Bark
I make this when I need something impressive but, honestly, can’t be fussed with baking sheets and 37 dirty bowls. My family goes wild for this stuff—especially my uncle Rick, who claims he’s not a “sweets guy” but always happens to wander through the kitchen, palm open, whenever it’s on the counter. (Oh, and it will stick to your teeth if you go too heavy on the peppermint. Been there.) Plus, if you’re looking for something to make with the kids, this is pretty much mess-proof—unless you count the chocolate under their fingernails. Which, if I’m honest, I do.
Here's What You'll Need (Substitutions and All)
- 200g white chocolate (or a couple of big handfuls if measuring isn’t your thing; I sometimes grab whatever’s on sale, and it works fine; grandma swore by Ghirardelli, but who has a trust fund for baking chocolate?)
- 200g semi-sweet or dark chocolate (milk is fine if you’ve got a super sweet tooth; I’ve swapped in chocolate chips when I ran out, no one noticed. Well, except my daughter. But she notices everything.)
- About ½ cup crushed peppermint candies or candy canes (just bang ‘em up in a freezer bag with a rolling pin; spearmint works too but the taste is… interesting? Proceed with caution.)
- ½ teaspoon peppermint extract (or a good splash, honestly; sometimes I leave it out if I’m feeling lazy and just use extra crushed candy)
- Pinch of sea salt (I forget this 50% of the time, but when I do remember, wow—the flavor really pops)
How I Put It Together (Instructions, But Make It Relatable)
- Melt your dark chocolate—slowly, either in the microwave (20-30 second bursts and stir every time or you’ll have a sad burnt glob) or in a heatproof bowl over a pot of simmering water.
- Line a baking tray (approx. 8x12 inch, or... the one you can find) with parchment. Pour in the melted dark chocolate. Use a spatula to coax it into the corners, not unlike chasing a cat under the couch.
- Bash the tray on the counter a few times to smooth it out (my favorite aggressive baking step). Pop it in the fridge for 15 minutes, or until it feels set but not rock-solid—on second thought, if it is rock-solid, that’s fine too; just let it sit a bit before the next step.
- Melt the white chocolate using the same process as before, but watch it like a hawk. It’s more temperamental. Stir in the peppermint extract if you’re using it.
- Pour the white chocolate over the dark chocolate layer (I try for even, but sometimes it just does its own thing). Spread gently, then sprinkle over all that crushed peppermint. Here’s where I usually sneak a few pieces for myself.
- A sprinkle of sea salt on top, if you remembered it. Now the patience part: back in the fridge for about an hour or so. Or until you cave in and just break off a corner—been there.
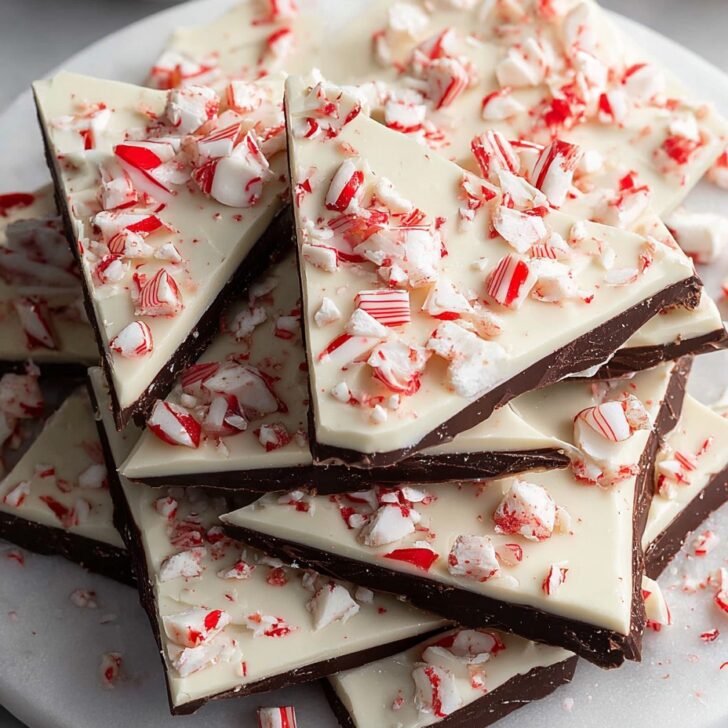
- Once it’s set, break into shards, uneven is good. And pick out the biggest one for yourself—chef’s privilege!
Some Real-Life Notes (AKA My Peppermint Bark Fails & Wins)
- Trying to get fancy swirls looks cool but, weirdly, makes it harder to break into neat-ish pieces. Still, Instagram loves a swirl, go figure.
- That time I forgot the parchment—it took ages to chip the bark off the tray. Don’t skip it.
- Once, I left it out too long on the counter during a summer BBQ; not pretty. Unless chocolate smears are your thing!
What Else Can You Try? (Variations and One That Flopped)
- Tried swirling peanut butter into the dark chocolate layer. Tasted amazing, looked…well, let’s just call it “rustic.”
- If you want extra color, sprinkle some festive sprinkles on top. My nephew says the gold ones are “the best.”
- Tried making it with orange zest instead of peppermint because I ran out one year. I thought it was okay (my mum, not so much). Maybe stick to peppermint unless you’re feeling brave.
Equipment? Only the Essentials (But Not Really)
- Baking sheet or big plate (I once used a giant Tupperware lid, so you do you)
- Parchment paper. Or honestly, wax paper in a pinch, just don’t try foil. Trust me on this.
- Microwave or stove. No reallly need for a fancy double boiler setup, but bowls that won’t explode are useful.
- Sturdy zip bag & rolling pin (or wine bottle, if you’re waiting for the bark to chill anyway)


How I (Try to) Store Peppermint Bark
Supposedly, you can keep it in an airtight container in the fridge for up to two weeks. But honestly, in my house it never lasts more than a day! Once, I hid it at the back behind the pickles. Didn’t help.
Serving It Up (And How We Enjoy It)
I like piling the shards high on a big platter—makes it look generous and festive. Occasionally, we’ll bag up pieces with some ribbon and give them away (if there’s any left). And, not that I would ever do this, but it pairs suspiciously well with strong coffee late at night while wrapping gifts. There, I said it.
A Few Pro Tips I Learned the Hard Way
- I once tried rushing the cooling time, thinking the freezer would speed things up. Ended up with weird white streaks and sad, bendy bark. So—patience, grasshopper.
- Actually, I find it works better if you let the bottom chocolate layer get just set, not frozen-solid, or the layers don’t stick as well. Learned that after several, let’s call them, “layer separations.”
FAQ: Actual Questions My Friends Have Asked
- Can I double the recipe? Totally—just use a bigger tray (or two if you’ve got them; or do what I did last Christmas and just pile it on really thick. People weren’t mad about it.)
- Does it have to be white and dark chocolate? Nah! I’ve done just white, just dark, milk—whatever’s hanging around after Halloween works, honestly.
- How do you crush the candy canes without making a mess? Haha, you don’t. Put ‘em in a zip bag, whack away, and prepare to find peppermint dust in mysterious places for days.
- Can I use flavored chocolate? You can. I tried those mint chocolate chips once—turned out surprisingly minty (a little too much, for me, but maybe you’re bolder than me!).
- Where do you get your peppermint extract? Usually the baking aisle. If I’m feeling fancy, I order King Arthur’s. Sometimes I just skip it entirely.
- What if I forgot the parchment paper? All is not lost; run a butter knife around the edges and gently warm the bottom of the tray. It’ll come off eventually (with some muttering).
- Where can I find good chocolate online? I like supporting smaller shops like Lake Champlain Chocolates. But seriously, any chocolate bar you like eating is the best choice.
Oh—and if you make too much and are feeling cheeky, package it up for friends or, I don’t know, a neighbor who once returned your runaway dog. Sharing is caring (or so they say; I’m still working on that one).


Ingredients
- 8 oz semisweet or dark chocolate, chopped
- 8 oz white chocolate, chopped
- ½ teaspoon peppermint extract
- ½ cup crushed peppermint candies
- 1 tablespoon coconut oil (optional, for chocolate melting)
- Pinch of salt
Instructions
-
1Line a baking sheet with parchment paper.
-
2Melt the semisweet chocolate (with ½ tablespoon coconut oil if using) in a microwave-safe bowl in 30-second bursts, stirring until smooth.
-
3Stir in ¼ teaspoon peppermint extract and a pinch of salt to the melted dark chocolate, then spread it evenly onto the prepared baking sheet. Chill until set, about 10 minutes.
-
4Melt the white chocolate (with ½ tablespoon coconut oil if using) in a microwave-safe bowl, stirring until smooth.
-
5Stir in the remaining ¼ teaspoon peppermint extract into the white chocolate, then pour and spread it evenly over the firm dark chocolate layer.
-
6Immediately sprinkle crushed peppermint candies over the top. Press lightly, and chill until completely set. Break into pieces to serve.
Approximate Information for One Serving
Nutrition Disclaimers
Number of total servings shown is approximate. Actual number of servings will depend on your preferred portion sizes.
Nutritional values shown are general guidelines and reflect information for 1 serving using the ingredients listed, not including any optional ingredients. Actual macros may vary slightly depending on specific brands and types of ingredients used.
To determine the weight of one serving, prepare the recipe as instructed. Weigh the finished recipe, then divide the weight of the finished recipe (not including the weight of the container the food is in) by the desired number of servings. Result will be the weight of one serving.
Did you make this recipe?
Please consider Pinning it!!