
Let Me Tell You About Peanut Butter Cookie Dough Truffles
I’ll be honest: these peanut butter cookie dough truffles are the dessert I make when I want people to think I’ve fussed, but really, I’m just craving something sweet and not in the mood for a marathon bake-a-thon. The first time I tried these (somewhere in the depths of a sticky summer, no less), it was because my oven was on the blink and my sweet tooth wouldn’t quit. You ever have those days where you just want to eat the dough rather than the cookie? That’s this, but tidier. Plus, you don’t have to worry about anyone giving you the side eye about raw eggs.
And for the record, my dog once tried to sneak a taste off the counter. It was almost a disaster, but don’t worry – no truffles were harmed, and he just got a stern talking to.
Why You’ll Love This (Or At Least, Why I Do)
- I make this when friends drop by unannounced, or when my kid suddenly remembers it’s their turn to bring snacks to soccer.
- My family basically inhales these. I think it’s the peanut butter – or maybe the chocolate shell. (Actually, maybe it’s both. Or just sugar, if I’m being honest!)
- I used to be annoyed by desserts that need tons of steps, but these? You barely even need to measure, and if you have a messy countertop, nobody will ever know. Just roll them up and dip – it’s like playdough but you get to eat it at the end.
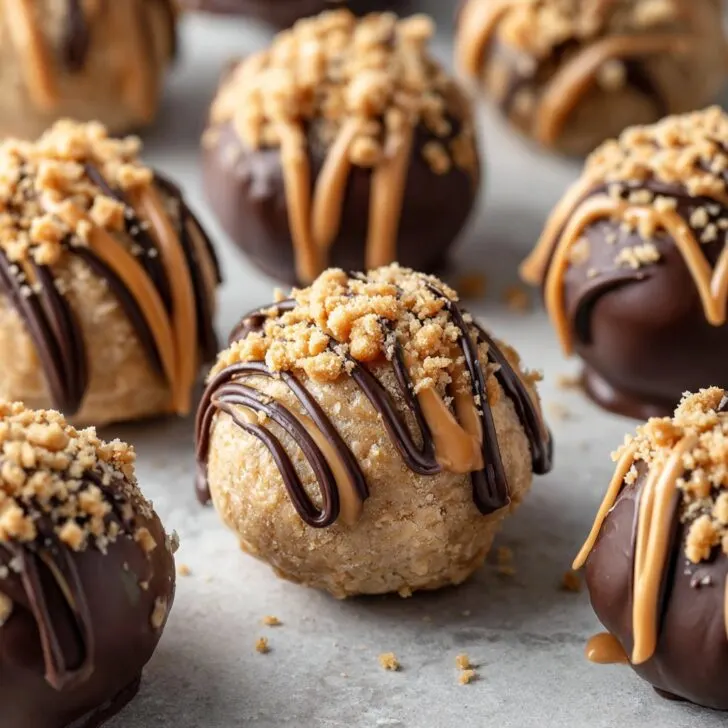
Here’s What You’ll Need (and What You Can Swap)
- 1 cup creamy peanut butter (though I’ve used chunky when that’s all I had – it’s crunchy, but still good!)
- ¼ cup unsalted butter, softened (my grandmother was adamant about using Land O’ Lakes, but honestly, most brands work just fine)
- ½ cup packed brown sugar (sometimes I mix in white sugar if I’m short – it’s not the end of the world)
- ½ cup all-purpose flour (for a gluten-free version, I’ve used oat flour and it worked surprisingly well)
- ½ teaspoon vanilla extract (I once forgot this and nobody noticed, but I notice!)
- 2 tablespoons milk (any kind, or even almond milk if you’re feeling fancy)
- ½ cup mini chocolate chips (honestly, regular ones are fine too – they just make bigger lumps)
- 1 ½ cups chocolate or melting wafers for dipping (dark, milk, whatever floats your boat)
How I Make These (Winging It Encouraged)
- In a medium bowl, beat together the peanut butter, softened butter, and brown sugar. An electric mixer makes it easier, but a wooden spoon and some elbow grease will do the trick (though your arm might be a bit sore. Maybe it's a good workout?).
- Mix in the flour, vanilla, and milk. At this point, it might look kinda gloopy – don’t panic. Once you stir in the chocolate chips, it’ll come together.
- Fold in those chocolate chips. This is where I usually sneak a bite – just a tiny one…quality control, right?
- Roll the dough into small balls, about the size of a big marble or a little smaller than a ping pong ball. Place them on a baking sheet lined with parchment or, honestly, I just use a plate if the sheet's covered in something else.
- Pop them in the fridge (or even the freezer if you’re in a hurry) for at least 30 minutes. They get firmer and easier to dip this way.
- Melt your chocolate or wafers in a microwavable bowl – go slow, 20 seconds at a time, so you don’t scorch it. (Learned that one the hard way.)
- Using a fork, dunk each chilled ball into the melted chocolate and tap off the excess. Set them back on your parchment (or, again, whatever flat thing you’ve got handy). Don’t worry if they look a bit messy – they taste the same, trust me.
- Refrigerate again until the chocolate is set. Or just eat one messy, melty truffle straight away. Who’s judging?
Notes Straight From My Kitchen (a.k.a. Things I Figured Out the Weird Way)
- If your dough seems too soft to roll, add a spoonful more flour. If it’s too stiff, more milk. I know, not very scientific, but it always works for me.
- I sometimes forget to chill the dough before rolling, and it’s a sticky mess. Don’t do that unless you want peanut butter hands for the next hour. (Maybe keep wet paper towels nearby, just in case.)
- Using parchment is less about being fancy and more about not scraping hardened chocolate off a plate for half an hour after.
What Else Can You Do With These? (A.K.A. Variations I’ve Actually Tried)
- Swap out peanut butter for almond butter – it’s a bit nuttier, and I like it, though my kids say it tastes “weird.”
- Once, I tried adding chopped pretzels, thinking I was a genius. It was…not great. Soggy pretzels are just sad.
- If you want to skip the chocolate dip (been there, lazy days happen), just roll them in cocoa powder or even powdered sugar. Not as fancy, but still yum.
Equipment You’ll (Probably) Want – But Don’t Panic If You Don’t Have Everything
- Mixing bowl (even a big soup pot works, in a pinch)
- Electric mixer or just a good old wooden spoon
- Parchment or wax paper (if you’re out, just grease a plate with a little butter – it’ll do)
- Microwavable bowl (or melt chocolate over a pot of simmering water, if you’re feeling patient)
- A fork for dipping – or two chopsticks, if that's your style. Once, I even used my fingers. Messy but effective.
")
")
How to Store ‘Em (If You Somehow Have Leftovers)
These keep in a container in the fridge for up to a week (so they say), but honestly, in my house, they barely make it through the evening. You can freeze them, just let ‘em thaw a bit before eating or you’ll break a tooth. (Not that I’ve done that, but…well…maybe once.)
Serving Them Up – My Favorite Ways
I usually just pile them on a plate and let people have at it, but if I’m feeling extra, I’ll drizzle them with a little melted white chocolate for, you know, pizzazz. My cousin likes to stick them on lollipop sticks for parties. I tried putting a few on top of ice cream once, and, well, let’s just say I highly recommend it.
Lessons I’ve Learned (a.k.a. Pro Tips From Too Many Batches)
- I once tried rushing the dipping step because I was running late. Big mistake – the chocolate shell looked like a toddler’s art project. Just chill the dough first, it’s worth the extra 10 minutes.
- Don’t substitute coconut oil for butter unless you want a really coconutty flavor. I mean, it’s not terrible, but it’s not the same thing at all.
- Actually, I find it works better if you use a fork instead of a spoon for dipping. More control, less mess (usually).
Some Questions I Get (And Maybe You’re Wondering Too?)
- Can I use natural peanut butter? You can, but the texture gets a bit looser, so maybe throw in an extra spoonful of flour or chill longer. Or just embrace the gooeyness.
- Is the flour safe to eat raw? Good question! Some folks like to heat-treat flour just to be safe; you can zap it in the microwave for a minute or so. Google it for the details if you want. (EatingWell has a guide!)
- Do I need to temper the chocolate? Honestly, I never do. If you want a perfectly glossy shell, you can, but I’m not fussed.
- Can I double the recipe? Absolutely. I do it all the time, especially if I’m hosting a crowd. Though, on second thought, maybe start with a single batch if it’s your first try – less pressure.
- Is this recipe gluten-free? Not as written, but swap the flour for a gluten-free blend or oat flour and it works great! (Check out this flour guide if you’re curious.)
If you make ‘em, let me know how it goes (and if you find any wild new combos that work, I’m all ears). Enjoy! And remember: messy chocolate fingers are part of the fun.
")
")
Ingredients
- 1 cup creamy peanut butter
- ½ cup unsalted butter, softened
- 1 cup powdered sugar
- 1 cup all-purpose flour (heat-treated)
- ½ cup mini chocolate chips
- 1 teaspoon vanilla extract
- ¼ teaspoon salt
- 1 ½ cups semisweet chocolate chips (for coating)
- 1 tablespoon coconut oil (optional, for melting chocolate)
Instructions
-
1In a large bowl, beat together the peanut butter and softened butter until smooth and creamy.
-
2Add powdered sugar, heat-treated flour, vanilla extract, and salt. Mix until a soft dough forms.
-
3Fold in the mini chocolate chips until evenly distributed throughout the dough.
-
4Scoop out tablespoon-sized portions of dough and roll into balls. Place them on a parchment-lined baking sheet.
-
5Freeze the dough balls for 15 minutes to firm up.
-
6Melt the semisweet chocolate chips with coconut oil (if using) in a microwave or double boiler. Dip each chilled dough ball into the melted chocolate, coating completely. Place back on the baking sheet and let set until chocolate is firm.
Approximate Information for One Serving
Nutrition Disclaimers
Number of total servings shown is approximate. Actual number of servings will depend on your preferred portion sizes.
Nutritional values shown are general guidelines and reflect information for 1 serving using the ingredients listed, not including any optional ingredients. Actual macros may vary slightly depending on specific brands and types of ingredients used.
To determine the weight of one serving, prepare the recipe as instructed. Weigh the finished recipe, then divide the weight of the finished recipe (not including the weight of the container the food is in) by the desired number of servings. Result will be the weight of one serving.
Did you make this recipe?
Please consider Pinning it!!