If You Love PB&J, Your Inner Kid Is About to Cheer
You know that feeling when you bite into a PB&J and, for a split second, you’re eight years old again? That’s basically what happens when I make this Peanut Butter and Jelly Cobbler. I threw it together on a rainy Sunday, mostly because I didn’t want to trek out for groceries—plus, my pantry always looks like a peanut butter museum. The first time I made it, I worried it’d be strange (turns out: it’s charmingly weird, like a cozy pair of socks or that one cousin everyone secretly likes best). And ok, I admit, I initially burnt the top because my brain hopped off somewhere after the third episode of my favorite baking show. Story of my life.

Why I Keep Coming Back to This (Even When I Mess Up)
I make this for my crew whenever everyone’s in the mood for something sweet but not, you know, fussy. Kids lose their minds over it—my youngest calls it “pie cake sandwich,” which, honestly, sums things up. My husband insists it’s breakfast food, though I say it’s best at room temp with ice cream. Oh, and if you’re a sucker for easy bakes that make the whole house smell like hugs, this one’s right in your wheelhouse (I still haven’t figured out why blueberry jam was a hard no last time, but grape jelly always vanishes?).
All the Pantry Stuff You’ll Need (Substitutions Fully Encouraged)
- ¾ cup creamy peanut butter (chunky works too, if you like things rustic—my gran swore by Peter Pan, but I usually reach for whatever's handy)
- ½ cup unsalted butter, melted (I’ve even used margarine in a pinch, promise it’ll work fine)
- 1 cup granulated sugar (sometimes I swap in brown sugar for half—just watch the bake color)
- 2 large eggs
- 1 ½ cups all-purpose flour (gluten-free blend works, though the texture gets slightly more... interesting?)
- 2 teaspoons baking powder
- ½ teaspoon salt
- ⅔ cup milk, any kind (last week I used oat milk and nobody noticed)
- 1 teaspoon vanilla extract
- 1 cup fruit jam or jelly—grape, strawberry, raspberry (choose your own adventure! Grape is tradition in my house but peach was a surprise hit one time... apple butter, not so much)
- Optional: a handful of roasted peanuts for crunch (totally skippable)
Let’s Make This (And Maybe Sneak Some Tastes)
- First, fire up your oven to 350°F (175°C). While that’s heating, grab your favorite 9-inch square baking dish. I grease mine with butter, but sometimes I’m lazy and go with spray. No shame.
- In a big-ish bowl, stir together melted butter and peanut butter until smooth-ish. Don’t stress about lumps—by the end, everything just sorts itself out.
- Toss in the sugar and eggs, then swirl everything up. I usually crack both eggs in at once (I know—risk taker), then mix until it’s kind of glossy.
- Sprinkle in flour, baking powder, and salt. Add the milk and vanilla, then blend it all together. Pro tip: don’t overmix; otherwise, it gets a bit dense, but nothing catastrophic. Once it looks like thick cake batter, you’re golden.
- Pour about two-thirds of the batter into your pan. Spread it around. It might seem like too little but trust me, it puffs up.
- Dollop spoonfuls of jam/jelly over the batter. I use big blobs—nothing exact. Swirl them around with a butter knife for that marble look. (This is the part where I sneak a taste, just me?)
- Plop the remaining batter in little patches on top. It won’t totally cover the jelly, but that’s good! Jelly peaks are what you want.
- If you’re feeling fancy, toss on some peanuts for crunch.
- Bake 35-40 minutes till golden and puffed and it smells like nostalgia. Jelly will bubble up in spots. If the edges look super brown but the middle’s still wobbly, tent with foil and finish baking—sometimes my oven has a mind of its own.
- Let it cool at least 15 minutes before diving in. Or don’t. Just know the jelly will be lava-like if you’re impatient. (Learned that the deliciously sticky way.)

My Notes—Because I Definitely Didn’t Nail It First Try
- Swapping in crunchy peanut butter makes for more texture, but it’s tougher to swirl.
- Once I mixed jam straight into the batter, and it got kind of murky. Tastes fine; looks weird.
- If your jelly sinks, don’t panic. It’ll settle into sweet pockets by the time it cools.
Things I’ve Tried (and Not All Were Winners)
- Blueberry jam is oddly divisive. Blackcurrant, though, actually works way better than I expected.
- Once tried a chocolate spread swirl—still not sure if it’s genius or a crime. Probably both.
- I wouldn’t bother with almond butter unless you’re really into it. Flavor gets lost under the jam, in my humble opinion.

What If You Don’t Have the Right Pan?
I swear by my old glass Pyrex, but I’ve baked this in everything from a deep pie dish to a lasagna tray. Even muffin tins if you’re into portion control. Just cut baking time by a few minutes if you use smaller pans (or trust your nose—when it smells amazing, it’s probably done).
Storing Leftovers… If You Have Any
If by some miracle you don’t eat it all in one go, cover it and keep at room temp for a day, or refrigerate up to 3. Reheats in the microwave just fine, but honestly, mine’s usually gone before breakfast the next day—so you might not get to test that advice.
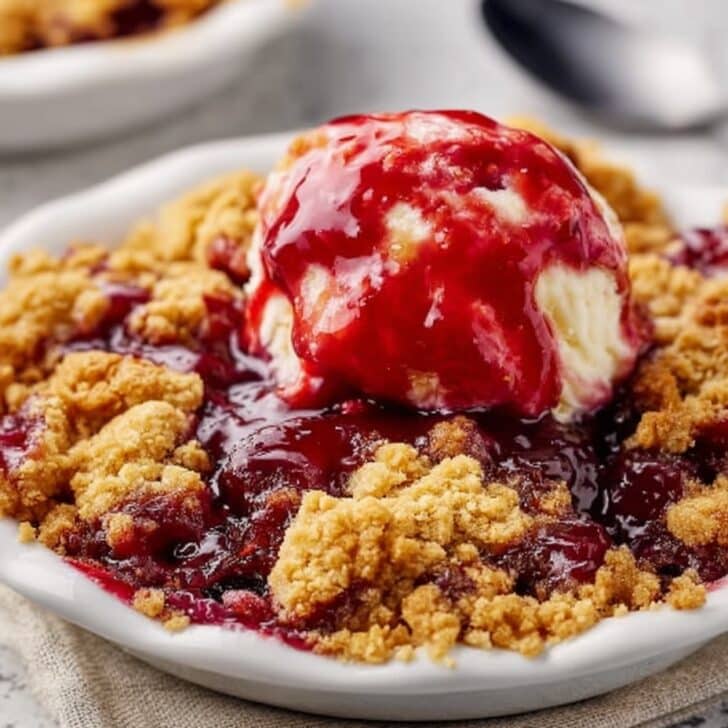
How I Like to Serve It
Big scoop, warm or room temp, with a dollop of vanilla ice cream if you’re feeling posh, or just a glug of cold milk for old times’ sake. On snow days, we’ve even put a piece in a bowl and poured cream over the top—don’t knock it till you try it.
Things I’ve Messed Up… So You Don’t Have To
- I once tried to bake it on the top rack and the edges scorched in record time. Middle shelf, every time.
- If you scrape the bowl squeaky clean, the top can end up a bit dry. Actually, leave a smidge in the bowl—it helps keep it moist somehow.
- Don't skip resting after baking. If you dig in too early, it's more lava than cobbler (I was impatient, paid the gooey price).
FAQs—Or Stuff I Keep Getting Asked (and Sometimes Guess At)
- Do I have to use grape jelly? Nope! Use whatever's hanging around. I mean, probably not marmite, but you get the idea.
- Can I halve the recipe? Sure, but watch the bake time—it drops by about a quarter. Or just make the whole thing and freeze leftovers. (Who am I kidding...)
- Peanut allergies—what then? Sunflower seed butter is the closest swap I've tried, though the flavor's a bit different. My friend swears it's just as good, but my kids noticed.
- It came out runny—what gives? Cobblers are meant to be a little gooey! If it's totally liquid, let it bake longer. Every oven's a law unto itself, honestly.
- Can this be breakfast? Yep. Not judging. (It's fruit and protein... sort of?)
Oh, almost forgot—once I ate this cold out of the pan, standing by the fridge like some sort of midnight bandit. Tastes even better that way. But don’t tell my kids.
Ingredients
- ¾ cup creamy peanut butter (chunky works too, if you like things rustic—my gran swore by Peter Pan, but I usually reach for whatever's handy)
- ½ cup unsalted butter, melted (I’ve even used margarine in a pinch, promise it’ll work fine)
- 1 cup granulated sugar (sometimes I swap in brown sugar for half—just watch the bake color)
- 2 large eggs
- 1 ½ cups all-purpose flour (gluten-free blend works, though the texture gets slightly more... interesting?)
- 2 teaspoons baking powder
- ½ teaspoon salt
- ⅔ cup milk, any kind (last week I used oat milk and nobody noticed)
- 1 teaspoon vanilla extract
- 1 cup fruit jam or jelly—grape, strawberry, raspberry (choose your own adventure! Grape is tradition in my house but peach was a surprise hit one time... apple butter, not so much)
- Optional: a handful of roasted peanuts for crunch (totally skippable)
Instructions
-
1First, fire up your oven to 350°F (175°C). While that’s heating, grab your favorite 9-inch square baking dish. I grease mine with butter, but sometimes I’m lazy and go with spray. No shame.
-
2In a big-ish bowl, stir together melted butter and peanut butter until smooth-ish. Don’t stress about lumps—by the end, everything just sorts itself out.
-
3Toss in the sugar and eggs, then swirl everything up. I usually crack both eggs in at once (I know—risk taker), then mix until it’s kind of glossy.
-
4Sprinkle in flour, baking powder, and salt. Add the milk and vanilla, then blend it all together. Pro tip: don’t overmix; otherwise, it gets a bit dense, but nothing catastrophic. Once it looks like thick cake batter, you’re golden.
-
5Pour about two-thirds of the batter into your pan. Spread it around. It might seem like too little but trust me, it puffs up.
-
6Dollop spoonfuls of jam/jelly over the batter. I use big blobs—nothing exact. Swirl them around with a butter knife for that marble look. (This is the part where I sneak a taste, just me?)
-
7Plop the remaining batter in little patches on top. It won’t totally cover the jelly, but that’s good! Jelly peaks are what you want.
-
8If you’re feeling fancy, toss on some peanuts for crunch.
-
9Bake 35-40 minutes till golden and puffed and it smells like nostalgia. Jelly will bubble up in spots. If the edges look super brown but the middle’s still wobbly, tent with foil and finish baking—sometimes my oven has a mind of its own.
-
10Let it cool at least 15 minutes before diving in. Or don’t. Just know the jelly will be lava-like if you’re impatient. (Learned that the deliciously sticky way.)
Approximate Information for One Serving
Nutrition Disclaimers
Number of total servings shown is approximate. Actual number of servings will depend on your preferred portion sizes.
Nutritional values shown are general guidelines and reflect information for 1 serving using the ingredients listed, not including any optional ingredients. Actual macros may vary slightly depending on specific brands and types of ingredients used.
To determine the weight of one serving, prepare the recipe as instructed. Weigh the finished recipe, then divide the weight of the finished recipe (not including the weight of the container the food is in) by the desired number of servings. Result will be the weight of one serving.
Did you make this recipe?
Please consider Pinning it!