
Let Me Tell You About These Cinnamon Rolls
Alright, so here’s the deal. If you’ve ever woken up on a lazy Saturday and thought, “Man, what I really want right now is a gooey cinnamon roll but also to put in zero effort this morning,” well, same. That’s honestly where this overnight Cinnamon Rolls recipe comes in. I remember making my first batch in my tiny flat years ago (the oven door squeaked louder than my kettle), and my sister still laughs about how I dropped half the filling on the floor that time—but hey, we salvaged enough rolls to eat, so it worked out. If you’re not in the mood for extra-fancy show-off baking, but want something ridiculously good, this one’s for you. Just don’t blame me if your kitchen smells like a cinnamon-sugar wonderland and you can’t get rid of the neighbours.


Why You'll Love This—According to Me (and Maybe My Neighbours)
I usually pull these off the night before a big breakfast (especially when we’ve got houseguests, or someone’s birthday, or, honestly, any excuse to eat too much sugar before noon). My family goes absolutely bonkers for these—like, there have been fights over the last one, though my little cousin claims that "saving" one for later is fair game, which it isn’t, actually. Whenever someone asks if it’s tricky or a ton of babysitting, I tell them it’s basically the pajama pants of baking: low effort, super comforting, and universally flattering (except that one time I tried to double the filling and it oozed... everywhere. Oops). Don’t be scared off by dough rising overnight—it’s way easier than it sounds.
Ingredients (Plus My Ramblings and Substitutions)
- 4 cups (ish) all-purpose flour (I say "ish" because sometimes dough just feels sticky and you’ll need a bit more—don’t stress)
- 1 packet (2 ¼ tsp) active dry yeast (I’ve used instant in a pinch, too)
- ¾ cup milk, warmed (I do full-fat if I’m feeling wild, but honestly, whatever’s in the fridge—oat milk actually works too!)
- ¼ cup white sugar (brown sugar’s nice if you want a caramel warmth, and I sometimes do half-n-half)
- ¼ cup unsalted butter, melted (if all I have is salted, I just don’t add quite as much salt later, probably too casual, but it works)
- 2 large eggs (room temp-ish if you remember, but I usually forget and it’s fine)
- ½ teaspoon salt
- Filling: ½ cup soft butter (melted, sure, or just left on the counter); ⅔ cup brown sugar; 2 tablespoon cinnamon; pinch of nutmeg (optional, but I like the extra nudge of spice)
- Icing: 1 ½ cups powdered sugar; 2 tablespoon cream cheese (softened); 1 to 2 tablespoon milk or cream (I don’t always measure, I just splash until it drizzles); dash vanilla (or not. It’s good either way!)
How I Actually Make Them (Chaos Included)
- First, in a big mixing bowl (or the bowl of your stand mixer, if you’re fancy or just tired of stirring), whisk the milk, sugar, and yeast. Let it sit for a few minutes—5 is good. It’ll get kind of foamy. If it doesn’t, your yeast might be dud, but don’t panic yet—sometimes it just takes longer.
- Stir in the melted butter, eggs, and salt. Then toss in about three cups of flour and get mixing. (I use a wooden spoon for maximum nostalgic effect, but use what you’ve got.) Add more flour a bit at a time until it’s too hard to stir, then dump it onto a floured counter. Here’s where it gets sticky. Knead for, I don’t know, 8 minutes or so? If the dough sticks to everything, add a little more flour—but try not to go overboard or they’ll be dense and, well, sad.
- Grease up your bowl (just a splash of oil’s good), tuck your dough in, toss a dishtowel on top, and let it rise until doubled. If it’s chilly in your kitchen (mine usually is), I stick it in the barely-warm oven (turn it on for a minute then off again) or just… wait longer. Patience is key, but if you peek every ten minutes, congrats—you’re normal.
- After the first rise, punch it down (this part’s weirdly fun), roll it out into—honestly, a big rectangle. About a foot by 18 inches, but if it’s not perfect, who cares? (Not me.) Spread with butter (this is where I sneak a taste). Sprinkle over brown sugar, cinnamon, and the nutmeg if you’re into it.
- Roll it up tightly (long side!), then cut into roughly 12 even slices. Use dental floss to cut them if you wanna be a show-off—it works better than a knife, which pulls the dough. Space in a greased 9x13 pan. Or whatever pan fits—I’ve jammed them in a round dish before and it still worked.
- Here’s the magic: Cover with plastic wrap, pop in the fridge overnight. Go live your life.
- Next morning: Let the rolls sit at room temperature while your oven heats to 350°F (180°C). I usually leave them out about 30–45 min—long enough to make coffee and maybe unload the dishwasher if I’m feeling productive, which, honestly, is rare.
- Bake for around 25–30 minutes. They’ll go golden and smell absolutely unreal. If the tops start browning too quick, loosely cover with foil.
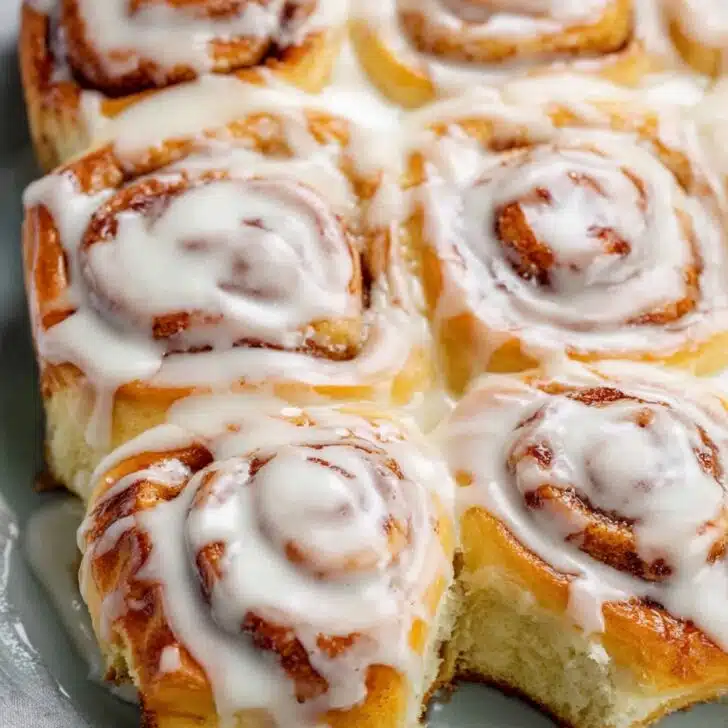
- Mix up the icing and drizzle it over the warm rolls. Extra icing? Go for it. You do you.
Real Life Notes & Mishaps
- I once forgot to cover the pan and the dough went a bit dry on top—still tasty, just a little extra chewy. Lesson learned: plastic wrap is your friend.
- Dough too sticky? Actually, I find it works better if you slightly oil your hands instead of just adding flour.
- Don’t stress about the roll sizes looking uneven. After baking and icing, no one notices (and if they do, tell them to bake their own).
The “I-Changed-My-Mind” Section: Variations
- I’ve tried swapping out the cinnamon for cardamom—it tasted really Scandinavian and I liked it, my partner not so much!
- One time, I got brave and added chopped pecans inside. Good idea, except I forgot to toast them and they went a bit mushy. So, toast first if you try that.
- Raisins, sultanas, or even diced apple work, though my mum groans every time I "ruin a perfectly good cinnamon roll" with fruit. (She’s dramatic.)
- I once replaced all the flour with wholewheat. Don’t do that. It tasted like a bread-shaped apology, if you know what I mean.


What You Need (or, Improvise as Needed)
- A large mixing bowl (clearly required, but a pasta pot will work if you’re desperate, I’ve done it)
- Rolling pin (or a wine bottle scrubbed clean, if that’s more your vibe)
- 9x13 baking dish (again, any oven-safe dish. Square is fine. I once used two small pans and just divided them up)
- A whisk, spoon, spatula, etc—don’t overthink it
- Plastic wrap or a plate for covering
Where Do You Even Store These?
So, if by some miracle you have leftovers (hasn’t often happened in my house), just cover and store at room temp for a day or two. Or the fridge for three-ish days—give ‘em a quick zap in the microwave to bring back the magic. Freezer? Sure, wrap tight and they’ll be fine for a couple months. But, honestly, ours disappear faster than a snowball in July. Good luck keeping them around.
How We Serve ‘Em (Oversharing, Optional)
These are best, in my very biased opinion, still warm and slightly gooey. Our family tradition is to serve Cinnamon Rolls on someone’s birthday morning, usually with way too much icing, and, if I remember, a pot of strong tea. Actually, once we had them with hot chocolate and my youngest nephew declared it the best breakfast of his life (he was five, but still, high praise).
Pro Tips—Learned the (Sometimes Hard) Way
- I once tried to skip the “let rolls warm up before baking” bit; big mistake, they barely bubbled and were way stodgier than usual. Just let them chill (or, er, un-chill) a little first.
- Don’t go light on the filling, but also, resist the urge to over-stuff. If it leaks, it caramelizes, but if you put in double, you’ll have a sugar lake at the bottom. Not that you can’t spoon that over, but it gets sticky.
- Plan ahead for pan size. Too small and you’ll get cinnamon roll skyscrapers. Tasty, but structurally unsound.
FAQ—These Are the Questions I Get (Or Just Imagine)
- Can I make these without overnight rising?
Sure, you can, just let them rise after shaping for about an hour and bake. But I think the overnight bit gives deeper flavor (and, more importantly, future me thanks present me for making the dough ahead). - Help! My dough didn’t rise much in the fridge. Did I mess up?
No stress. Sometimes it barely rises while cold, but it’ll puff up once you take it out before baking. Give it time. Yeast moves at its own pace, honestly. - What if I don’t have cream cheese?
You can just use a tiny bit extra butter and milk for the icing—it’ll be more of a glaze, but nobody’s going to turn it down. - Can I freeze the rolls before baking?
Yes! Freeze the shaped (unbaked) rolls in the pan after the first rise. When ready, thaw in the fridge overnight, then bake as usual in the morning. - Why are my rolls tough?
Probably too much flour, or you kneaded like a CrossFit champion. Next time, try to knead just until smooth and elastic. Or maybe just relax and eat the icingy bit in the middle—always the softest. - Is it okay to eat them late at night?
I’d say yes, but I’m the wrong person to ask. Midnight cinnamon rolls are a thing of beauty, trust me. - Oops, I forgot to grease the pan!
A bit of a faff to clean later, but your rolls should come out with a bit of gentle prodding (or, in a pinch, a butter knife and a muttered apology).
Anyway, hope you make them, mess up a bit, and love them even more for it. Let me know how it goes—unless you’re using wholewheat flour, then you’re on your own (just kidding—sort of). Enjoy and don’t forget to lick the spoon!
Ingredients
- 3 ½ cups all-purpose flour
- ¼ cup granulated sugar
- 2 ¼ teaspoon active dry yeast
- ½ cup whole milk, warm
- ¼ cup unsalted butter, melted
- 2 large eggs
- ½ teaspoon salt
- ½ cup brown sugar, packed
- 2 tablespoon ground cinnamon
- ¼ cup unsalted butter, softened
- ¾ cup powdered sugar
- 2 tablespoon cream cheese, softened
- 2 tablespoon milk
- ½ teaspoon vanilla extract
Instructions
-
1In a large mixing bowl, combine warm milk, sugar, and yeast. Let sit for 5 minutes until foamy.
-
2Add melted butter, eggs, salt, and flour. Mix until a soft dough forms. Knead for 5-7 minutes until smooth.
-
3Place dough in a greased bowl, cover, and let rise for 1 hour or until doubled in size.
-
4Roll dough on a floured surface to a rectangle. Spread softened butter over dough. Sprinkle with brown sugar and cinnamon.
-
5Roll up dough tightly and cut into 12 rolls. Place in a greased baking dish. Cover with plastic wrap and refrigerate overnight.
-
6Remove rolls from fridge and let rise at room temperature for 1 hour. Preheat oven to 350°F (175°C). Bake for 25 minutes or until golden. For icing, mix powdered sugar, cream cheese, milk, and vanilla until smooth. Spread over warm rolls.
Approximate Information for One Serving
Nutrition Disclaimers
Number of total servings shown is approximate. Actual number of servings will depend on your preferred portion sizes.
Nutritional values shown are general guidelines and reflect information for 1 serving using the ingredients listed, not including any optional ingredients. Actual macros may vary slightly depending on specific brands and types of ingredients used.
To determine the weight of one serving, prepare the recipe as instructed. Weigh the finished recipe, then divide the weight of the finished recipe (not including the weight of the container the food is in) by the desired number of servings. Result will be the weight of one serving.
Did you make this recipe?
Please consider Pinning it!!