
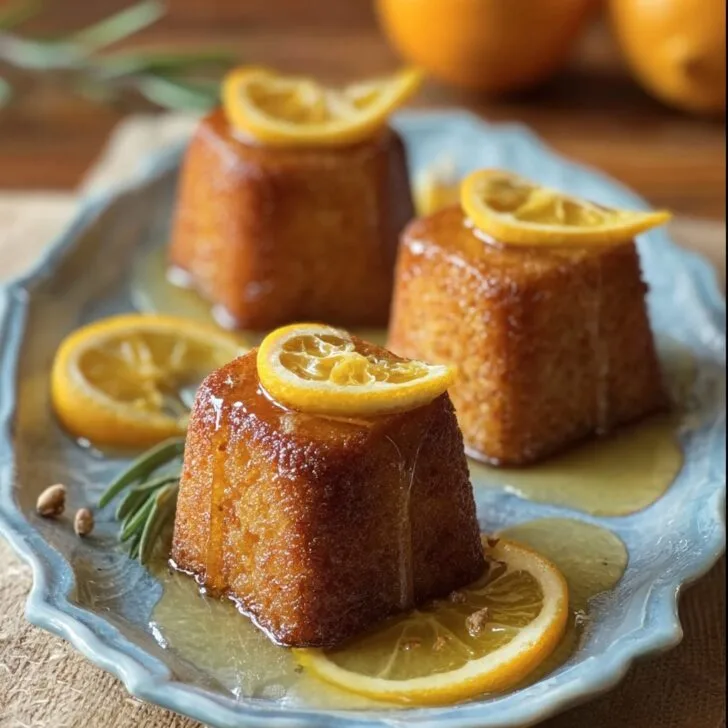
Let Me Tell You About These Cakes...
You know that feeling when you taste something and it just zings? These Orange Ginger Honey Cakes do that for me. First time I made them, it was a rainy Tuesday and my kitchen looked like I'd tried to fight a bag of flour (kitchen one, me zero). But wow—when these came out? My partner walked in and said, "What smells so unreal?" So, yeah... these little cakes are now kind of a thing in our house. Bonus: they look all fancy but are secretly easy.
I actually found the basic idea while doom-scrolling food blogs one late night—can't remember which, but I do remember clicking away from a Serious Eats ginger loaf in favor of something less, ah, strenuous (sometimes I just can't be bothered with a mixer). Now, this recipe's been seriously tweaked and given a bit of a British edge, since someone in my family claims all cakes should have "bits in." Still not sure what counts as a bit, but orange zest and ginger certainly do the trick here.
Why I Keep Making These (And Why You Might Too)
I make these Orange Ginger Honey Cakes when I need a little sunshine on my plate (or when I've massively overbought oranges, which happens more than I'd like to admit). My family pretty much loses the plot for them—especially my sister, who dubbed them "bouncy little cloud cakes." And if you've ever had a cake that's dry as old boots, you'll appreciate these...they're basically the opposite, thanks to the honey. Although, honest moment? Once I totally forgot the eggs and wondered why they were a bit chewy. Learned my lesson the sticky way.
I reckon you'll love these for brunches, garden tea, or, let's be real, just hiding from your family and eating them while watching BBC Good Food recipe videos (been there; no shame!).
Here's What You'll Need (Sort Of)
- 2 large eggs (I once used 3 medium by accident; didn't hurt really)
- 100g runny honey (Orange blossom is amazing, but plain clover honey works just fine. My nan swears by local farm stuff, fair play.)
- 100g unsalted butter, softened (Or, if you forget to take it out, zap it for 10 seconds—no judgment.)
- 120g self-raising flour (If you're out, all-purpose flour plus 1.5 teaspoon baking powder is nearly as good)
- Scant half teaspoon ground ginger (more if you like a spicy kick; fresh gratings work in a pinch, too)
- Zest from one medium orange (organic if you're feeling flush; I don't always bother)
- 2 tablespoon orange juice (the real squeeze is best but, between us, carton juice has rescued me more than once)
- Pinch salt
- Optional: a handful of chopped crystallized ginger, or even some dark chocolate chips if you want a twist (I've lobbed both in, no one's complained)
Step-by-Step Directions (With My Tangents)
- Heat things up: Oven to 175°C (350°F)—get it going early, or you'll be waiting forever later. Line a muffin tray with paper cases or just grease well. I've even used a random brownie tin, and it worked, sort of.
- Butter and honey: Cream the butter with the honey in a bowl (fancy mixer? Go ahead; I use a wooden spoon mostly because I can't be bothered to drag the stand mixer out). It won't look perfectly smooth, and that's fine—I'd say it probably looks a bit weird here, don't stress!
- Add eggs: Beat them in, one by one. If it splits, just keep going. On second thought, a spoonful of flour after the first egg can keep things together, but it's not a crisis either way.
- Dry goods time: Sift in the flour, ginger, and a good pinch of salt. Fold gently. Then comes the zest (this is where I usually sneak a taste—yes, raw eggs, bad me!).
- Orange juice and extras: Fold these in gently, just until combined. If you're adding crystallized ginger or chocolate bits, plonk them in now. Don't overmix, or you'll get tough cakes—and no one needs that stress.
- Spoon & bake: Divide the batter among your cases; about ⅔ full is good. Into the oven for about 18–22 minutes, until golden and springy. If you poke them and they bounce back, they're done. Or use a skewer to check—if it comes out mostly clean, pull 'em out.
- Cool it down: Let them cool in the pan for 5 minutes (I always pick at the edges) then onto a wire rack. Try not to burn your tongue, but, well, I always do.
Stuff I've Learned Along the Way
- Adding a little extra honey can make them stick to the cases, but honestly, lick the paper. You're at home!
- If your oranges aren't very zingy, a smidge more zest saves the day.
- Actually, I find it works better if you use room temp eggs—less lumpy batter.
If You Fancy a Change (Or Fancy a Disaster)
- Lemon instead of orange works, but it's more tart—good for a switch-up.
- Once tried rosemary... eh, won't do that again. Bit too perfumey for me.
- Subbing half spelt flour? Brilliantly nutty.
- Gluten-free flour blend does work, but texture's a wee bit crumblier.
Got No Fancy Tools?
Look, a hand whisk is great, but a soup spoon and some elbow grease gets the job done. Don't have muffin tins? Just use a regular loaf tin and bake ten minutes longer—keeps the washing-up simpler too.


Storing These Beauties (Not That They Stick Around)
Store in a cake tin, covered, for up to 3 days... though honestly, in my house it never lasts more than a day! If you must save some, a layer of baking paper keeps them from sticking together. Freezers are fine for leftovers but I think it loses some of that citrus zing.
Best Ways to Eat Them (Trust Me)
I love mine with a big mug of Yorkshire tea, preferably when no one is watching and there’s a bit of honey dribbling down my fingers. My aunt slathers them in more butter and even a dab of orange marmalade—over the top? Maybe. Delicious? Absolutely.
If Only I Knew This Sooner (Pro Lessons Learned)
- Once tried to speed-cool them in the fridge—big mistake; they go tough. Just be patient (or as patient as cake-lust allows).
- Squeezing oranges straight into the bowl splatters everywhere—juice in a little cup first avoids a sticky eyebrow. Ask me how I know.
Your Questions Answered (No Holds Barred)
Q: Can I make these dairy-free?
Yep, swap the butter for a plant version—bake’s a bit softer, but still lovely. (My friend Lee loves the Oatly stuff.)
Q: Kids hate ginger. Suggestions?
Honestly, leave it out, or go light. Zest and honey do loads on their own.
Q: Can I use honey with a stronger flavor?
I say go wild! Once used chestnut honey, almost too fragrant, but hey—variety is the spice.
Q: Help! My cakes sunk in the middle.
Oven was maybe a bit cool, or you peeked too early. Happens to the best of us (or maybe just me—less dramatic, still tasty).
There, that's about the size of it. If you try these and get jazzed, drop me a shout—always glad to trade baking tales. And if you want more citrus bakes, this one from Smitten Kitchen is a stunner. Now go bake something that tastes like sunshine—in cake form!


Ingredients
- 1 ½ cups all-purpose flour
- ⅔ cup honey
- 2 large eggs
- ½ cup unsalted butter, melted
- ⅓ cup freshly squeezed orange juice
- 1 tablespoon orange zest
- 1 tablespoon grated fresh ginger
- 1 teaspoon baking powder
- ¼ teaspoon salt
Instructions
-
1Preheat your oven to 350°F (175°C) and lightly grease a muffin tin or mini cake molds.
-
2In a large bowl, whisk together the flour, baking powder, and salt.
-
3In a separate mixing bowl, beat the eggs with the honey until well combined, then stir in melted butter, orange juice, orange zest, and grated ginger.
-
4Gradually add the wet ingredients to the dry ingredients, mixing gently until just combined. Do not overmix.
-
5Divide the batter evenly among the prepared molds. Bake for 18-20 minutes, or until a toothpick inserted in the center comes out clean.
-
6Allow the cakes to cool in the pan for 5 minutes, then transfer to a wire rack to cool completely before serving.
Approximate Information for One Serving
Nutrition Disclaimers
Number of total servings shown is approximate. Actual number of servings will depend on your preferred portion sizes.
Nutritional values shown are general guidelines and reflect information for 1 serving using the ingredients listed, not including any optional ingredients. Actual macros may vary slightly depending on specific brands and types of ingredients used.
To determine the weight of one serving, prepare the recipe as instructed. Weigh the finished recipe, then divide the weight of the finished recipe (not including the weight of the container the food is in) by the desired number of servings. Result will be the weight of one serving.
Did you make this recipe?
Please consider Pinning it!!