If You Can Stir, You Can Make This Bread (No Joke)
You know, every time I make this No-Knead Bread, I remember the first loaf: kitchen smelling like yeasty heaven, me absolutely covered in flour (honestly, I still am half the time), and that wild moment of panic thinking I’d completely messed it up before – plot twist – it came out golden, crusty, perfect. Made it on a Sunday in my pajamas after binge-watching some random baking show. Nothing fancy, just good mood, bad hair, and the world’s easiest bread. My neighbor wandered over when he smelled the loaf and we cut into it still warm, slathered on way too much butter, and didn’t say much for a few minutes except ‘Oh, wow.’ I guess bread really does speak for itself.

Why This Is My Go-To Lazy Bread (Even When I’m Busy)
I make this when I want fresh homemade bread but—full confession—I don’t want to deal with kneading, timers, or flour all over the windowsill (never figured out how it gets there; it just does). My family starts circling the kitchen as soon as it goes in the oven, kind of like curious feral cats, and honestly, the only thing that ever goes wrong is if I forget to actually bake it because I’ve left it "resting" overnight and get too distracted the next morning. Also, it’s like, impossible to mess up. Dry yeast, a spoon, and a little patience are truly all you need (though patience isn't always my strong suit, but that's another story). Lots of no-knead breads taste a bit...heavy. But this one? It works every time. Unless you try to use self-rising flour. Yeah, don’t do that (ask me how I know!).
All the Ingredients (Plus Some Substitutions I Actually Use)
- 3 cups (375g) all-purpose flour – Sometimes I use bread flour if that’s what’s languishing at the back of the cupboard, and honestly, it makes for a slightly chewier crumb. Both work great.
- 1 ¼ teaspoons salt – I usually grab whatever fine sea salt is handy, but table salt is totally fine. My gran swore by kosher, but you do you.
- ½ teaspoon instant yeast – If I've only got active dry yeast, I add a smidge more and maybe a splash of warm water to get things moving, but it hardly matters.
- 1 ½ cups (360ml) water – Lukewarm-ish. Cold tap water is what I use though, seriously, room temp seems to work just dandy.
How I Actually Make This Bread (Spoiler: It’s Ridiculously Easy)
- In a big bowl (use the biggest you own, trust me), toss in 3 cups flour, 1 ¼ teaspoons salt, and ½ teaspoon yeast. I use a wooden spoon but you can stick your hands in—won't bite. Mix these dry bits up so everything gets to know each other.
- Pour in the water. Don’t worry about being fancy; just dump it in. Mix everything around until you have a shaggy, kind of sticky dough. It will not look like normal bread dough yet—that's okay! Cover it with plastic wrap, a damp towel, or, like me, the only clean tea towel you have left.
- Let it rest for 12 to 18 hours at room temperature. (Overnight is easiest.) Sometimes mine sits for 15 because I forget – not a big deal. The dough should look bubbly, jiggly, and doubled in size when it's ready.
- Flour your countertop generously. Turn the dough out onto it – it will be a bit stringy and sticky. Use your hands or a dough scraper to fold it over on itself a couple of times (maybe 3). You can squish it into a rough ball. Don’t stress if it looks weird; that’s normal.
- Let that blob rest for about 30 minutes on a floured parchment square or floured towel. Actually, I just set it on whatever clean surface I can find (one time it was on a cutting board, worked fine). Cover it loosely with a towel again.
- While it’s resting, stick your Dutch oven—with the lid on—into the oven and preheat to 450°F (230°C). If you don't have a Dutch oven, see my note below for a workaround (been there, done that). After about 30 minutes, the oven and pot should be really hot.
- Carefully (don’t burn your mitts!) drop your dough into the hot pot. I sometimes give it a gentle shake to even it out, but it never really looks perfect here, and that's *fine.*
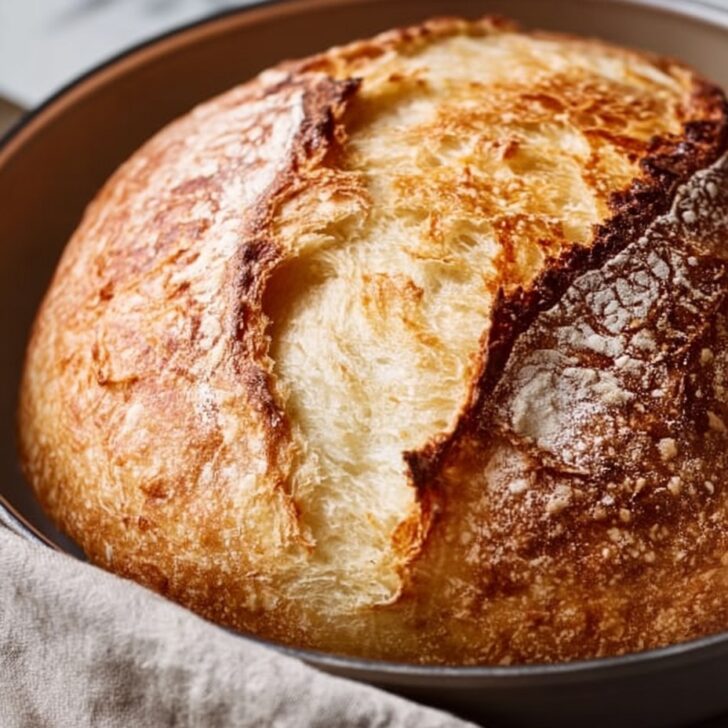
- Bake (lid on) for 30 minutes, then whip the lid off (watch out for the steam!) and bake another 15–20 minutes until it's golden brown and crisp-tastic on top. You can knock it and if it sounds hollow, it’s good, but honestly I just use my eyeballs most days.
- Cool on a rack for as long as you can stand it or at least 30 minutes. If you slice too early (guilty as charged), expect some gummy spots. Don’t worry, the flavor’s still great.

Things I’ve Learned the Hard Way (Notes From My Kitchen)
- A stickier dough leads to better holes–don’t be tempted to add loads more flour.
- If you forget it overnight and it goes like 20 hours, it still works. Just looks a little funky.
- Don’t skip the preheat step–cold Dutch oven = sad, pale bread.
Experiments That Actually Worked (And One That Didn’t)
- I swapped ½ cup flour for whole wheat once; nice nutty vibe, but you need a splash more water.
- Threw in rosemary and cracked black pepper – chef’s kiss.
- One time, I tried kneading in olives. That was, well, a salty disaster. Don’t blame the recipe, blame my heavy hand with the olives. Lesson learned!

Don’t Sweat the Gear – Equipment Chat
- Dutch oven (mine is hand-me-down and has chips; works fine!).
- No Dutch oven? Use a heavy lidded pot, or even a casserole dish with a foil tent – I did this once and yeah, crust was softer but still worth it.
- A big bowl, a spoon, some parchment, and a rack for cooling (or, if you’re like me, just a wooden board for lack of space).
How I Store This (When There’s Any Left)
Technically, it’ll keep on the countertop for 2–3 days wrapped in a towel or in a bread bag, but, to be honest, in my house, it never ever makes it past day one. Leftover slices make a dreamy grilled cheese the next morning though!
This Is How We Eat No-Knead Bread At My Place
I love slicing this up while it’s still a tad warm, slathering with cold butter, and eating it standing up next to the toaster (old habit). My sister swears this bread was invented for mopping up soup on cold days. Sometimes we turn the day-old end into rustic croutons for salad. Actually, try it with a cheesy pasta bake; you’ll thank me later.
Learned From My Goofs – Real Life Bread Pro Tips
- I once tried to speed up the rise by sitting it on a radiator. The dough got so weirdly bubbly, it crawled halfway out of the bowl. Don’t do that.
- If you cut into the loaf before it’s cooled, it’ll get a bit gummy (but I always do it anyway!)
FAQ (Because People Really Do Ask... Often Around My Table!)
- Can I use whole wheat flour for all of it?
- You can, but it gets a bit dense. I’d mix in a bit with white flour for a softer crumb—trust me, did it once and my mum nearly broke a tooth, haha.
- Do I have to wait the full 12 hours?
- If you want those classic airy holes, yes, but once I rushed it after 8 and it still tasted good. Just... don’t make a habit of it unless you like really sturdy sandwiches.
- My dough looks too wet. Is that right?
- Yeah! No-knead dough is weird and sticky. Don’t overthink it. Embrace the weirdness.
- What if I don’t have a Dutch oven?
- Honestly, any heavy oven-safe pot with a lid works. I’ve even used two small casserole dishes stacked. Crust isn’t as crisp, but you’ll still be grinning ear to ear.
- How hot is too hot for the water?
- I just use lukewarm. If you put your finger in and it feels like nothing, you’re good. Too hot will kill the yeast; too cold just means it takes longer. Don’t sweat it.
(Thanks for sticking with my rambling story. Wouldn’t trade this bread method for anything – except maybe a winning lottery ticket and a weekend in Cornwall!)
Ingredients
- 3 cups (375g) all-purpose flour – Sometimes I use bread flour if that’s what’s languishing at the back of the cupboard, and honestly, it makes for a slightly chewier crumb. Both work great.
- 1 ¼ teaspoons salt – I usually grab whatever fine sea salt is handy, but table salt is totally fine. My gran swore by kosher, but you do you.
- ½ teaspoon instant yeast – If I've only got active dry yeast, I add a smidge more and maybe a splash of warm water to get things moving, but it hardly matters.
- 1 ½ cups (360ml) water – Lukewarm-ish. Cold tap water is what I use though, seriously, room temp seems to work just dandy.
Instructions
-
1In a big bowl (use the biggest you own, trust me), toss in 3 cups flour, 1 ¼ teaspoons salt, and ½ teaspoon yeast. I use a wooden spoon but you can stick your hands in—won't bite. Mix these dry bits up so everything gets to know each other.
-
2Pour in the water. Don’t worry about being fancy; just dump it in. Mix everything around until you have a shaggy, kind of sticky dough. It will not look like normal bread dough yet—that's okay! Cover it with plastic wrap, a damp towel, or, like me, the only clean tea towel you have left.
-
3Let it rest for 12 to 18 hours at room temperature. (Overnight is easiest.) Sometimes mine sits for 15 because I forget – not a big deal. The dough should look bubbly, jiggly, and doubled in size when it's ready.
-
4Flour your countertop generously. Turn the dough out onto it – it will be a bit stringy and sticky. Use your hands or a dough scraper to fold it over on itself a couple of times (maybe 3). You can squish it into a rough ball. Don’t stress if it looks weird; that’s normal.
-
5Let that blob rest for about 30 minutes on a floured parchment square or floured towel. Actually, I just set it on whatever clean surface I can find (one time it was on a cutting board, worked fine). Cover it loosely with a towel again.
-
6While it’s resting, stick your Dutch oven—with the lid on—into the oven and preheat to 450°F (230°C). If you don't have a Dutch oven, see my note below for a workaround (been there, done that). After about 30 minutes, the oven and pot should be really hot.
-
7Carefully (don’t burn your mitts!) drop your dough into the hot pot. I sometimes give it a gentle shake to even it out, but it never really looks perfect here, and that's *fine.*
-
8Bake (lid on) for 30 minutes, then whip the lid off (watch out for the steam!) and bake another 15–20 minutes until it's golden brown and crisp-tastic on top. You can knock it and if it sounds hollow, it’s good, but honestly I just use my eyeballs most days.
-
9Cool on a rack for as long as you can stand it or at least 30 minutes. If you slice too early (guilty as charged), expect some gummy spots. Don’t worry, the flavor’s still great.
Approximate Information for One Serving
Nutrition Disclaimers
Number of total servings shown is approximate. Actual number of servings will depend on your preferred portion sizes.
Nutritional values shown are general guidelines and reflect information for 1 serving using the ingredients listed, not including any optional ingredients. Actual macros may vary slightly depending on specific brands and types of ingredients used.
To determine the weight of one serving, prepare the recipe as instructed. Weigh the finished recipe, then divide the weight of the finished recipe (not including the weight of the container the food is in) by the desired number of servings. Result will be the weight of one serving.
Did you make this recipe?
Please consider Pinning it!