
The Story Behind My No Bake Christmas Peppermint Pie
So, here's the deal—Christmas Eve is always a little bananas at my house. One year, I was panic-searching for a dessert because my oven was full (ham, casserole; you know the drill). My cousin Jill showed up with this ridiculously pink pie, and everyone, including my picky uncle, demolished it. I made a mental note: no bake, peppermint, pie. I mean, talk about ticking all the festive boxes! Ever since, this has sneaked its way onto our Christmas table. And okay, one year I dyed it too dark and it looked like a flamingo exploded, but it still tasted fab.
Why You'll Love This (or at Least Tolerate Making It)
I whip this up when I need something that looks special, but my energy's headed south and—frankly—I'd rather be watching old Christmas movies. My family devours it (my brother even tries hiding a second slice in the fridge, the sneak). It's creamy, minty, and very forgiving. If you accidentally drop a candy cane in, who's gonna notice?
Also, I used to hate recipes that demand 25 bowls. This one? You're using, like, two. Maybe three if you get wild.
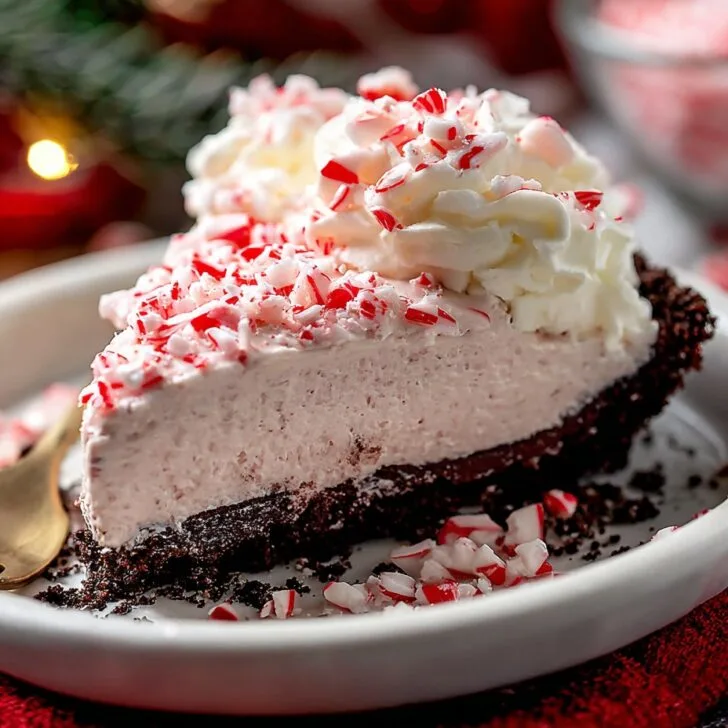
What Goes In My No Bake Christmas Peppermint Pie
- 1 pre-made chocolate cookie crust (graham cracker works too—actually, Ritz crackers once in desperation, didn't hate it!)
- 1 cup heavy whipping cream (or use Cool Whip if you're in a hurry—I won't tell)
- 225g (8 oz) cream cheese, room temp (my gran swore by Philadelphia, but I've used store brand without catastrophe)
- ½ cup powdered sugar
- 1 teaspoon peppermint extract (go easy here, too much can taste like toothpaste... learned that one the hard way)
- 6-8 drops red food coloring (I usually eyeball it; pink is festive, not neon red!)
- 1 cup crushed peppermint candies or candy canes (buy pre-crushed if you value your countertops)
- Optional: a handful mini chocolate chips, for the rebel in you
How I Throw This Together (Step By Step-ish)
- In a big bowl, whip the heavy cream until it forms soft peaks. If you're using Cool Whip, just, well, plop it in a bowl. No judgment.
- In another bowl, mix the cream cheese and powdered sugar until smooth. This is when I sneak a spoonful. Quality control, right?
- Add peppermint extract and food coloring. Try not to have flashbacks of high school science class here. Mix till it’s nice and pink (or just swirl for a marbled look—no rules).
- Stir in about ¾ cup of the crushed peppermint. Keep some for topping. I usually forget and dump it in all at once, but honestly, that’s ok too.
- Gently fold the whipped cream into the pink mixture. It's OK if it's not luxuriously smooth—mine usually looks like Play-Doh at this point.
- Spoon the filling into your pie crust and spread it out. Top with the rest of the peppermint candies and some mini chips (if you remember).
- Chill for at least 4 hours. Overnight is even better, but who's got that level of patience at Christmas?
My Notes – AKA Things I Learned The Hard Way
- If you use too much peppermint extract, people really will make faces. Go easy.
- Don’t skip chilling. Once, I got impatient and ended up with peppermint goo. Not a vibe.
- Cream cheese can be lumpy. Just beat a bit longer. Or embrace the lumps! Rustic, as the British say.
If You Wanna Mix It Up (Variations I’ve Tried… Or Failed)
- One time, I swapped out peppermint extract for vanilla + a splash of mint schnapps. It was... memorable? Maybe stick with peppermint unless you’re feeling adventurous (or have nowhere to drive).
- Chocolate crust rules, but Oreo crust is even more decadent. I also once went half-and-half on Oreo/vanilla cookies—awkward color, good taste.
- I've read Sally’s Baking Addiction for pie inspiration, but their whipped cream looks fancier than mine ever comes out. (Guessing they don’t have kids swiping tastes mid-mix.)
What Equipment I Actually Use (And What I Substitute)
You technically need an electric mixer for the cream. But, last Christmas when mine died (stupid cord snapped), I just used a big old whisk and some elbow grease—good for the arms, not so nice for the patience. Don’t have a pie pan? I’ve just made it in a casserole dish. Or in individual cups. It works, really.


How Long Does This Pie Last? (Or Doesn’t?)
Covers and keeps in the fridge for up to 4 days…though honestly, at my house, it never makes it past day one. If you’re a planner, you can totally make it a day ahead; honestly, I think it tastes even better the next day, a bit more set and the flavors all mingling.
Here’s What I Do When Serving
I cut sneaky huge slices because life’s too short for baby pieces. Sometimes we add a splash of stabilized whipped cream on top (Santa would approve). On Christmas Eve, we legit leave a slice out for Santa—and not once has he complained.
Some Pro Tips (Things I’ve Messed Up So You Don’t Have To)
- I rushed the chilling once—never again. The pie was a runny mess, like melted ice cream (not in a cute way).
- Trying to crush peppermints in a plastic bag with a rolling pin... leaks. Go for a sturdier bag, or just buy the crushed candy.
FAQ – The Stuff People Ask Me (And What I Told Them)
- Do I have to use food coloring?
Actually, no. It's just for that classic pink vibe. Pie tastes fine without it—just paler. - Can I freeze this?
You can, but the texture goes a bit weird—sort of crumbly. Tastes good, just not as creamy. - Do I have to use cream cheese?
Once I tried mascarpone because I ran out of cream cheese. It was richer, but honestly, a little fussy for a no bake pie. - Can I make it ahead?
Yup! In fact, make it the night before and thank yourself later. Just cover tightly so it doesn’t pick up fridge odors. Learned that, uh, after the "pickle pie" incident.
Oh, and one final thing—if you ever want to try making little individual pies in jelly jars, the kids go wild for them. I did them once for a bake sale; somehow, I still ended up taking home half of them, but hey, more for me.
If you're looking for more Christmas dessert inspiration, check out these no bake ideas. Otherwise, happy (un)baking and may your holiday pie always survive the fridge raid.


Ingredients
- 2 cups crushed chocolate sandwich cookies (such as Oreos)
- ¼ cup unsalted butter, melted
- 1 package (8 oz) cream cheese, softened
- 1 cup powdered sugar
- ½ teaspoon pure peppermint extract
- 1 ½ cups whipped topping (such as Cool Whip), thawed
- 4 drops red food coloring
- ½ cup crushed peppermint candies, plus extra for garnish
Instructions
-
1In a medium bowl, combine the crushed chocolate sandwich cookies and melted butter. Mix until the crumbs are evenly coated.
-
2Press the cookie mixture firmly into the bottom and up the sides of a 9-inch pie dish to form the crust. Place in the refrigerator to set while preparing the filling.
-
3In a large bowl, beat the softened cream cheese and powdered sugar together until smooth and creamy.
-
4Add peppermint extract and red food coloring to the cream cheese mixture. Mix until evenly combined and desired pink color is achieved.
-
5Gently fold in the whipped topping and crushed peppermint candies until just incorporated.
-
6Spread the peppermint cream filling evenly into the chilled cookie crust. Garnish with extra crushed peppermint candies. Refrigerate for at least 4 hours before serving.
Approximate Information for One Serving
Nutrition Disclaimers
Number of total servings shown is approximate. Actual number of servings will depend on your preferred portion sizes.
Nutritional values shown are general guidelines and reflect information for 1 serving using the ingredients listed, not including any optional ingredients. Actual macros may vary slightly depending on specific brands and types of ingredients used.
To determine the weight of one serving, prepare the recipe as instructed. Weigh the finished recipe, then divide the weight of the finished recipe (not including the weight of the container the food is in) by the desired number of servings. Result will be the weight of one serving.
Did you make this recipe?
Please consider Pinning it!!