
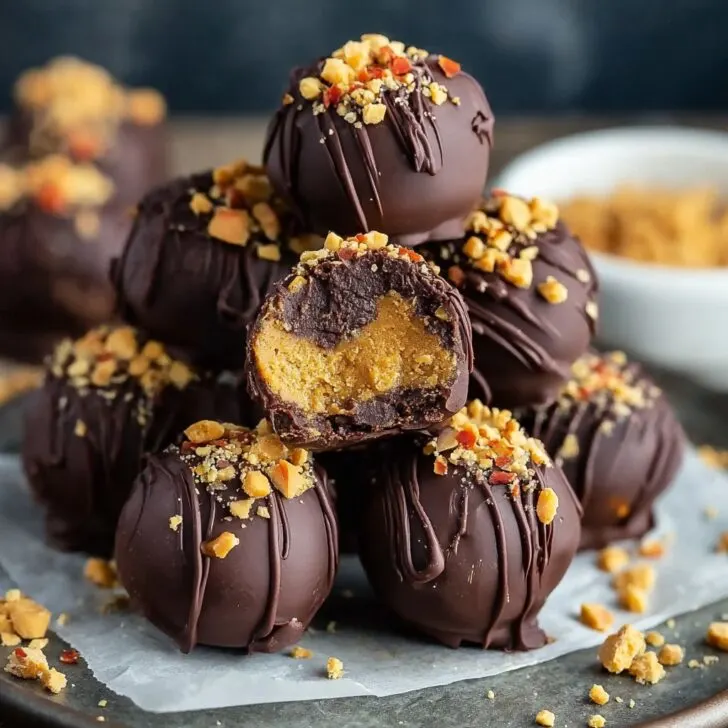
Catching Up Over No Bake Chocolate Peanut Butter Truffles
Look, I have to admit up front: I first made these No Bake Chocolate Peanut Butter Truffles because I’d forgotten I’d promised to bring a dessert to a party. You know that cold sweat where you open the cupboard and just sort of pray something speaks to you? Well, peanut butter called out (like it always does in a crisis). Actually, it sort of leapt out and hit me on the head, but that’s another story. My son, Max, is obsessed with all things chocolate, so the combo’s a win-win. Plus, there’s zero oven required. That’s huge for me, since I seem to turn the kitchen into a sauna every time I try to bake in July. These truffles have since become my go-to when I need quick treats, or just want to impress with minimal effort. Honestly, one time these saved my bacon at a bake sale where my cookies totally crumbled—so now they’re legendary (well, at least in our street WhatsApp group!).
Why You’ll Love Making (and Eating) These
I make this when dinner’s running late and the kids start the sweetie-chant. My family goes silly for these because they taste like a peanut butter cup—if someone made it just for you, and maybe hid it from the rest of the world (not that I’ve done that). There’s no baking, so no need to babysit the oven or stress over burnt bottoms.
Also, melt chocolate in the microwave? Yes, please. Once, my mixer decided to throw a wobbly halfway through, and you know what? A wooden spoon (and some elbow grease) saved the day. These truffles are pure kitchen magic—easy, forgiving, and as close as I get to instant gratification. And hey, if you sneak a bite of the mix before rolling, I won’t judge (I mean, who’s watching?).
Let’s Chat About What You’ll Need
- 1 cup creamy peanut butter (I’ve gone rogue with chunky now and then—it’s great for texture. Grandma always said Skippy was the best, but honestly, store brand is fine.)
- ¼ cup unsalted butter, softened (Or swap in coconut oil in a pinch. It’s got a tropical vibe that way.)
- 2 cups powdered sugar (Sift it if you remember. Sometimes I forget, lumps happen.)
- ½ teaspoon vanilla extract (I once used maple, and it actually worked!)
- 1 ½ cups semi-sweet chocolate chips (Dark chocolate is awesome if you want them richer. Or mix both. Who’s going to complain?)
- 1 tablespoon coconut oil or a bit of neutral oil (To get that shiny, snappy chocolate. No oil? Just wing it, the chocolate will still set—maybe a little less glossy but still yum.)
- Pinch of salt (I just dash it in; no measuring spoon here)
Here’s How I Throw These Together
- Mix up the peanut butter, butter, and vanilla. I use a bowl and a wooden spoon—or a mixer if I’m feeling fancy. Don’t worry if it looks a bit grainy, it comes together soon.
- Tip in the powdered sugar. Start slow (unless you want sugar clouds everywhere. Ask me how I know). Mix until you have a thick dough that doesn’t stick much when you pinch it.
- Scoop and roll into balls. About the size of a walnut. Or eyeball it, honestly. Place them on a parchment-lined tray. This is the step where I usually nick one for a ‘quality check’—chef’s perks, right?
- Pop them in the freezer for 15-20 minutes. This helps them hold together when you dunk ‘em in chocolate.
- Melt chocolate and oil together. I usually zap them in the microwave in 30-second bursts, stirring as I go. But a stove and a bowl works if you’re old-school (or your microwave’s on the fritz).
- Dip the balls in chocolate. Forks work, or even a skewer. Let the extra drip off and put them back on the tray. Don’t stress if they look rustic. Mine always do (and I like it that way).
- Chill to set. 10 minutes in the fridge does the trick. If you can wait longer, go for it. I rarely can.
Mishaps, Little Notes, and Hard-Won Wisdom
- I tried freezing the coated truffles for longer once—figured it’d make them super firm. Nope. Ended up with weird condensation and sticky chocolate. So, just chill until set.
- Use parchment or silicon mat under your truffles, or you’ll be scraping chocolate off your tray (which, to be fair, isn’t terrible as snacks go).
- If the mix feels too sticky, I add a bit more sugar. Too crumbly? Splash in a tad more butter—or even a teaspoon of milk. There’s wiggle room.
If You Want to Tweak Things...
I once went wild and rolled the finished truffles in crushed pretzels—amazing sweet-salty combo. Sprinkles are fun for birthdays. Mini M&Ms sank straight to the bottom when I tried those (not recommended unless you like rainbow bottoms). Want to go a bit fancy? Drizzle with white chocolate or dust with cocoa. Or add a hint of cinnamon—trust me, pretty tasty if you like a teeny twist.
No Fancy Gear? No Problem!
I always reach for my hand mixer, but honestly, a spoon and muscle gets it done. For rolling, hands work best. If you don’t have parchment, a well-oiled plate (or even that junk mail flyer you never recycled—kidding) will do. Chocolate dipping forks sound posh; I use forks or a pair of chopsticks, sometimes even my fingers (just be quick, it’s messy!).


How to Store Them (But Will You Even Need To?)
These keep in the fridge for up to five days in a sealed box, but—here’s the real talk—mine never make it past 24 hours. Theoretically, you could freeze them for a few weeks (layered with parchment). But I’ve yet to see any left over to freeze (I blame Max).
Serving: My Family’s Style
We pile these No Bake Chocolate Peanut Butter Truffles into a clumsy mountain on a plate and stick a little paper flag on top at birthdays. Sometimes I’ll scatter sea salt flakes on top for a little flair. Or just eat them straight out of the fridge at midnight—no judgment. If you want a posh finish, serve with coffee for adult movie night.
Done This Wrong? Me Too! What I’ve Learned
- Don’t try to melt chocolate in one big go; I’ve ended up with burnt, lumpy messes. Go slow, stir a lot!
- Patience pays off. If you skip the first chill, the dough’s way too sticky. On second thought, just chill it twice—first before rolling, then after chocolate.
- Kids love helping, but maybe keep them clear during hot chocolate-melting. Learnt that the hard way with a chocolate-splattered shirt (mine, not theirs).
Real Questions I’ve Actually Been Asked
- Do I need fancy peanut butter?
- Not at all! Use whatever you have. I used organic once, flavour was great, but classic Jif works just fine. Some folks love almond butter—tastes slightly different, but still dreamy.
- Can I skip the chocolate coating?
- You sure can—but it’s the best bit. Maybe roll in cocoa or crushed nuts if you want to make it less chocolatey.
- Why are my truffles greasy?
- This sometimes happens if I don’t chill them enough before coating. Or maybe the butter was extra soft!
- How small should they be?
- I mean, whatever fits in your mouth in a bite or two. Golf ball or walnut sized is the sweet spot; I’ve made them massive before and, yeah, delicious but a bit OTT.
- Any resources for homemade peanut butter?
- Absolutely! Sally’s tutorial is fun, or check Bigger Bolder Baking for bold ideas. I’m a sucker for homemade but don’t always have the energy, y’know?
Right—I’ve prattled on enough. These No Bake Chocolate Peanut Butter Truffles are the real deal for a treat that looks (and tastes) far more complicated than it is. If you try something wild with them, let me know. Or if you don’t—just eat them, no fuss. That’s the best bit of all. Next time, remind me to tell you about the Great Scone Incident (blame it on too much baking powder...)


Ingredients
- 1 cup creamy peanut butter
- ¼ cup unsalted butter, softened
- 1 ½ cups powdered sugar
- ½ teaspoon vanilla extract
- 2 cups semisweet chocolate chips
- 1 tablespoon coconut oil
- A pinch of salt
- Chopped peanuts or sprinkles for garnish (optional)
Instructions
-
1In a mixing bowl, combine peanut butter, unsalted butter, vanilla extract, and salt until smooth and well mixed.
-
2Gradually add powdered sugar, stirring until a thick and slightly stiff dough forms.
-
3Scoop out tablespoon-sized portions and roll into balls. Place the balls on a parchment-lined baking sheet and freeze for 15 minutes.
-
4In a microwave-safe bowl, melt the chocolate chips and coconut oil in 30-second intervals, stirring until smooth.
-
5Dip each peanut butter ball into the melted chocolate, coating completely. Return to the lined baking sheet.
-
6Garnish with chopped peanuts or sprinkles, if desired. Chill in the refrigerator for 10 minutes or until set. Serve and enjoy.
Approximate Information for One Serving
Nutrition Disclaimers
Number of total servings shown is approximate. Actual number of servings will depend on your preferred portion sizes.
Nutritional values shown are general guidelines and reflect information for 1 serving using the ingredients listed, not including any optional ingredients. Actual macros may vary slightly depending on specific brands and types of ingredients used.
To determine the weight of one serving, prepare the recipe as instructed. Weigh the finished recipe, then divide the weight of the finished recipe (not including the weight of the container the food is in) by the desired number of servings. Result will be the weight of one serving.
Did you make this recipe?
Please consider Pinning it!!