
You Won’t Believe How Fun Muffin Tin Mini Pizzas Are
Okay, so you know those random days when you open the fridge and just stare, hoping dinner will magically appear? That's exactly how my muffin tin mini pizza adventures started. I wanted pizza, my kids wanted something “cool,” and honestly, I just didn't want to wrestle with a giant ball of dough (not after that flour explosion incident last year, thanks very much). So, I grabbed my trusty muffin tin, crossed my fingers, and – poof – these little beauties were born. Now they’re a staple in our house, especially when my nephew Toby comes over and announces he’s “starving to death” (he’s eight; he’s always starving).
Why I Keep Coming Back to These Little Pizzas
I make these when I’ve got leftover toppings lurking in the fridge or when we need lunch that’s more exciting than PB&J (again). My family goes crazy for these because they get to choose their own toppings—no arguments about mushrooms, at least not out loud. And look, I’m not going to lie: I tried to make a cauliflower crust version once and let’s just say the dog wouldn’t even eat it, so regular dough it is! Plus, muffin tin means less cleaning up, which is a win in my book.
All the Ingredients (With a Few Swaps and Family Secrets)
- 1 can of refrigerated pizza dough (sometimes I use crescent roll dough instead; my grandmother swore by the kind with the red label, but I find any will do)
- ½ cup pizza sauce (homemade is nice but honestly jarred works fine for weeknights—this one from Smitten Kitchen is fab if you’ve got time)
- 1 cup shredded mozzarella cheese (or whatever cheese is in the fridge, and once I even used cheddar—no shame)
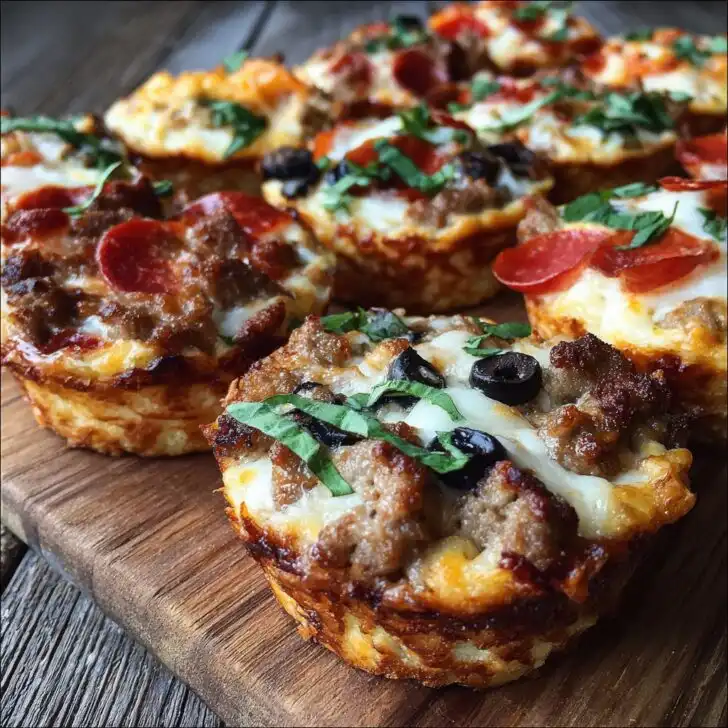
- Toppings: mini pepperoni, chopped bell peppers, olives, mushrooms, cooked sausage, pineapple (I know, controversial), etc.
- Olive oil or spray for greasing the muffin tin
- Optional: garlic powder, Italian seasoning, red pepper flakes (my husband always adds way too much—his tastebuds are made of steel)
How I Actually Make These (Step by Step, More or Less)
- First, preheat your oven to 400°F (or 200°C if you think in Celsius like my cousin in the UK).
- Grease your muffin tin. This is not optional unless you like prying stuff out with a fork for 10 minutes—trust me, I’ve tried skipping this step. Not fun.
- Roll out your dough and cut it into circles about 3 inches across. I use a glass or whatever’s handy (once used a cookie cutter shaped like a dinosaur, that was… interesting). Press each circle into the muffin tin holes, letting the edges come up a bit.
- Spoon a little pizza sauce into each cup. Try not to drown the dough; a heaping teaspoon is usually enough. This is where I usually sneak a taste. Actually, I find it works better if you don’t over-sauce.
- Sprinkle cheese generously. There is no such thing as too much cheese, in my opinion.
- Add your toppings. This is the fun part! I usually let the kids go wild here, which is why one will have five olives and another just a mountain of pepperoni.
- If you like, sprinkle on some garlic powder or Italian seasoning. Or both, no one is judging.
- Bake for about 12 to 15 minutes. Watch for golden edges and bubbling cheese. Don’t worry if they look a bit weird at this stage—it always does right before it gets good.
- Let them cool for a couple of minutes before popping out. You might need to run a butter knife around the edges—unless you greased really well, in which case, they’ll jump right out (well, almost).
Notes I Wish Someone Had Told Me
- Don’t overload with sauce or toppings. I once tried to stuff in extra sausage—ended up with a soggy mess. Less is more here, at least for the base layer.
- If you want crispy bottoms, pre-bake the dough circles for 2 minutes before adding the sauce. I sometimes forget and it’s still fine, but it does help.
- You can use leftover roasted veggies or even last night’s chicken (just chop it up small). Actually, I think the fridge clean-out pizzas are the best kind.
Some Variations I’ve Tried—And a Fail
- Breakfast Mini Pizzas: Scrambled eggs, bacon bits, and a sprinkle of cheddar. Pretty good with hot sauce, too, though my daughter says it’s “weird.”
- Veggie-Loaded: Chopped spinach, mushrooms, and feta. This is my lunch favourite (even if no one else is excited about it).
- Gluten-Free: Tried with a premade GF dough once; it was a bit crumbly but not terrible. I wouldn’t serve it to company unless they’re on a GF diet, though.
- Cauliflower Crust: Nope, never again. Mush city.
Here’s What You’ll Need (Or What I Use, Anyway)
- Muffin tin (12-cup muffin tins are easiest—if you only have a mini one, shrink your dough circles, no big deal)
- Rolling pin (or a wine bottle when I can’t find mine; happens more than I’d like to admit)
- Sharp knife or a glass for cutting dough circles
- Mixing bowl for toppings (unless you’re lazy like me and just pile them on the counter)


Storing Leftovers (But Let’s Be Real)
If, by some miracle, you have leftovers, store them in an airtight container in the fridge. They’ll keep for about 2-3 days. But honestly, in my house they never last more than a day! And if you want to reheat, a few minutes in the oven or toaster oven freshens them up way better than the microwave (which makes them a bit floppy, but hey, edible’s edible).
How We Serve ‘Em (And Why It Matters)
We usually pile these up on a big plate and put them in the middle of the table—kind of like a snacky dinner. I like to make a quick salad with whatever greens are kicking about and some homemade ranch (if I’m feeling ambitious). My son, on the other hand, dips his in ketchup. Don’t ask me why.
Pro Tips (Learned the Hard Way…)
- I once tried rushing the cooling time. Bad idea. The cheese stuck everywhere and I spent the next hour scraping.
- If you use parchment to line your muffin cups, it helps with sticking, but actually, I find it works better if you just grease them well.
- Hand-stretching the dough works in a pinch, but don’t pull it too thin or you’ll get holes (not that pizza with a hole in the bottom is un-eatable, but it’s messy).
Mini FAQ (Because People Actually Ask Me This Stuff)
- Can I use biscuit dough instead of pizza dough? Oh, for sure. It’s a bit fluffier, but kind of delightful. Just watch the bake time—sometimes takes a few minutes longer, and the edges brown faster.
- What about making these ahead of time? Yeah, you can—just assemble, cover, and pop in the fridge for a few hours before baking. Wouldn’t go overnight with the sauce though, the dough gets a bit soggy.
- Do these freeze well? I’ve tried, but honestly, I think they taste better the next day from the fridge than from the freezer. But if you must freeze, wrap them tight and reheat in the oven.
- How do you keep the dough from sticking? Grease, grease, and did I mention grease? And don’t skip the letting them cool part.
- Can I make these vegan? Sure thing—use your favourite vegan cheese and veggies. (I hear Daiya melts pretty well, though I haven’t tried it myself.)
Side note: Once, my friend tried making these on a camping stove. It almost worked, but let’s just say muffin tins and open flame aren’t best mates. Stick with an oven when you can.
And if you want a deep dive into homemade dough, check out this King Arthur Baking recipe. But really, store-bought is just fine most days.


Ingredients
- 1 can refrigerated pizza dough
- ½ cup pizza sauce
- 1 cup shredded mozzarella cheese
- ½ cup mini pepperoni slices
- ¼ cup diced bell peppers
- ¼ cup sliced black olives
- 1 tablespoon olive oil
- ½ teaspoon dried Italian herbs
Instructions
-
1Preheat your oven to 400°F (200°C) and lightly grease a 12-cup muffin tin with olive oil.
-
2Roll out the pizza dough and cut into 12 equal squares. Press each square into the bottom and up the sides of each muffin cup.
-
3Spoon about 2 teaspoons of pizza sauce into each dough cup.
-
4Sprinkle mozzarella cheese evenly over the sauce, then top with mini pepperoni, diced bell peppers, and sliced black olives.
-
5Sprinkle dried Italian herbs over the top of each mini pizza.
-
6Bake for 12-15 minutes, or until the dough is golden and the cheese is bubbly. Let cool slightly before removing from the muffin tin and serving.
Approximate Information for One Serving
Nutrition Disclaimers
Number of total servings shown is approximate. Actual number of servings will depend on your preferred portion sizes.
Nutritional values shown are general guidelines and reflect information for 1 serving using the ingredients listed, not including any optional ingredients. Actual macros may vary slightly depending on specific brands and types of ingredients used.
To determine the weight of one serving, prepare the recipe as instructed. Weigh the finished recipe, then divide the weight of the finished recipe (not including the weight of the container the food is in) by the desired number of servings. Result will be the weight of one serving.
Did you make this recipe?
Please consider Pinning it!!