
So... Let Me Tell You About This Mixed Berry Pavlova
Honestly, if you’d told me a few years ago that I’d be whipping up something as posh-sounding as Mixed Berry Pavlova in my own kitchen, I’d have probably laughed and grabbed a packet of biscuits instead. But one summer, my mate Lucy came over with a pile of berries from her garden (no joke, she grows more than a farmer’s market), and after a bit of friendly bullying—er, encouragement—from her, we gave this dessert a bash. Let’s just say, it’s now my go-to for any gathering where I want people to think I’ve got my act together. Also, there was that one time I dropped the finished pavlova face-down on the kitchen floor, but let’s not dwell on that.
Why You'll Love This (Or At Least Tolerate It)
I whip this up when I want to impress guests without having to faff about with fiddly cake layers. My family goes absolutely bonkers for it—especially when there’s extra cream (sometimes I even hide a bit for myself). And, look, if you’ve ever had a meringue that turned out flat as a pancake (been there; sulked about it), this recipe kind of forgives those little mishaps. Plus, you end up with something that’s crispy, chewy, fruity, and creamy all at once. It’s like the best bits of dessert just hanging out together in a big, fluffy pile.
What You'll Need (With My Occasional Swaps)
- 4 large egg whites (I’ve used the pre-separated stuff in a carton before, when I couldn’t be bothered—works okay!)
- 1 cup (about 200g) caster sugar (sometimes I use superfine sugar; if you can only find regular sugar, just blitz it in your blender quickly)
- 1 teaspoon white vinegar (apple cider vinegar if that's lurking in your cupboard—it works)
- 1 teaspoon cornstarch (cornflour in the UK; my gran used to just chuck in a bit extra, "for luck")
- 1 teaspoon vanilla extract (the real stuff if you can swing it, but the fake stuff won’t ruin your night, promise)
- 1 cup (about 250ml) heavy cream (double cream is even better if you’re feeling fancy)
- 2 tablespoons icing sugar (confectioners’ sugar, if you’re Stateside; sometimes I skip it if the berries are sweet enough)
- 2-3 cups mixed berries—strawberries, blueberries, raspberries, blackberries (or frozen berries when it's January and you’ve forgotten what sunshine feels like)
- Optional: A few fresh mint leaves for garnish (I forget this step 9 times out of 10)
What To Do (I Promise This Is Not Complicated)
- Preheat your oven to 120°C (about 250°F), or as close as your oven dial will let you. Line a baking sheet with parchment paper. I usually try to draw a rough circle (around 8 inches/20cm) to guide the shape, but honestly, it ends up more blob than circle every time.
- In a big, clean bowl (I mean it—any grease and your egg whites will sulk), beat the egg whites with an electric mixer until soft peaks form. You know, they kind of hold their shape, but droop a bit at the tip. If you only have a whisk and strong arms, fair play, but I’ve never managed it without giving myself a cramp.
- Add the sugar a spoonful at a time. Yes, really—don’t dump it all in, unless you want sugary soup. Keep beating until the mixture is glossy and the peaks are stiff. Sometimes I get impatient here, but it’s worth seeing it through. You should be able to hold the bowl over your head (I never do, but the kids dare me every time).
- Sprinkle in the vinegar, cornstarch, and vanilla. Gently fold them in—don’t go wild, just enough to combine.
- Scoop the meringue onto your prepared sheet, aiming for a big, proud, pillowy mound. Smooth the sides and make a shallow dip in the middle (that’s where all the good stuff will sit later). Don’t try for perfection. Lopsided pavlova is basically my trademark.
- Pop it in the oven and immediately reduce the heat to 100°C (210°F). Bake for 1 hour and 15 minutes. Turn off the oven and leave the meringue inside with the door cracked open, to cool slowly (this stops it from cracking too badly—though, sometimes it cracks anyway; still tastes fab).
- When it’s cool (usually takes me ages to wait), whip the cream with the icing sugar until soft and luscious. Not too stiff—I once overwhipped and ended up with butter (still ate it, no shame).
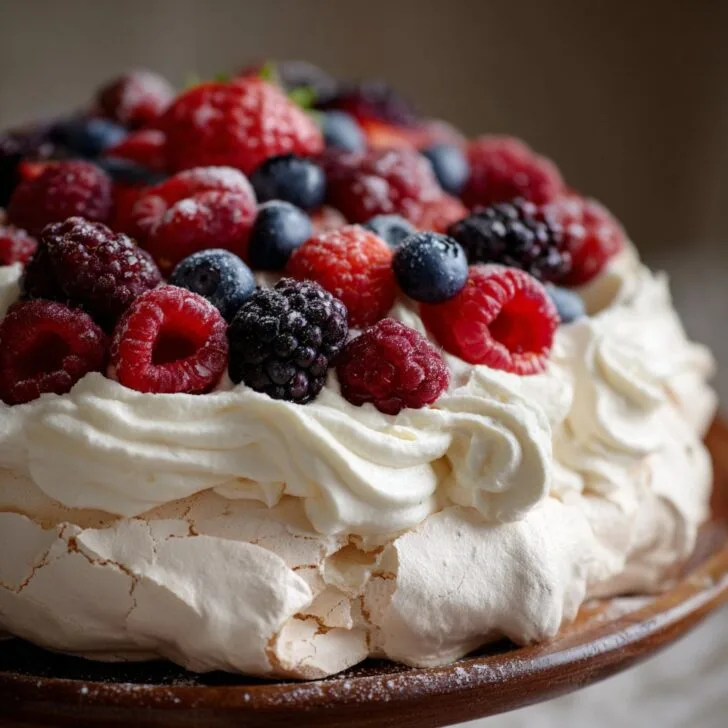
- Spoon the cream onto the meringue, then tumble the berries on top. This is where I usually sneak a taste—quality control, right?
- Decorate with mint if you remember. And there you go. Mixed Berry Pavlova, looking fancier than it has any right to.
Some Notes (aka, Stuff I Figured Out the Hard Way)
- If your meringue weeps a bit of syrup, it’s probably just humidity or the sugar wasn’t fully dissolved. Doesn’t ruin anything, just messes with your self-esteem for about five seconds.
- I once tried using brown sugar—don’t. It tasted a bit odd, plus the meringue went beige (unless you’re after a tan pavlova, then go ahead).
- Letting the meringue cool in the oven really does help keep it from collapsing. I used to skip this. Now I know better.
Stuff I’ve Tried (And Sometimes Regretted)
- Adding a touch of lemon zest to the cream—honestly, pretty bright and lively!
- Using frozen berries straight from the freezer—works fine in a pinch, but they can make the pavlova soggy if you pile them on while still icy.
- Chocolate shavings on top... Not my cup of tea (but my mate Tom loved it, so maybe worth a shot).
- Tried piping mini pavlovas once, but they just fused into each other—so much washing up, too.
Do I Really Need Fancy Equipment?
A stand mixer makes life easier, not gonna lie. But a hand mixer and a big bowl does the trick too. If you only have a whisk and a sense of adventure, well, I admire your spirit (just make sure to stretch first). Don’t stress if you’re missing a spatula—just use a big spoon or the back of a ladle. Sometimes I use my hands, don’t tell anyone.


How to Store Your Pavlova (If You Even Have Leftovers)
In theory, you can keep the assembled pavlova in the fridge for a day, maybe two, but the meringue softens up. Honestly, in my house, it never lasts more than a day. If you need to make ahead, bake the meringue a day early and keep it airtight (I once used a cake carrier—worked a treat). Only add the toppings right before serving.
This Bit’s About Serving (And Family Traditions)
I like to plonk it right in the middle of the table and let everyone dig in—no slicing, just spoons and chaos. Sometimes we do a little drizzle of homemade berry sauce (if I’m feeling extra). My aunt swears by a dusting of cocoa powder, but I think she just likes making a mess.
Pro Tips (From Someone Who’s Messed Up Plenty)
- Seriously, don’t rush beating the egg whites. I once tried to multitask, got distracted by a text, and ended up with a puddle. Not recommended.
- If you start to see grains of sugar when you rub the meringue between your fingers, keep beating—it should feel smooth, not gritty.
- Don’t assemble until you’re ready to eat, unless you fancy a meringue puddle (delicious, but not what we’re after).
FAQ (Because Friends Really Have Asked Me These!)
- Can I use frozen berries?
- Oh, absolutely—just thaw and drain them first or your pavlova will get a bit swampy. I’ve done it, and the world didn’t end.
- My meringue cracked—should I panic?
- Nope! Cracks add character (and give you a place to shove more cream). Trust me, even the messiest pavlova gets devoured.
- Can I make the meringue ahead?
- Yeah, just keep it dry and airtight. I actually think it tastes better the next day (but that might just be me).
- Is it gluten free?
- Yes! Unless you do something wild with the toppings. Nice one for friends who avoid wheat.
- Any good berry sauce recipes?
- Loads! I sometimes use this BBC compote recipe or just mash up a handful of berries with a bit of sugar and lemon juice. No need to overthink it.
- Where’d you learn to make this?
- I cobbled it together from a few cookbooks and sheer stubbornness. Sally’s Baking Addiction was a lifesaver early on.
Bit of a random aside: If you ever find yourself with leftover egg yolks (which you will), try making custard or lemon curd. Or just chuck them in an omelette. Waste not, want not, as my nan used to say.
Now go on—give Mixed Berry Pavlova a whirl. And if it all goes sideways, just call it Eton Mess and pretend you meant it. Happy baking!


Ingredients
- 4 large egg whites, at room temperature
- 1 cup granulated sugar
- 1 teaspoon cornstarch
- 1 teaspoon white vinegar
- 1 teaspoon vanilla extract
- 1 cup heavy whipping cream
- 2 tablespoons powdered sugar
- 1 cup strawberries, hulled and sliced
- ½ cup blueberries
- ½ cup raspberries
- ½ cup blackberries
Instructions
-
1Preheat the oven to 250°F (120°C). Line a baking sheet with parchment paper and draw a 9-inch circle as a guide.
-
2In a clean bowl, beat the egg whites until soft peaks form. Gradually add the granulated sugar, one tablespoon at a time, beating until stiff, glossy peaks form.
-
3Gently fold in the cornstarch, vinegar, and vanilla extract. Spoon the meringue onto the parchment paper, shaping it into the circle and creating a slight well in the center.
-
4Bake for 1 hour and 15 minutes, then turn off the oven and let the pavlova cool completely inside the oven with the door slightly ajar.
-
5Whip the heavy cream with powdered sugar until soft peaks form. Spread the whipped cream over the cooled meringue base.
-
6Top with strawberries, blueberries, raspberries, and blackberries. Serve immediately.
Approximate Information for One Serving
Nutrition Disclaimers
Number of total servings shown is approximate. Actual number of servings will depend on your preferred portion sizes.
Nutritional values shown are general guidelines and reflect information for 1 serving using the ingredients listed, not including any optional ingredients. Actual macros may vary slightly depending on specific brands and types of ingredients used.
To determine the weight of one serving, prepare the recipe as instructed. Weigh the finished recipe, then divide the weight of the finished recipe (not including the weight of the container the food is in) by the desired number of servings. Result will be the weight of one serving.
Did you make this recipe?
Please consider Pinning it!!