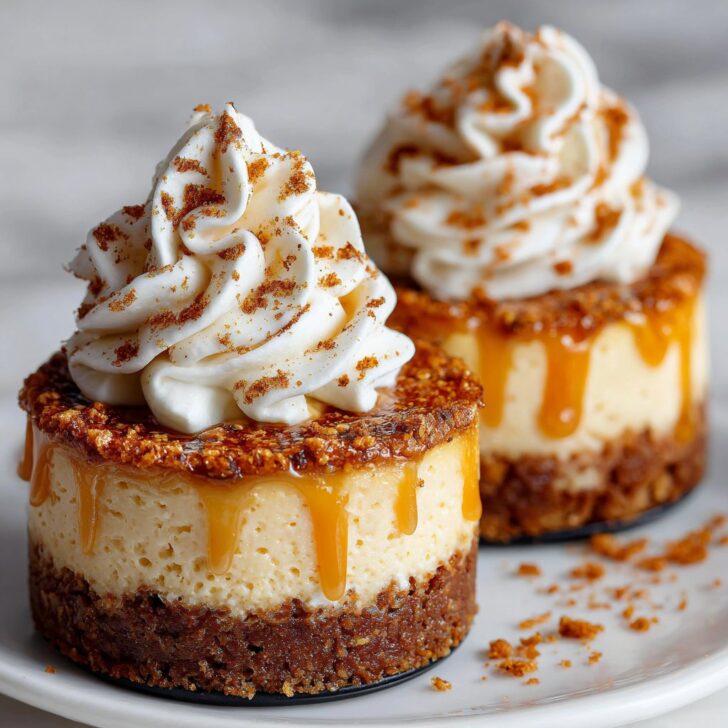

Let Me Tell You About These Mini Pumpkin Cheesecakes...
Alright, pull up a chair—I've got a good one for you. So, the first time I made these mini pumpkin cheesecakes with gingersnap crust was for a last-minute Friendsgiving. I panicked, because who brings mini cheesecakes to an event dominated by pies? Well, I did! And honestly, people lost their minds a little bit (one friend even tried to sneak a second before dessert was officially served). Plus, the crust always gives my kitchen that spicy-sweet smell I wish I could bottle up. Or maybe just stuff into a candle. Anyway, if you want to make a dessert that's a little more interesting—and, dare I say, cuter—than your basic pumpkin pie, here we go. And yes, the first batch I made was a bit of a mess, but that's half the fun, right?
Why I Keep Making These (And Why You Might, Too)
I bake these whenever I want to impress people but don't have the energy for a full cheesecake. My family, especially my cousin who claims not to "like pumpkin," polishes them off embarrassingly fast. (It's probably the gingersnap crust—something about that spicy crunch just gets everyone.) Plus, they're bite-sized, so technically you can eat three without it counting as a real dessert. I used to have issues getting the crust not to fall apart, but after a few tries (and, okay, a few mild tantrums with the food processor), I've mostly sorted it out. It's honestly become my go-to fall treat, and if you like the flavor of pumpkin pie but less squishy—these are for you.
Here’s What You’ll Need (And What I Occasionally Swap)
- 1 ½ cups gingersnap cookie crumbs (I use store-bought cookies, but if you want to bake your own, knock yourself out. My grandma swore by Nabisco, but the Aldi brand works fine.)
- 3 tablespoon melted butter (sometimes, if I’m out, I blend in a spoonful of coconut oil—totally works)
- 8 oz cream cheese, softened (I’ve used Neufchâtel when I’m feeling "healthier")
- ½ cup pumpkin puree (the canned stuff is fine; if you’ve got time to roast and mash your own, you’re a better person than me)
- ¼ cup white sugar (once I ran out and used brown sugar—turns out, it’s delicious)
- 1 large egg
- ½ teaspoon vanilla extract (more or less, I just eyeball it honestly)
- ½ teaspoon ground cinnamon
- ¼ teaspoon ground ginger (or pumpkin pie spice if you’re not fussed with measuring)
- Pinch of salt
- Optional: Whipped cream or a sprinkle of extra gingersnap crumbs for topping
How I Actually Make These Mini Pumpkin Cheesecakes
- Preheat your oven to 325°F (160°C). Line a 12-cup muffin tin with paper liners (or, if you’re out, just grease the heck out of the pan and hope for the best—been there!).
- In a bowl, mix gingersnap crumbs and melted butter. It should look a bit like wet sand; if it feels dry, add another splash of butter. Spoon about a heaping tablespoon into each liner and press it down. I use a shot glass for this, but fingers work too. (This is usually where I sneak a crumb or two.)
- Bake the crusts for 5 minutes—just enough to set them. They smell amazing right away, so don’t get distracted and forget them. Ask me how I know.
- Meanwhile, beat cream cheese in a medium bowl until creamy and smooth. Add pumpkin puree, sugar, egg, vanilla, and spices. Mix until well combined—don’t worry if you see a few lumps; they’ll mostly disappear during baking.
- Spoon the pumpkin mixture evenly over the crusts. Fill them most of the way up, but not to the tippy-top (they puff a little).
- Bake 18-22 minutes, until just set. They should jiggle slightly in the center but not look soupy. If you overbake, they get a bit tougher but still taste good (trust me, I’ve done it).
- Cool in the pan for at least 30 minutes. Then chill in the fridge for a couple hours. Here’s a tip: they taste even better after a night in the fridge, though I admit I rarely manage to wait that long.
- Top with whipped cream or extra cookie crumbs if you’re feeling fancy. Or both.
Notes I Learned the Hard Way
- If you use low-fat cream cheese, the texture gets a bit weird, kind of like mousse but less satisfying. Just go full-fat. Life’s short.
- Crusts do sometimes stick; parchment liners help, but I’ve also just pried them out gently with a butter knife. Don’t stress.
- Actually, I find it works better if you let the cheesecakes sit at room temp for ten minutes before eating. The flavors pop more.
Some Fun Swaps (And One Flop)
- Once I used crushed Biscoff cookies for the crust—super tasty, although a bit sweeter than I prefer.
- Swapped half the cream cheese for Greek yogurt by accident (don’t ask)—it was edible, but not quite right. Wouldn’t do it again.
- Tried adding a swirl of caramel before baking, but it disappeared. Maybe add caramel after baking instead.
Equipment—And What to Do If You’re Missing Something
- Muffin tin is ideal, but I’ve used silicone cupcake molds on a baking sheet when I couldn’t find mine. They wobble a bit, but it works.
- No electric mixer? I’ve mashed everything with a fork and a lot of elbow grease—takes longer, but totally doable. Good stress relief, too.
- Shot glass for pressing crusts is optional, but it makes you feel like a pro.


How to Store Them (If They Even Last)
Pop them in an airtight container and store in the fridge. They’re good for 3 days, in theory, though honestly, in my house they never last more than a day! You can freeze them for a couple weeks, but the texture gets a bit denser. Still tasty, just different.
How I Like to Serve Them
At family get-togethers, I set these out on a big platter and let people grab their own—no forks necessary, really (though my aunt insists on one). Sometimes I top each with a dollop of real whipped cream and a drizzle of maple syrup. It feels fancier, even if you’re just wearing sweatpants.
Things I’ve Messed Up So You Don’t Have To (AKA Pro Tips)
- I once tried rushing the chilling step and ended up with gooey cheesecake muffins—not what I was going for. Give them time to set. It’s worth it.
- Don’t overmix the batter—just get it smooth and call it a day. Overmixing makes them dense and kind of rubbery (learned that the hard way).
- If your crust mixture looks too dry, just add a bit more butter. There’s no medal for stinginess here.
Some Real-Life Questions I’ve Gotten
- Can I make these gluten-free?
Yep, just use gluten-free gingersnaps. I like Pamela’s, but really, any crunchy gluten-free cookie will do. - What if I don’t have a muffin tin?
Honestly, you can use ramekins or even small mason jars, though baking time might change a bit. Just keep an eye on them. - Can I use fresh pumpkin?
Sure, but make sure you really drain it well. Too much water = sad, soggy cheesecakes. Canned is just easier, in my opinion. - How do I get that smooth top?
Sometimes mine crack a little, but I just cover it with whipped cream. Or you could try tapping the tray gently before baking to pop air bubbles. Or, you know, embrace the rustic look. - Where do you get your spices?
Usually the supermarket, but once I ordered from The Spice House—their cinnamon is incredible. Makes a difference, honestly. - Can I double the recipe?
Oh, absolutely. I’ve done it when I need a whole mess of them for a party. You’ll need two tins (or just bake in shifts—patience, grasshopper).
And now, for no real reason except that I love it, here's a totally unrelated fact: did you know pumpkins are technically a fruit? My nephew told me that and I checked—he was right. Kids these days.
If you want more pumpkin inspiration, I like this big pumpkin cheesecake recipe too, but honestly, minis are more fun. Hope you love these as much as I do—let me know how they turn out, and if you end up creating a new variation, please share! (But maybe skip the Greek yogurt thing.)


Ingredients
- 1 cup gingersnap cookie crumbs
- 3 tablespoons unsalted butter, melted
- 8 oz cream cheese, softened
- ½ cup canned pumpkin puree
- ⅓ cup granulated sugar
- 1 large egg
- ½ teaspoon vanilla extract
- ½ teaspoon ground cinnamon
- ¼ teaspoon ground nutmeg
- Pinch of salt
Instructions
-
1Preheat oven to 325°F (163°C). Line a 12-cup muffin tin with paper liners.
-
2In a small bowl, combine gingersnap cookie crumbs and melted butter. Divide the mixture evenly among the muffin cups and press firmly to form the crust.
-
3In a medium bowl, beat cream cheese until smooth. Add pumpkin puree, sugar, egg, vanilla extract, cinnamon, nutmeg, and salt. Mix until well combined.
-
4Spoon the cheesecake filling over the crusts, filling each cup nearly to the top.
-
5Bake for 18-20 minutes, or until centers are set. Let cool to room temperature, then refrigerate for at least 2 hours before serving.
Approximate Information for One Serving
Nutrition Disclaimers
Number of total servings shown is approximate. Actual number of servings will depend on your preferred portion sizes.
Nutritional values shown are general guidelines and reflect information for 1 serving using the ingredients listed, not including any optional ingredients. Actual macros may vary slightly depending on specific brands and types of ingredients used.
To determine the weight of one serving, prepare the recipe as instructed. Weigh the finished recipe, then divide the weight of the finished recipe (not including the weight of the container the food is in) by the desired number of servings. Result will be the weight of one serving.
Did you make this recipe?
Please consider Pinning it!!