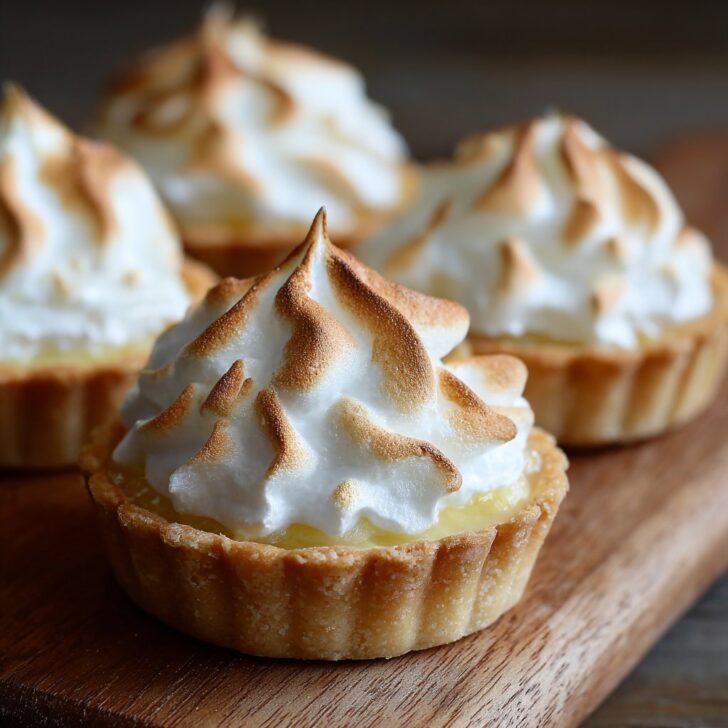

So, About These Mini Lemon Meringue Pies...
I have this memory, you know, of my little cousins sneaking into the kitchen when I wasn’t looking and pinching the toasty tops off these mini lemon meringue pies before dinner. I’d play it cool but secretly, I was gutted (I mean, who wouldn’t want that golden top?). If you ask me, these pies are the right kind of trouble—tiny, zesty, a little messy, and they vanish faster than you can say "lemon." Anyway, I started making them back in college when I needed something impressive but not too fussy. Now, it’s just sort of a family thing. Also, if anyone tells you pie can’t be cute, point them at these minis.
Why You'll Love This Recipe
I make this when I want to look like I've spent hours baking (but, actually, it's pretty manageable!). My family goes absolutely bonkers for these because they’re like sunshine in a pastry shell—sometimes, literally, the only thing that brightens up our rainy Saturdays. Oh, and don’t get me started on the crust—I used to dread making pastry, but with these, you can totally take a shortcut! (I won’t tell if you won’t.) I once tried skipping the meringue (I know, blasphemy), and my dad almost staged a protest. So, lesson learned.
What You'll Need (Honestly, Don't Stress)
- 1 batch of mini tart shells (store-bought is fine, or use your favorite homemade shortcrust—my gran used to say only Sally’s recipe would do, but I reckon any will work)
- 3 large eggs, separated (the yolks will make it rich, but I’ve swapped in 2 yolks + 1 whole egg when I’m short)
- ¾ cup granulated sugar (plus a bit more for the meringue—sometimes I use caster because it dissolves quicker)
- ¼ cup fresh lemon juice (I squeeze my own, but in winter I’ve used the bottled stuff and, honestly, it’s still good)
- Zest of 1 lemon (or more if you like it punchy)
- 2 tablespoon unsalted butter (I’ve used salted in a pinch; just dial back the extra salt)
- ¼ teaspoon cream of tartar (you can skip this, but the meringue holds better with it)
- A pinch of salt
- ½ teaspoon vanilla extract (optional, but it gives a nice warmth)
Optional: A dash of patience if you’re making meringue on a humid day.
How I Actually Make Mini Lemon Meringue Pies
- Prep the tart shells: If you’re using store-bought, just pop them on a tray. If making your own, press the dough into mini muffin tins and prick with a fork. Bake at 350°F (180°C) for about 10-12 minutes; you want pale gold. (This is usually when I put the kettle on.)
- Whip up the lemon filling: In a saucepan, whisk together egg yolks (plus that extra egg, if using), sugar, lemon juice, zest, and salt. Stir over medium-low heat. Don’t wander off! It’ll thicken after 5 minutes or so. Take it off the heat, then stir in the butter till glossy and smooth. (Here’s where I sneak a taste—so tart, so good!)
- Fill the shells: Spoon the lemon filling into each tart shell. I’ve overfilled a few before, and it’s fine—it just means more gooeyness. Let them cool a bit while you make the meringue.
- Meringue time: Beat the egg whites with cream of tartar and a pinch of salt until soft peaks form (it’s okay if it looks a bit weird at first—mine always does). Gradually add in a few spoonfuls of sugar until glossy and stiff. Add vanilla if you’re feeling fancy.
- Top and toast: Dollop (or pipe if you want to show off) the meringue on the tarts. I use the back of a spoon to make little peaks. Bake at 400°F (200°C) for about 5 minutes, just till golden. Or, use a kitchen torch if you’re feeling dramatic. Just don’t set off the smoke alarm like I did once.
- Let them cool (ish). I mean, who waits? But they set better if you give them half an hour.
My Honest Notes (From The School of Knockabout Baking)
- The meringue sometimes shrinks away from the crust if you don’t spread it right to the edge. Learned that the hard way.
- If you overcook the lemon filling, it can go a bit lumpy. Just whisk like mad, or call it “rustic.”
- I once tried making the filling in the microwave. It sort of worked, but it was, um, very lumpy.
Variations I’ve Tried (Some Winners, Some...Not)
- Swapping out lime for lemon—delightful! Like a tropical holiday in a bite.
- Used coconut crust once instead of pastry—nice, but a bit crumbly. Still, worth a go if you love coconut.
- Tried making these gluten free with almond flour shells. Actually, I think they tasted even better! Here’s a vegan lemon curd I tried with mixed results.
- Oh, and once I added a berry compote swirl under the meringue. Didn’t set properly, but the flavor was fab.
Gear I Use (And What To Do If You Don’t Have It)
Mini muffin pan is best for the tart shells, but if you don’t have one, honestly, I’ve used cupcake liners on a regular tray—just not as "posh" looking. Electric mixer helps for the meringue, but I’ve done it with a whisk and some elbow grease (arms were sore for days though, just saying).


How to Store These (If You Even Need To)
Keep them in a covered container in the fridge—they’re good for about two days, though honestly, in my house they’re usually gone by sundown. The meringue can weep a bit after a day, so I try to make them close to serving time (if I’m organized, which is rare).
How I Like to Serve Mini Lemon Meringue Pies
I usually serve these as is, but sometimes I dust a little extra zest on top, just to show off. My aunt insists on serving them with a pot of strong tea and a stack of mismatched plates; she says it makes everything taste fancier. Also, I’ve been known to eat one straight from the fridge at midnight. No shame.
Things I Learned the Hard Way (Pro Tips, Sort Of)
- Don’t try to pipe the meringue with a ziplock bag that’s too thin—it split all over my hands. Not my finest moment.
- I once rushed the cooling step and the filling ran out. Just…take a breath and give it time.
- If you’re using bottled lemon juice, add a little extra zest for kick.
Mini FAQ (Because People Always Ask)
- Can I freeze these? Sort of. The crust is fine, but the meringue gets a bit odd after thawing. I’d just eat them fresh if you can (shouldn’t be hard!).
- What if my meringue won’t peak? Make sure your bowl is squeaky clean and no yolk snuck in—happens to me more often than I like to admit.
- Do I have to use cream of tartar? Nah, I’ve skipped it. The meringue is just a bit less sturdy. Not a dealbreaker.
- Can I make the filling ahead? Yep, it keeps in the fridge for a day or two. Actually, I think it tastes better the next day, but don’t quote me!
- Why are my shells soggy? I probably overfilled them, or my oven ran cool. Try baking the crust a bit longer next time.
Random digression: Once tried making these with blood orange instead of lemon. Turned out pink and surprisingly dramatic—maybe good for Valentine’s Day? Might be too much for some though. Up to you!
If you want more pie inspiration, I love checking out King Arthur Baking’s lemon meringue for technique ideas. And for a video walkthrough, there’s loads on YouTube—the accents always crack me up, but the pies look delicious!


Ingredients
- 1 sheet refrigerated pie crust
- 3 large eggs, separated
- ½ cup granulated sugar
- ¼ cup fresh lemon juice
- 1 tablespoon lemon zest
- 2 tablespoons cornstarch
- 1 cup water
- ¼ cup unsalted butter
- ¼ teaspoon cream of tartar
Instructions
-
1Preheat oven to 375°F (190°C). Cut pie crust into circles and press into a muffin tin to form mini pie shells. Bake for 10-12 minutes until golden. Let cool.
-
2In a saucepan, whisk together egg yolks, sugar, cornstarch, lemon juice, lemon zest, and water. Cook over medium heat, stirring constantly, until thickened. Remove from heat and stir in butter. Spoon lemon filling into cooled pie shells.
-
3In a clean bowl, beat egg whites with cream of tartar until soft peaks form. Gradually add 2 tablespoons sugar and continue beating until stiff peaks form.
-
4Pipe or spoon meringue over the lemon filling, making sure to seal the edges.
-
5Bake pies for 10-13 minutes, or until meringue is golden brown. Cool before serving.
Approximate Information for One Serving
Nutrition Disclaimers
Number of total servings shown is approximate. Actual number of servings will depend on your preferred portion sizes.
Nutritional values shown are general guidelines and reflect information for 1 serving using the ingredients listed, not including any optional ingredients. Actual macros may vary slightly depending on specific brands and types of ingredients used.
To determine the weight of one serving, prepare the recipe as instructed. Weigh the finished recipe, then divide the weight of the finished recipe (not including the weight of the container the food is in) by the desired number of servings. Result will be the weight of one serving.
Did you make this recipe?
Please consider Pinning it!!