
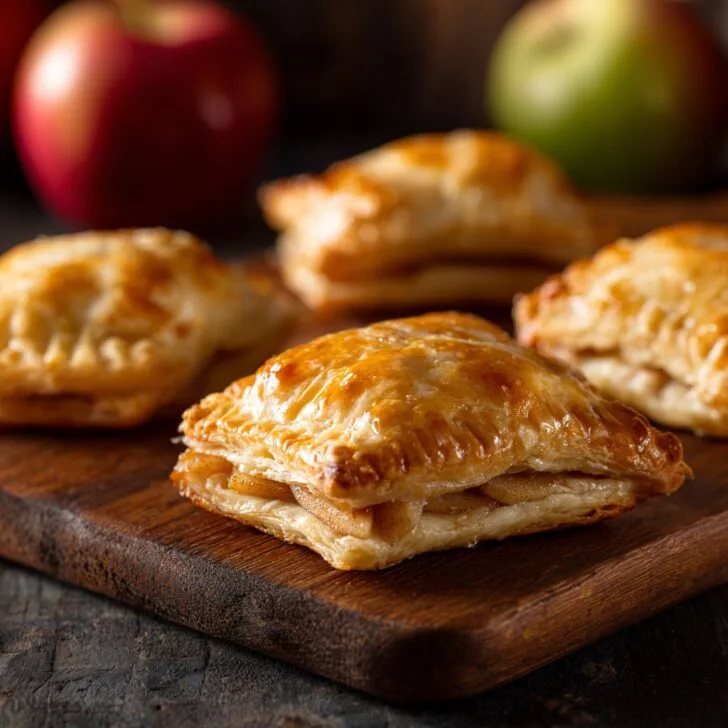
Let’s Talk About Mini Apple Hand Pies (and a Tangent or Two)
I swear, there’s something about mini apple hand pies with puff pastry that just gets me. Maybe it’s the flakey layers, or the way the apple filling gets all gooey and cozy in the middle. Anyway, I started making these little pies back when my son came home from school one day with a half-eaten apple and a look like he’d found buried treasure. So, instead of letting the apple go to waste (I hate waste—except when it comes to socks. Where do they even go?!), I decided to wrap it up in some store-bought puff pastry. Never looked back.
So here we are. If you’re ever in the mood for something sweet, easy, and a little bit fancy-feeling (without actually being fancy), this is your jam. Or pie, I guess. And yes, the first time I made these, the kitchen looked like a small flour tornado had hit. But honestly, that’s half the fun.
Why You'll Love This (Or, Why I Keep Making It)
I make these hand pies when I want dessert but can't be bothered with a million steps—or when my family is circling the kitchen like sharks. They go wild for these, honestly. It’s also my go-to when there’s leftover apples from the bottom of the fruit bowl (you know, the ones that look a bit sad). And sometimes I just crave that cinnamon-apple smell—my house feels like an autumn festival, even if it’s July. If you’ve ever been frustrated by making proper pie dough (ugh), this skips that bit entirely. Plus, I always sneak a piece before anyone else spots them (not sorry).
What You’ll Need (Plus My Not-So-Secret Substitutions)
- 2 medium apples (Granny Smith’s great, but I’ve used whatever’s rolling around—Honeycrisp is lovely too)
- 2 tablespoons granulated sugar (sometimes I do half brown sugar for more caramel vibes)
- 1 teaspoon cinnamon (or just shake in however much feels right—my grandmother always did!)
- 1 tablespoon lemon juice (if you don’t have it, a splash of orange juice works too)
- 1 package puff pastry, thawed (I usually grab Pepperidge Farm but literally any brand, even the cheap stuff, is fine)
- 1 egg, beaten with 1 tablespoon water (for the shiny golden finish, but sometimes I skip it if I’m being lazy)
- Pinch of salt
- Optional: a handful of raisins or chopped nuts, especially if you want to get a little wild
How I Make Them (With a Few Sidetracks)
- Preheat your oven to 400°F (that’s about 200°C for my friends across the pond). Line a baking sheet with parchment—or don’t, but cleaning the tray is less fun than eating pies.
- Chop the apples into little chunks (think the size of a dice or maybe just slightly bigger). I don’t always peel them, but you can. Toss them in a bowl with sugar, cinnamon, lemon juice, salt, and whatever extras you fancy. This is where I usually sneak a taste (for quality control, obviously).
- Roll out the puff pastry on a lightly floured surface. If it sticks, just dust on a bit more flour—no need to stress. Cut into squares or circles, maybe 4 inches each. I use a glass as a cutter sometimes. Does the trick.
- Spoon a bit of apple filling onto half of each square (not too much or you’ll get a leaky pie situation, trust me).
- Fold over the pastry to cover the filling. Press the edges together with a fork—don’t worry if they look a bit messy, they puff up and hide all sins. If you want to get fancy, crimp them. I almost never do.
- Brush the tops with the egg wash. (When I forget this, they still taste great, but they don’t get that epic golden color.) Cut a tiny slit in the top for steam to escape. Or not. They haven’t exploded—yet.
- Bake for 18-22 minutes, or until they look puffed and golden. Sometimes I get impatient and pull them out early—don’t. They’re better with a little extra color.
- Cool for at least 10 minutes. (Or don’t, but I’ve burned my tongue more than once. Live and learn.)
Notes from My Kitchen Disasters
- If you overfill them, they leak. But then you get caramelized sugar on the tray, and honestly, that’s delicious.
- I’ve tried freezing them before baking—worked fine, but needed a couple more minutes in the oven. Just don’t forget they’re in there. (Guilty.)
- Puff pastry gets sticky if it gets too warm. Chuck it back in the fridge for 10 minutes if it’s being stubborn.
Variations I’ve Tried (and Some That Flopped)
- With pears: Actually, this is fantastic—swap apples for pears, maybe add a tiny bit more lemon juice.
- Cheddar cheese: Sounds odd, but a pinch inside with the apples? Next level. My kids weren’t convinced, but I loved it.
- Nutella version: Once tried swapping apples for Nutella and banana. Not my finest hour—way too runny. Maybe you’ll have better luck?
- Spices: Cardamom or ginger are nice if you want to mix things up.
Gear You Need (But Not Really)
- Baking sheet: Any flat tray works. I’ve even used the bottom of my grill pan in a pinch.
- Parchment paper: Not essential, just saves on cleaning. If you don’t have any, butter the tray. (Or line with foil; not traditional, but hey.)
- Pastry brush: I’ve 100% used my fingers or a bit of kitchen paper before. Works fine.
- Knife or pizza cutter: For cutting pastry. Or tear it (rustic!).


Storing These (Not That They Last Long)
Supposedly, you can keep these in a container for up to two days at room temp, or a few days in the fridge. But honestly, in my house, they vanish by the next morning. If you do need to reheat, pop them in the oven, not the microwave—keeps them crisp.
How I Like to Serve Them
Warm, with a scoop of vanilla ice cream or a dollop of whipped cream. Or just with coffee at breakfast—no one’s judging. Sometimes I sprinkle a little powdered sugar on top if I’m feeling fancy, but usually I just grab them straight off the tray. Once, my sister brought salted caramel sauce and, well, that was dangerous.
Pro Tips (Learned the Hard Way)
- Don’t rush thawing the pastry—one time I nuked it in the microwave and it turned into a sad, sticky mess. Room temp is best, even if it means waiting.
- Actually, I find it works better if you cool the filling before putting it on the pastry. Sometimes I don’t bother, but it does help stop leaks.
- Let them cool a bit before eating. (Yes, I know. But I’ve scorched my tongue more than I care to admit!)
- If you want to dig deeper into pastry science, I found Sally’s Baking Addiction super helpful for my first few tries.
FAQ (Answering Questions From the Wilds of My Inbox)
- Can I use frozen apples? Sure, but thaw and drain them first or you’ll get soggy pies. I did that once; it was...not great.
- Is homemade puff pastry worth it? Maybe, if you love a project. But I rarely have the time or patience—store-bought’s just fine.
- What’s the best apple? Honestly, whatever’s in the fruit bowl. But Granny Smith or Pink Lady are top picks for me.
- How do I stop them leaking? Don’t overfill, and press the edges firmly. Or embrace the leaks, because caramelized bits are the best part.
- Can I freeze the baked pies? Yep! Let them cool, wrap, and freeze. Reheat in the oven. This post on freezing pies is handy.
- Can I make these gluten-free? I’ve tried with GF puff pastry, and it worked fine. Sometimes a bit more crumbly, but still tasty.
There you go—mini apple hand pies with puff pastry, in all their imperfect glory. If you give these a go, let me know what twists you try! (And if you find those missing socks, send word, yeah?)


Ingredients
- 1 sheet puff pastry, thawed
- 2 medium apples, peeled, cored, and diced
- 2 tablespoons granulated sugar
- 1 tablespoon brown sugar
- 1 teaspoon ground cinnamon
- ½ teaspoon lemon juice
- 1 tablespoon all-purpose flour
- 1 egg, beaten (for egg wash)
- 1 tablespoon coarse sugar (optional, for sprinkling)
Instructions
-
1Preheat the oven to 400°F (200°C) and line a baking sheet with parchment paper.
-
2In a bowl, combine diced apples, granulated sugar, brown sugar, cinnamon, lemon juice, and flour. Mix well to coat the apples evenly.
-
3Roll out the puff pastry sheet on a lightly floured surface and cut into 8 equal rectangles.
-
4Place a spoonful of the apple mixture onto one half of each rectangle, leaving a border around the edges.
-
5Brush the edges with beaten egg, fold the pastry over the filling, and press the edges with a fork to seal. Cut a small slit on top of each pie for steam to escape.
-
6Arrange the pies on the prepared baking sheet, brush tops with egg wash, and sprinkle with coarse sugar if desired. Bake for 20-22 minutes or until golden brown. Cool slightly before serving.
Approximate Information for One Serving
Nutrition Disclaimers
Number of total servings shown is approximate. Actual number of servings will depend on your preferred portion sizes.
Nutritional values shown are general guidelines and reflect information for 1 serving using the ingredients listed, not including any optional ingredients. Actual macros may vary slightly depending on specific brands and types of ingredients used.
To determine the weight of one serving, prepare the recipe as instructed. Weigh the finished recipe, then divide the weight of the finished recipe (not including the weight of the container the food is in) by the desired number of servings. Result will be the weight of one serving.
Did you make this recipe?
Please consider Pinning it!!