
So Here’s the Story With This Lemon Blueberry No-Bake Cheesecake…
I can’t even count how many times I’ve made this Lemon Blueberry No-Bake Cheesecake for friends—one time I whipped it up at, like, midnight after a movie marathon because we were all still hungry, and, honestly, it turned out better than half the ones I'd planned in advance. Maybe it’s just the thrill of late-night improvisation? Anyway, this cheesecake’s been a hit at every family BBQ, random Tuesday, and even at that one potluck where I forgot to bring a serving spoon (we made do with a spatula—no shame!). Oh, and if you spill a bit of lemon zest on the counter, just call it kitchen confetti. No one's judging here.
Why I Keep Making This (and Maybe You Will Too)
I make this Lemon Blueberry No-Bake Cheesecake when I want something that looks fancy but requires basically zero oven time (especially when the kitchen feels like a sauna in July). My family practically inhales it; my cousin asked me for the recipe so many times I finally just texted her a picture of my messy ingredient list. It’s one of those desserts that makes you look like you tried way harder than you actually did, and who doesn’t love that? If you’ve ever had a regular cheesecake crack on you and wanted to scream into the void, well, this one is pretty much foolproof (I still get nervous flipping it out of the pan, but, honestly, it’s never fallen apart on me. Yet.)
What Goes Into This Cheesecake (Substitutions and All)
- 200g digestive biscuits or graham crackers (sometimes I use ginger snaps if I’m feeling wild or, once, even Oreos—my little niece swears they’re better)
- 90g (about 6 tbsp) melted unsalted butter (I’ve used salted before; honestly, it just gives it a bit of a salted caramel thing… not bad)
- 400g (about 1 ¾ cups) full-fat cream cheese (Philadelphia, supermarket brand, whatever you’ve got—my gran always insisted on Philly, but I don’t always listen)
- 100g (about ½ cup) powdered sugar (sometimes I run out and use regular sugar, and it’s… slightly grainy, but still edible!)
- Zest and juice of 1 large lemon (or two tiny ones; my lemon tree is wildly inconsistent, so I wing it)
- 250ml (1 cup) heavy cream (double cream if you’re in the UK; once I used whipped topping in a pinch and it was fine, though not as rich)
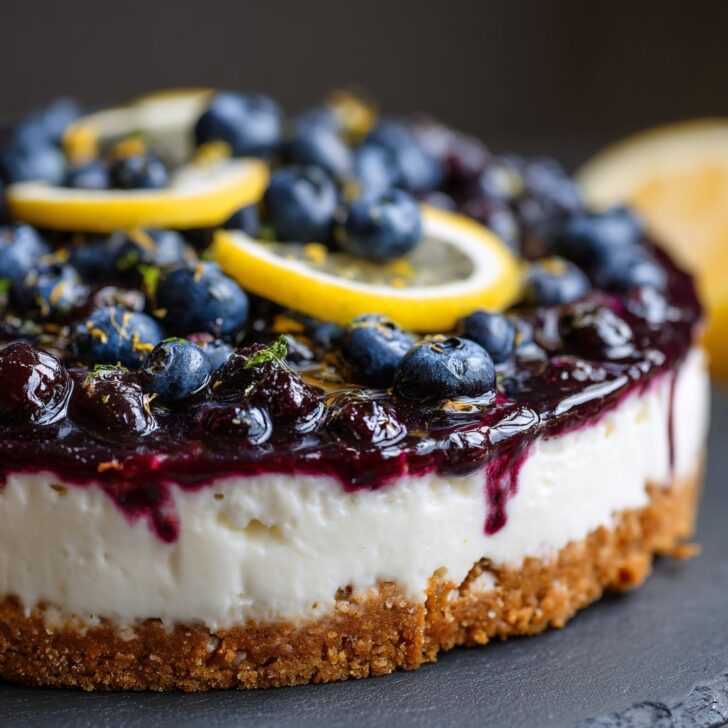
- 200g (about 1 ½ cups) fresh blueberries (frozen work if you thaw and drain them a bit, but they do bleed purple streaks—don’t panic)
- 1 teaspoon vanilla extract (sometimes I use lemon extract for extra zing)
- Optional: extra berries, a sprig of mint, or honestly just a shower of more lemon zest for serving
How I Throw This Together (And Where I Usually Sneak a Taste)
- Crush your biscuits/graham crackers until they’re pretty fine—sometimes I use a food processor, but a zip-top bag and a rolling pin work too (and it's weirdly satisfying). Mix with your melted butter till it looks like damp sand. Press this into the bottom of a springform pan (mine’s 8-inch, but I don’t stress if it’s a bit bigger or smaller). Chill in the fridge for at least 20 mins—sometimes I skip this if I’m super impatient, but it’s definitely firmer if you let it set.
- In a big bowl, beat the cream cheese and powdered sugar until smooth. This is where I usually sneak a taste. Add the lemon zest, juice, and vanilla; beat again till it looks creamy and you want to stick your face in it. (Don’t, but I mean…)
- Whip your cream in a separate bowl until you get soft peaks—don’t go too far or you’ll end up with butter (ask me how I know; actually, on second thought, don’t ask).
- Fold the whipped cream into your cream cheese mixture gently. It might look a bit lumpy or weird at first—don’t worry, it always smooths out in the end.
- Carefully fold in most of the blueberries, saving a few for the top. If you’re using frozen, prepare for some purple swirls—it’s not a bad thing, just… colorful.
- Scoop the whole lot onto your chilled base, smooth the top (a spatula or even the back of a spoon is fine), and scatter over your remaining berries. Add mint if you’re feeling fancy.
- Chill at least 4 hours (overnight is best, though I almost never have that much patience). If you try to cut it too soon, it’s more like cheesecake mousse—which, to be honest, is still delicious.
Some Notes I Learned the Hard Way
- If your kitchen is hot, the base can get weirdly crumbly—sometimes I just pop the whole pan in the freezer for 15 minutes instead.
- Don’t stress if your blueberries sink to the bottom or float on top—depends on how gently you fold them in. Either way, it tastes great.
- Actually, I find it works better if you zest the lemon before cutting it (I always forget, then curse myself while fishing slippery lemon halves out of the bowl).
- If you want really sharp lemon flavor, add a drop of lemon extract. Not too much, though—it can taste like furniture polish if you overdo it.
Experiments and Variations (Some Hits, Some Misses)
- Tried it once with raspberries—lovely, but they went a bit mushy. Maybe blackberries next time?
- Swapped in ginger snaps for the base at Christmas, and that got rave reviews (my nephew said it was like cheesecake and gingerbread had a baby).
- Once I tried a swirl of lemon curd on top—looked gorgeous, but was a bit too sweet for my taste. Maybe thin it with a bit of lemon juice next time?
- I do not recommend trying to make this with low-fat cream cheese. Just… don’t. It never sets and tastes weirdly chalky.
What If You Don’t Have All the Right Gear?
Honestly, a springform pan makes life easier, but I’ve made this in a regular cake tin lined with baking paper (makeshift sling style). You just have to be careful getting it out, and maybe use a spatula to wedge it free—if it cracks a bit, just cover it with extra berries, no big deal. If you don’t have an electric beater, a regular whisk (and some elbow grease) will do, but it’s a bit of a workout. Treat it as bonus cardio.


How Do I Store This (If There’s Any Left)?
Cover it and stick it in the fridge—it’ll keep for two or three days, though honestly, in my house it never lasts more than a day! I think it tastes even better the next day, when the lemon has had time to hang out with the cream cheese. You can freeze slices if you want, but I find the texture gets a bit weird. Up to you.
How I Like to Serve This (Plus the Family Ritual)
We usually cut big, fat slices and pile on extra blueberries. Sometimes a drizzle of honey or a dollop of thick Greek yogurt on the side—my mum likes it with hot tea, but I’m more of a lemonade-with-cheesecake person. If it’s a special occasion, I dust more lemon zest on top (purely for the drama).
Pro Tips (AKA, Learn From My Goofs)
- I once tried rushing the chilling step—huge mistake. It was tasty, but the slices looked like pudding plopped on plates. Just wait it out if you want neat slices.
- If your base isn’t holding together, try a little bit more melted butter. Or press it down really well—sometimes I use the bottom of a measuring cup.
- Don’t substitute low-fat cream cheese, really. Just… you’re better off with the full-fat stuff. Trust me.
FAQ (Stuff People Have Actually Asked Me—Some More Than Once!)
- Can I use bottled lemon juice? Eh, yeah, in a pinch. But, honestly, fresh lemons just taste brighter. If bottled’s all you’ve got, roll with it.
- Do I have to use blueberries? Nope! I’ve done strawberries, blackberries, even a mix of whatever was on sale. The texture changes, but it’s always tasty.
- Is it gluten-free? If you use gluten-free biscuits, absolutely. Just double-check your labels.
- Can I make it ahead? For sure. Actually, I tend to think it gets even better the next day. Just keep it wrapped up in the fridge.
- How do you get clean slices? Wipe your knife between cuts—or don’t, if you’re lazy like me. It’s cheesecake, not a wedding cake!
- Where do you get your springform pan? I got mine here—but any supermarket one will do. Or try this review for some options.
One Last Thing (Unrelated But, Hey, It’s My Recipe)
Did you know blueberries are technically not berries in the botanical sense? I only discovered that after a random trivia night (which I lost spectacularly, but at least I had cheesecake left over at home). Anyway, don’t let that ruin your day—the more you know, right? So, grab a fork, don’t worry about perfection, and enjoy your Lemon Blueberry No-Bake Cheesecake (messy kitchen and all).


Ingredients
- 200 g graham cracker crumbs
- 80 g unsalted butter, melted
- 400 g cream cheese, softened
- 200 ml heavy cream
- 100 g powdered sugar
- 2 tablespoon fresh lemon juice
- 1 teaspoon lemon zest
- 150 g fresh blueberries
- 1 teaspoon vanilla extract
Instructions
-
1In a medium bowl, combine graham cracker crumbs and melted butter. Mix until the crumbs are evenly coated.
-
2Press the crumb mixture firmly into the bottom of a 9-inch springform pan to form the crust. Chill in the refrigerator while preparing the filling.
-
3In a large bowl, beat the cream cheese until smooth. Add powdered sugar, lemon juice, lemon zest, and vanilla extract. Mix until well combined.
-
4In a separate bowl, whip the heavy cream until stiff peaks form. Gently fold the whipped cream into the cream cheese mixture until smooth and fluffy.
-
5Fold in half of the blueberries into the cheesecake filling. Pour the mixture over the chilled crust and smooth the top.
-
6Refrigerate the cheesecake for at least 4 hours or until set. Before serving, top with remaining blueberries and extra lemon zest if desired.
Approximate Information for One Serving
Nutrition Disclaimers
Number of total servings shown is approximate. Actual number of servings will depend on your preferred portion sizes.
Nutritional values shown are general guidelines and reflect information for 1 serving using the ingredients listed, not including any optional ingredients. Actual macros may vary slightly depending on specific brands and types of ingredients used.
To determine the weight of one serving, prepare the recipe as instructed. Weigh the finished recipe, then divide the weight of the finished recipe (not including the weight of the container the food is in) by the desired number of servings. Result will be the weight of one serving.
Did you make this recipe?
Please consider Pinning it!!