
Let Me Tell You About This Cake…
Alright, so here’s the scoop: last winter when my cousin Catie came over (unannounced, of course), I was absolutely starving for something chocolatey but not the sugar bomb kind that’d wreck my attempts at keto. So, what do you do when you’ve got ricotta in the fridge, exactly one bar of unsweetened chocolate, and a serious craving? Well, you experiment. This Keto Chocolate Ricotta Cake is now my flag in the sand. It’s fudgy, not too sweet, but rich in that way that makes you hum as you take a bite. Oh, and pro tip—I once dropped the bowl on the floor and the dog had a field day, but, hey, second batch turned out even better.
Why I Keep Coming Back to This
I make this when I want dessert but don’t want to risk my trousers getting any tighter. My family (even the die-hard sugar lovers) goes a bit loopy for this one. I suspect it’s the texture – not quite a brownie, not quite a cheesecake; somewhere in the middle. If you’ve ever struggled with gritty or overly dry keto treats, this is your fix. And honestly, there’s something oddly satisfying about mixing cheese and chocolate and having it actually work (unlike the time I tried to make ricotta pancakes and they tasted suspiciously like eggshells… we don’t talk about that anymore).
Here’s What You’ll Need (and What You Can Fudge)
- 1 ½ cups (370g) ricotta cheese (full fat is what I use, but honestly, part-skim works if that’s what’s lurking in your fridge)
- ½ cup (45g) almond flour (sometimes I swap in hazelnut flour for a nice twist, pretty sure Grandma would disapprove but she’s never here for cake anyway)
- ¾ cup granulated erythritol (I like Swerve, but monk fruit sweetener’s also fine—beware of stevia, though, unless you like that ‘cooling’ aftertaste…)
- 3 large eggs (fresh if you can swing it, but I’ve used the ‘best-before-last-week’ kind too and we all survived)
- ½ cup (100g) unsweetened chocolate, melted (Baker’s brand is what’s at the shop, but Lindt 90% works on a good day. In a pinch, a handful of sugar-free choco chips is alright, just nuke ‘em in the microwave)
- 2 tablespoon cocoa powder (Dutch process or whatever, just make sure it’s not sweetened)
- ⅓ cup heavy cream (or, as I did once, use plain yoghurt—it’s tangier, not bad at all!)
- ½ teaspoon vanilla extract (if you have it, otherwise a glug of coffee liqueur gives it a kick)
- Pinch of salt (seriously, it matters)
Let’s Make This Thing (Don’t Panic—It’s Easy)
- Preheat your oven to 350°F (180°C). I sometimes forget and have to wait, so maybe do this first so you’re not side-eyeing a cold oven later.
- Grease a cake pan (about 8-inch/20cm) or swirl with parchment if you’re lazy like me. If you’ve just got a loaf tin, I’ve done that too, turns out like brownies.
- Melt the chocolate. Usually, I break it into clumsy chunks, nuke it in a bowl in the microwave (stir every 20-30 seconds or it’ll burn, ouch), or melt gently in a pan. Let it cool a minute—you don’t want scrambled eggs.
- Grab a big bowl: Toss in the ricotta, sweetener, and cream. Mix until smooth (ish). A whisk works, or a fork if yours disappeared like mine did.
- Add eggs one at a time, whisking after each. Don’t stress if it looks a tad runny. It comes together, promise.
- Stir in the melted chocolate and vanilla. Here’s where I usually ‘accidentally’ drip some on the counter—worth it. Give it a quick taste if you want (though I’m obliged to say there’s raw egg. I risk it anyway).
- Add your almond flour, cocoa powder, and salt. Fold it in. Batter will be thick, but not cement. If it’s dry, a splash more cream helps.
- Pour into your tin, smooth the top (or leave it rustic—nobody will care).
- Bake for about 35-40 minutes, until the centre is set but the edges start to pull away. Or, stick a toothpick in and it should come out mostly clean (a little goo is fine; it’ll firm up as it cools). If it’s wobbly, give it another 5 minutes.
- Cool in the pan for 15 min (don’t skip, or it’ll collapse faster than my New Year’s resolutions), then turn out onto a wire rack, or, you know, the cleanest plate you’ve got.
Little Notes from My Kitchen Fails
- You can mix by hand—electric mixer is easier, but I’ve been too lazy to fetch mine many times. Your elbow gets a workout.
- Don’t overbake! It dries out if you do (ask me how I know). Actually, underbaked is better.
- If it cools too long in the pan, it can get a bit, eh, sweaty on the bottom. Don’t stress—just eat the top first!
Tried-and-Tested Variations (And a Flop or Two)
- I sometimes add a handful of chopped walnuts—they’re nice for crunch.
- Espresso powder? Brilliant. A teaspoon in the batter makes it deeper (I read about this on King Arthur Baking).
- I tried folding in raspberries once—looked gorgeous but tasted a bit weirdly tart, so, take that at your own risk.
- A friend did it with orange extract last month. Actually kind of amazing (good with whipped cream!)
But What If I Don’t Have Fancy Equipment?
You honestly just need a bowl and a spoon—my electric mixer is usually hiding at the back of the cupboard anyway. If you don’t have a wire rack, a chopping board works for cooling, just don’t block the steam. Cake pan? Use a loaf tin, or even a pyrex dish, in a pinch. It’s not fussy.


Storing the Good Stuff
Okay, so technically, you should wrap leftovers and stick them in the fridge. It’ll keep 3-4 days for sure. But… I’ve literally never had any last beyond day two. Sometimes I freeze a couple slices for emergencies, and I think the texture gets fudgier that way. Your mileage may vary.
Serving: What Makes It Special for Us
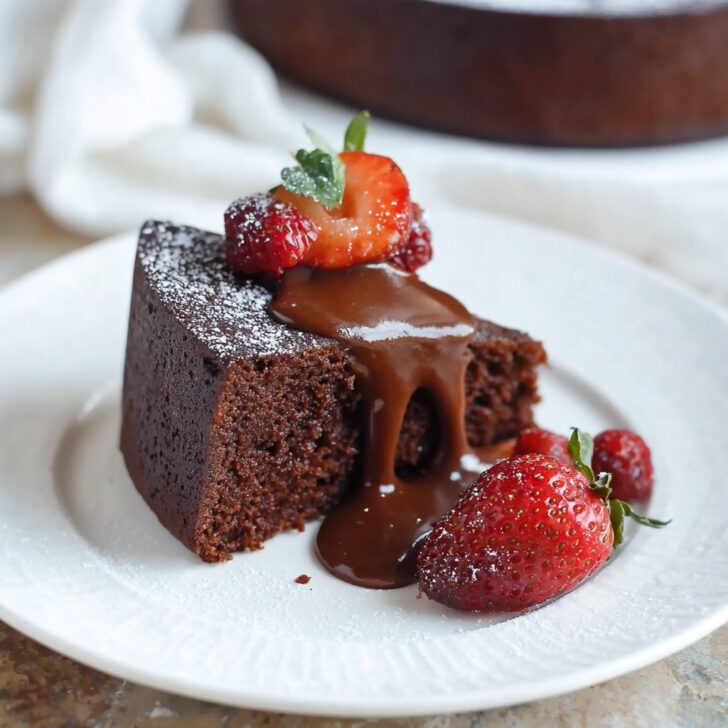
We do it plain most days—can’t be bothered, honestly—but on birthdays, I break out the sugar-free whipped cream and a grating of extra dark chocolate. My nephew swears it tastes best with a dollop of peanut butter (I’m not convinced, but he gobbles it). Sometimes, a fancy saucer and a sprinkle of cocoa powder makes it feel café-worthy. If you want to be really extra, check out these homemade keto ice cream options on Ruled.me—good stuff.
Things I’ve Learned (the Hard Way)
- I tried to cool this in the fridge once to save time. Don’t. It gets weirdly dense. Let it cool on the counter instead. Patience pays (or distract yourself with podcasts, that’s what I do)
- Don’t skip the salt. For real, it wakes the chocolate right up.
- Oh, and if you use a dark cocoa, the color is dramatic—but the flavor can get almost too intense. Maybe start with regular the first time.
Talking Out Some Common Questions
Can I use cottage cheese instead of ricotta?
Someone actually messaged me that—truthfully, I tried it. Texture gets a bit grainy; not bad in a pinch. But ricotta is creamier.
Can I make it nut free?
Yep—just use sunflower seed flour. It’s a little earthy, but it does the trick.
What sweetener works best?
Depends how picky you are. I use erythritol, but some people are diehard for allulose (though it bakes a little softer, so your cake might need another few minutes).
Is this actually keto?
Well, I’m not a nutritionist (trust me!), but using these ingredients, the carbs are low. Always double check if you’re tracking macros—some ricotta brands are sneakier than others.
Do I have to let it cool before eating?
Technically yes because it firms up and slices prettier, but also—sometimes I just can’t wait. Messy cake? Still cake.
If you bake this Keto Chocolate Ricotta Cake, let me know how it goes. Or just brag to your neighbors, like I do. Oh—if you find yourself halfway through with no cream, don’t stress; it’ll survive. And if you have a favorite weird twist, I’d love to hear about it. Happy baking!


Ingredients
- 1 cup ricotta cheese, full-fat
- ½ cup almond flour
- ⅓ cup unsweetened cocoa powder
- ½ cup granulated erythritol or sweetener of choice
- 3 large eggs
- ¼ cup unsalted butter, melted
- 1 teaspoon baking powder
- 1 teaspoon vanilla extract
- ¼ teaspoon salt
Instructions
-
1Preheat your oven to 350°F (175°C) and grease an 8-inch round cake pan or line it with parchment paper.
-
2In a large mixing bowl, combine ricotta cheese, eggs, melted butter, and vanilla extract. Whisk until smooth and creamy.
-
3Add almond flour, cocoa powder, erythritol, baking powder, and salt. Mix well until a thick batter forms.
-
4Pour the batter into the prepared cake pan and smooth the top with a spatula.
-
5Bake for 35 minutes, or until a toothpick inserted into the center comes out mostly clean. Allow the cake to cool before slicing and serving.
Approximate Information for One Serving
Nutrition Disclaimers
Number of total servings shown is approximate. Actual number of servings will depend on your preferred portion sizes.
Nutritional values shown are general guidelines and reflect information for 1 serving using the ingredients listed, not including any optional ingredients. Actual macros may vary slightly depending on specific brands and types of ingredients used.
To determine the weight of one serving, prepare the recipe as instructed. Weigh the finished recipe, then divide the weight of the finished recipe (not including the weight of the container the food is in) by the desired number of servings. Result will be the weight of one serving.
Did you make this recipe?
Please consider Pinning it!!