
So Here’s Why I Keep Coming Back to These Fig Bars
You know, every time I make these oatmeal fig bars, it’s like my kitchen turns into a time machine, zipping right back to when my aunt would send stacks of these bars for school lunch swaps—though hers were always a tad more mysterious (raisins? prunes? We never knew). Making them now, it’s at least half nostalgia, and the other half is probably just craving a cozy snack that pretends to be healthy but really just means I can eat three before anyone notices. Anyway, once the kids start smelling the figs simmering, they don’t leave the kitchen till I’m done. Or, you know, until the bars run out. Honestly, this happens more often than I’d like to admit, which is embarrassing since I’m the one supposed to be rationing snacks. Welp!
Why You'll Probably Fall In Love With These Bars (Like Me)
I make these whenever I need something quick but a little fancier than just plain oatmeal, or when I have a hankering for fig newtons but don’t want to shell out grocery store prices (or maybe I’m out and feeling too lazy to drive). My family goes wild for these—well, except for my youngest, who claims to hate figs, until I call them magic fruit bars and suddenly he’s snarfing them right off the tray. (Should I feel guilty? Probably, but it works.) I did once try swapping out the figs for dates, and it turned a bit odd, but more on my kitchen failures later. Just know, these bars are sweet, hearty, and pretty forgiving… unless you burn the bottom. Which, honestly, I have, but don’t let that throw you.
This Is What You’ll Need (But Swap As You Please)
- 1 ½ cups dried figs (if you’ve only got dates, go for it; I sometimes mix half/half if I’m low—my grandma would probably shake her head, but hey...)
- 2 tablespoon fresh lemon juice (bottled works fine if your lemons are MIA)
- ⅓ cup water (honestly, I’ve thrown in orange juice once when I ran out—kind of worked!)
- 1 ¾ cups rolled oats (don’t stress if you only have quick oats, just pulse them a bit less)
- 1 cup all-purpose flour (or whole wheat if you feel virtuous; gluten-free flour blend kind of works, just turns out denser)
- ½ cup packed brown sugar (light or dark, whatever's lying about)
- ½ teaspoon cinnamon
- ½ teaspoon salt
- 1 teaspoon baking soda
- ¾ cup unsalted butter, softened (once I used coconut oil; it was…eh. Butter wins.)
- 1 teaspoon vanilla extract
How To Whip These Up—Imperfect But Delicious
- Preheat & Line: Oven at 350°F (175°C). Grab an 8x8 or 9x9 pan, toss in parchment (or just grease it; parchment makes for easy removal though—trust me, you’ll thank yourself later).
- Fig Filling First: Toss chopped figs, lemon juice, and water into a small saucepan. Bring to a simmer on medium, stirring now and then (okay, sometimes I wander off, but don’t stray too far!). When it’s thick and the figs are soft, mash with a fork. Ideally, let it cool—unless you’re as impatient as me, then just carry on.
- Crust & Crumble: In a big mixing bowl, combine oats, flour, brown sugar, cinnamon, salt, and baking soda. Give it a good stir. Add butter and vanilla, work them in with your hands (it’s a bit squishy, but satisfying—like sand at the beach). Should look like chunky crumbs; don’t worry if a bit uneven.
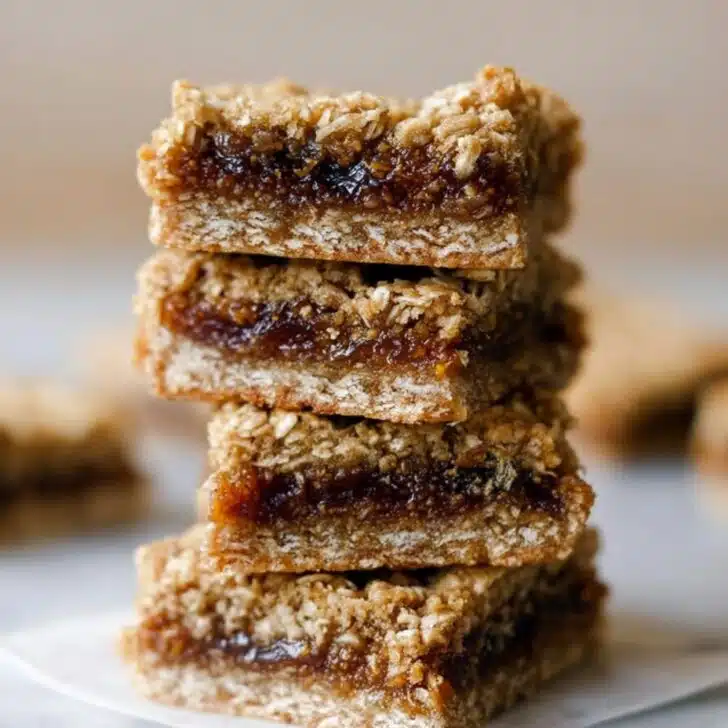
- Build the Bar: Press about two-thirds of the oat mix into your prepared pan. Use your fingers or—if you’re fancy—a flat-bottomed cup, but fingers are just as good. Spread the fig filling over that base (a butter knife helps, but I’ve used the back of a spoon, messy but gets the job done).
- Top & Bake: Crumble the remaining oat mixture on top. Bake 25–30 minutes, or until the top is golden and your kitchen smells like a cozy bakery. This is usually when I sneak a corner just to make sure it’s, you know, edible.
- Cool Down (Almost): Let them cool at least 20 minutes before attacking, otherwise hello, fig lava. Actually, I find they slice cleaner after an hour, but who waits?
Notes I Wish Someone’d Told Me (But Lived To Learn)
- Don't panic if the fig layer looks too thick in places—it settles.
- Once, I tried chilling the bars before slicing—game changer for neat squares (but we never wait, so up to you).
- If you leave a few fig seeds stuck to the pan, don't sweat it. Adds rustic charm, right?
Variations: My Kitchen Experiments (Some Winners, Some… Not)
- Nutty version: Toss in a handful of chopped walnuts or pecans with the crumble. Adds a nice crunch, but my cousin with nut allergies said never again for his lunchbox, so be warned.
- Date swap: Tried swapping half the figs for dates—honestly, too gooey, but might be your jam.
- Choc chip peril: I got wild with mini chocolate chips in the oat mix—my husband liked it, but it competed too much with the figs for me.
- Once tried dried cranberries, but the tartness overpowered. Not my best move, but maybe you’re braver.
Equipment Chat: What You Need (And What You Don't!)
I use a basic 8x8-inch pan mostly because that’s what fits in my toaster oven (long story, don’t ask). If you don’t have one, a loaf pan will do—just keep an eye on the bake time, might run a smidge longer. I use a regular saucepan for the figs, but honestly, I microwaved the filling once (in desperation) and it was okay, but definitely stick to the stovetop if you can.


How To Store (If There’s Anything Left To Store!)
Tuck these in an airtight container on the counter, and they’ll last 3 days before drying out. Fridge gets you maybe a week. Though honestly, in my house they disappear in a single afternoon—usually when I’m not looking.
Serving Ideas (AKA How We Eat Ours)
We slice them into little squares and pile on a plate for weeknight snacking. If I’m feeling posh (ha!), a scoop of vanilla ice cream on a just-warm bar—ridiculously epic. My partner likes them with coffee at breakfast, but I say they’re best as a midnight snack when the house is quiet and you don’t have to share.
Pro Tips Stolen Form My Mistakes
- If you try rushing the fig simmering, you’ll end up with chewy chunks, not spreadable jam—don’t be like past me.
- Letting the bars cool is key for tidy slices; I once served them piping hot and basically spooned them onto plates. Still tasty, just a mess.
- Sometimes, the oat crumb seems dry as you’re mixing—just squish with your hands a bit, it usually comes together.
Real FAQ (From Friends, Family, and the Occasional Stranger)
- Do I have to use dried figs? Can I use fresh?
- Well, dried works best for the sticky-sweet layer. Fresh figs turn sort of mushy and watery; I tried once and it was a bit of a soggy affair. Save fresh for topping Greek yogurt, maybe!
- Is there a way to make this less sweet?
- Sure. Cut the brown sugar down to ⅓ cup, or dial it up if your sweet tooth’s hollering. The figs do a lot of the heavy lifting sweetness-wise anyway.
- Can I freeze these fig bars?
- You bet your boots. Just wrap 'em up well—parchment between layers helps. Defrost on the counter, and they’re good as new (though maybe a tad crumblier)
- What’s the best way to chop those sticky figs?
- I usually snip with kitchen scissors—that way they don’t gunk up a knife. Or, coat your knife's blade with a tad of oil and go to town.
- Do you recommend a brand for dried figs?
- Ah, I don’t get too fussy; whatever’s in bulk at the store or even order online from nuts.com. My aunt swears by Sun-Maid but, honestly, they all work if they're plump and not shriveled like old slippers.
And if you fancy a deeper dive on making your own fillings, Sally’s Baking Addiction’s fig filling method is more involved—worth a peek if you’ve got extra time on your hands or love details.
Final word: Don’t let a crumbly crust or slightly uneven bars put you off. At the end of the day, you’ll have a tray of cozy, figgy goodness. And maybe, just maybe, a few left for breakfast. Or not (self-control, what’s that?).


Ingredients
- 2 cups old-fashioned rolled oats
- 1 cup dried figs, stems removed and chopped
- ½ cup whole wheat flour
- ½ cup unsalted butter, melted
- ⅓ cup honey or maple syrup
- ¼ cup brown sugar
- 1 teaspoon vanilla extract
- ¼ teaspoon salt
- 1 tablespoon lemon juice
- ¼ cup water
Instructions
-
1Preheat your oven to 350°F (175°C) and line an 8x8-inch baking pan with parchment paper.
-
2Combine chopped figs, water, lemon juice, and 1 tablespoon of honey in a small saucepan. Cook over medium heat for 6-8 minutes, stirring, until figs are soft. Mash into a thick paste and set aside to cool.
-
3In a mixing bowl, whisk together oats, whole wheat flour, brown sugar, and salt. Add melted butter, remaining honey, and vanilla extract. Mix until thoroughly combined.
-
4Press half of the oat mixture firmly into the bottom of the prepared baking pan. Spread the fig paste evenly over the oat layer.
-
5Crumble the remaining oat mixture over the fig layer and gently press down. Bake for 30 minutes, or until the top is golden.
-
6Allow to cool completely in the pan before cutting into bars and serving.
Approximate Information for One Serving
Nutrition Disclaimers
Number of total servings shown is approximate. Actual number of servings will depend on your preferred portion sizes.
Nutritional values shown are general guidelines and reflect information for 1 serving using the ingredients listed, not including any optional ingredients. Actual macros may vary slightly depending on specific brands and types of ingredients used.
To determine the weight of one serving, prepare the recipe as instructed. Weigh the finished recipe, then divide the weight of the finished recipe (not including the weight of the container the food is in) by the desired number of servings. Result will be the weight of one serving.
Did you make this recipe?
Please consider Pinning it!!