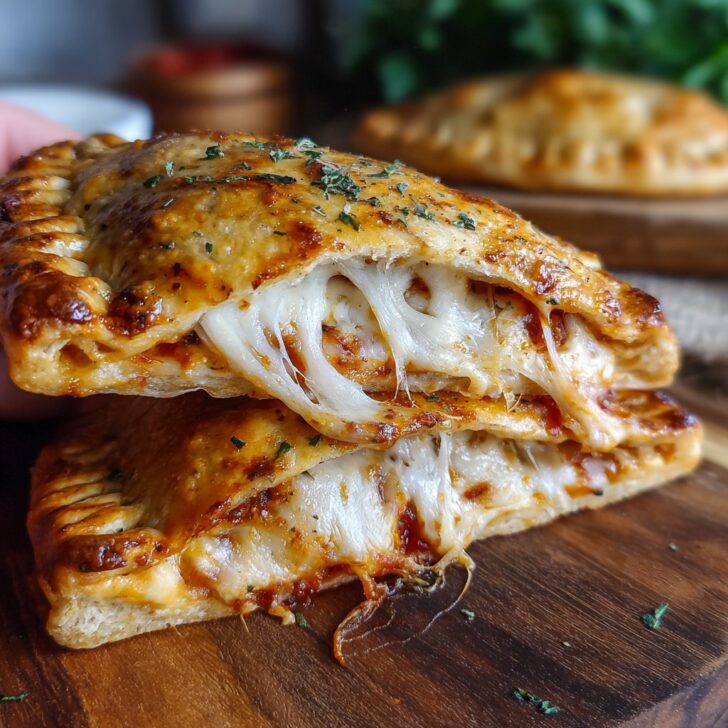

Hey there! So, have you ever craved pizza but didn't want the mess (or the commitment) of a full pie? Enter my homemade easy cheesy pizza pockets. Honestly, these take me straight back to Saturday afternoons when my siblings and I would have 'make your own' lunches. Half the cheese would end up on the counter, and we never managed to keep the filling inside, but boy, did we have fun. These days, my own kids get just as messy, and honestly, that's half the charm. The other half? Gooey cheese, of course.
Why You'll Love These Pizza Pockets (I Promise!)
I make these when the fridge is looking a bit sad or when everyone's asking for something "fun" for dinner but I can't be bothered with the rolling pin drama of a full pizza. My family literally cheers (not kidding) for pizza pocket night—probably because they get to choose their own fillings. Also, if you’ve ever tried cleaning melted cheese off a baking tray, just know: parchment paper is your best mate. Oh, and these are perfect for picky eaters, because no one can refuse molten cheese wrapped in crispy dough, right?
What You'll Need (With My Usual Substitutions)
- 1 pack pizza dough (store-bought is fine; I sometimes use biscuit dough when I'm in a real hurry. My gran would frown, but honestly, it's delicious either way.)
- 1–1½ cups shredded mozzarella cheese (cheddar works if that's all you've got; I've tried a weird mix of both, and nobody noticed)
- ½ cup pizza sauce (homemade is nice, but I’ve used pasta sauce, and it’s fine—don't let anyone tell you otherwise)
- ½ cup pepperoni slices (or try ham, cooked sausage, or skip entirely for veggie pockets)
- 1 egg, beaten (for brushing, but you can skip if there's an egg allergy—it just makes things shinier)
- Optional: diced peppers, mushrooms, olives, spinach, or whatever toppings you like. Once I added pineapple. I regret nothing.
Here's How to Make 'Em (Don't Overthink It)
- Preheat your oven to 400°F (or about 200°C). This is a good time to line your baking tray with parchment paper—trust me, it's a lifesaver.
- Roll out the dough on a floured surface. About ¼ inch thick is good, but honestly, a bit thicker or thinner is fine too. Cut it into rectangles or circles. I usually go for rectangles because I'm lazy.
- Spoon a tablespoon (or a heaping spoonful if you’re feeling rebellious) of pizza sauce onto one half of each piece. Don’t get too close to the edge, or you’ll have a tomatoey disaster on your hands.
- Top with a nice handful of mozzarella, then add your pepperoni or favorite toppings. This is where I always sneak a few bites of cheese. Quality control, right?
- Fold the dough over to cover the filling. Pinch the edges together—fingers work, or use a fork for that classic, crimped look. If it doesn’t seal perfectly, don’t stress; the cheese lava escape is part of the magic.
- Brush the tops with your beaten egg (or don’t). I once forgot, and they were still tasty, just a bit dull looking.
- Bake for 15–18 minutes or until golden brown and bubbling at the seams. If they leak, congratulations, you’re normal.
- Let them cool for a few minutes before serving. I’ve burned my tongue more times than I can count, so learn form my mistakes!
Notes from My Kitchen (AKA Lessons Learned)
- If your dough is sticking, sprinkle on more flour. Or oil your hands—sometimes that's less messy. Or just embrace the chaos.
- Don't overload the filling, no matter how tempting. Actually, I find it works better if you keep it modest; too much will just ooze out.
- I've tried using whole wheat dough. It's... fine. But regular dough just tastes more like childhood, you know?
Variations I’ve Tried (Some Winners, Some Not So Much)
- Swap the mozzarella for a smoked cheese—amazing.
- Add cooked chicken and BBQ sauce for a twist. Tastes like summer picnics.
- Spinach and ricotta is lovely, but once I tried adding blue cheese and, well, let’s just say it was a bit much.
- Vegan friends? Use vegan cheese and dough. Even my skeptical uncle liked it (though he did add hot sauce to everything).
Equipment (Or What I Use When I Can Find It)
- Baking tray. Or a roasting pan if that's what’s clean.
- Parchment paper. Foil in a pinch, but it sticks more.
- Rolling pin. I’ve used a wine bottle before—works fine, just don’t drop it.
- Small bowl for egg wash (I use a mug half the time).


How to Store (Though, Realistically...)
You can keep leftovers in an airtight container in the fridge for up to 3 days. They reheat well in the oven at 350°F for about 10 minutes—honestly, in my house, these barely last a day, so I wouldn’t know for sure how they freeze (but The Kitchn has good freezer tips if you want to try). Cold pizza pockets for breakfast are also legit.
Serving These Up (My Favorite Ways)
I love serving these with a side of marinara for dipping. Sometimes I set out a little salad (mostly for appearances), and occasionally, if we're feeling fancy, we do a full pizza pocket bar with different sauces—ranch, garlic butter, you name it. On movie nights, it’s just pockets, napkins, and a big jug of lemonade. Simple things, right?
My Best "Don’t Mess This Up" Tips
- Don’t try to rush the sealing step—seriously, I once skipped it and there was cheese everywhere. Stick with the fork.
- Let them rest a few minutes before biting in. Mouth burns are no joke (and ruin the experience, trust me).
- If you’re using veggies, cook them first. Raw mushrooms make it watery—I learned that the soggy way.
FAQ (Because People Really Do Ask)
- Can I freeze homemade pizza pockets? Yeah, you can. I usually wrap them in foil and reheat in the oven. Microwaving makes 'em a bit soggy though.
- Do you have a favorite store-bought dough? I like Trader Joe’s (when I can get it), but honestly, any brand works, and sometimes I just use Sally’s homemade pizza dough if I’m feeling ambitious.
- What if I don’t have parchment paper? Actually, foil works, but grease it well. Or use a silicone baking mat if you’ve got one (I only recently got one—it’s a game changer, no kidding).
- Can I make these gluten free? Sure, just use gluten-free dough. I’ve only tried it once, but it worked okay.
- How do I keep them from bursting? Don’t overfill, and make sure to seal 'em. But a little cheese volcano situation is kinda fun!
Okay, that's probably more than you bargained for about my homemade easy cheesy pizza pockets, but if you make them, let me know how it goes! And if you come up with a new filling combo that knocks your socks off, I'm all ears. Oh, almost forgot—a friend once made these for a road trip snack, and now that's all I can think of when I see a Thermos. Funny how food does that.


Ingredients
- 1 can refrigerated pizza dough (about 13.8 oz)
- 1 cup shredded mozzarella cheese
- ½ cup pizza sauce
- ½ cup sliced pepperoni
- ¼ cup grated Parmesan cheese
- ¼ cup chopped bell peppers
- 1 tablespoon olive oil
- ½ teaspoon dried Italian seasoning
Instructions
-
1Preheat your oven to 400°F (200°C) and line a baking sheet with parchment paper.
-
2Roll out the pizza dough on a lightly floured surface and cut into 4 equal rectangles.
-
3Spread a spoonful of pizza sauce on one half of each rectangle, leaving a border around the edges.
-
4Top with mozzarella cheese, pepperoni, bell peppers, and a sprinkle of Parmesan cheese.
-
5Fold the dough over the filling to form pockets and seal the edges by pressing with a fork.
-
6Brush the tops with olive oil, sprinkle with Italian seasoning, and bake for 16-18 minutes or until golden brown. Let cool slightly before serving.
Approximate Information for One Serving
Nutrition Disclaimers
Number of total servings shown is approximate. Actual number of servings will depend on your preferred portion sizes.
Nutritional values shown are general guidelines and reflect information for 1 serving using the ingredients listed, not including any optional ingredients. Actual macros may vary slightly depending on specific brands and types of ingredients used.
To determine the weight of one serving, prepare the recipe as instructed. Weigh the finished recipe, then divide the weight of the finished recipe (not including the weight of the container the food is in) by the desired number of servings. Result will be the weight of one serving.
Did you make this recipe?
Please consider Pinning it!!