
Let Me Tell You About My Brownie Adventure…
If you’d asked me a few years back whether brownies and “healthy” belong in the same sentence, I’d have probably raised an eyebrow at you while holding a suspicious spatula. Turns out, after one too many overripe banana mishaps (my kitchen is basically a banana graveyard most weeks), I took the plunge with these healthy banana brownies. And honestly? They ended up being a bit of a household legend. My cousin still brings up that time the cat ran through mid-mixing and I almost dropped the cocoa everywhere. Long story short: this recipe’s seen some action, and it’s survived. And the fudgy deliciousness? Worth every banana-splattered apron.
Why I Keep Making These (…and Why You’ll Love Them Too)
I whip these up when I’ve got those slightly-sad bananas winking at me from the fruit bowl (you know the ones). My crew goes wild for these; it’s almost embarrassing how quickly they disappear. Plus, they somehow trick my kids into eating something good for them, so it’s a win-win. There was one batch where I tried to sub in some fancy coconut flour—I don't recommend it unless you're really into cardboard with a hint of chocolate. But anyway, the triumphs far outweigh the fails, and, uh, sneaking a little batter now and then makes this whole baking thing worth it.
Stuff You’ll Need (and a Few Swaps If You’re in a Pinch)
- 3 ripe bananas (the spottier, the better—though I’ve used less ripe in an emergency and just mashed ’em extra well)
- ½ cup nut butter (usually peanut for me, but almond’s great—my gran swore by SunButter, honestly any will do)
- ¼ cup cocoa powder (Dutch-processed is fancy, but I use grocery store stuff most times)
- 2 large eggs (sometimes I’ve used flax eggs: 1 tablespoon ground flax + 2.5 tablespoon water per egg, if I’m out)
- ⅓ cup maple syrup (agave or even runny honey works too—it’s pretty forgiving)
- ½ teaspoon baking soda
- 1 teaspoon vanilla extract (real or the fake kind—I can’t always taste the difference)
- Pinch of salt (I’ve forgotten this before—don’t, trust me)
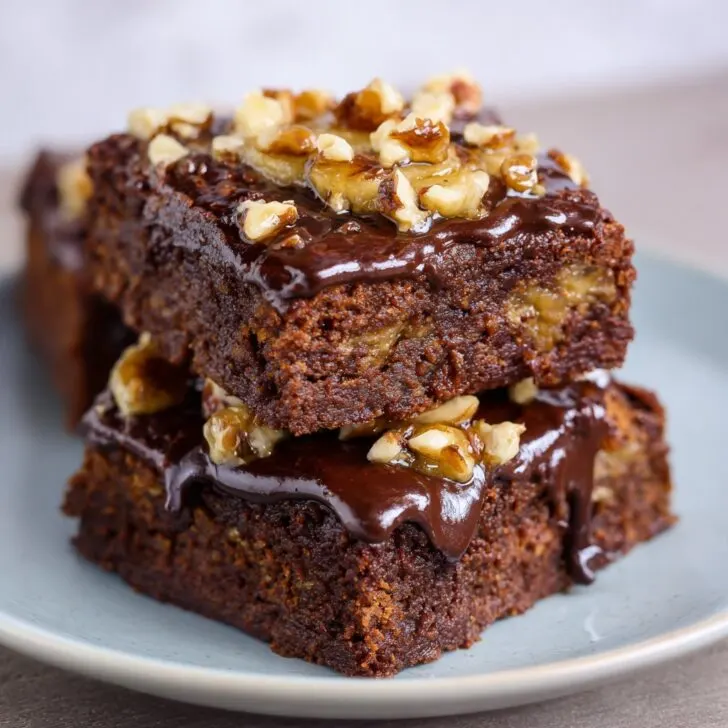
- ½ cup chocolate chips (optional, but… is it really optional?)
How To Whip ’Em Up (With a Few Sidetracks)
- Preheat your oven to 350°F (about 180°C). Find yourself an 8x8 inch baking pan. Mine’s battered and missing some enamel, but honestly, it adds character. Line with parchment paper or just grease it up.
- Mash the bananas in a big bowl. I use a fork, but you could smash with a potato masher or even clean hands (very rustic, very satisfying).
- Add in the nut butter, eggs, maple syrup, cocoa, baking soda, vanilla, and salt. Now, my personal tip: don’t just dump it all at once—actually, on second thought, sometimes I do, and it works. So whatever, just mix it till you’ve got a creamy, thickish batter. If you spot lumps, don’t panic. It always starts lumpy for me.
- Stir in chocolate chips if you’re going for those (honestly, why not?).
- Pour (or, really, kind of plop) the batter into your pan. Smooth the top a bit. Here’s the stage where I usually swipe a fingerful; hot tip: don’t get caught.
- Bake around 25 to 30 minutes. If a toothpick comes out mostly clean, you’re good. Little gooey crumbs? Even better, in my book.
- Let 'em cool (good luck with that)—at least 10-15 minutes if you have willpower, but if not, just go for it and accept a bit of crumble.
Notes (Learned the Hard Way…)
- If your bananas are really overripe and mushy, cut the maple syrup down a smidge.
- Cocoa powder matters less than you think. I thought Dutch-processed would be magical; wasn’t, really.
- Don’t skip the parchment. The first time I made these, I pried the brownies out in pieces—still tasty, just, you know, sort of freeform art brownies.
How I’ve Played Around With This Recipe (Wins and Whoopsies)
- Sometimes I toss in chopped walnuts or pecans—great for crunch, unless you hate nuts (in which case, skip!).
- I tried sweet potato instead of banana once. Did not go down well at home. Bananas just do their job best, in my humble opinion.
- For a dairy-free vibe, use vegan chocolate chips. I genuinely didn’t notice the difference.
Tools I Use (But You Don’t Need The Fancy Stuff)
- Mixing bowl (biggish—less splatter, less mess)
- Fork or potato masher (whichever’s closer—honestly, once I used a mug when desperate)
- 8x8 inch pan (if you only have a loaf tin, that’ll work… just bake a little longer)
- Rubber spatula (handy, but a wooden spoon works; I used my hand once, which was ill-advised)


How Long Do They Keep?
So, technically, these will keep for up to three days in an airtight tin, though to be fair, in my house, they’ve never lasted beyond 24 hours. I’ve snuck leftovers into the freezer—wrap in foil and then a freezer bag, and you’re golden for a month. Apparently. I always forget I have them until I’m cleaning out the freezer and get a surprise treat!
How We Eat ’Em (Just Ideas, Not Rules)
- Warm from the oven (with a scoop of vanilla ice cream if I’m feeling fancy)
- With coffee for breakfast—yes, it counts as breakfast, I will die on this hill
- Cut into tiny squares and tucked in a lunchbox (wrap in wax paper; the eco-friendly kind from Bee's Wrap is brilliant, imo)
What I Learned The Silly Way (Pro Tips, Ish)
- I once tried to bake these at a higher temp to save time. Big mistake; ended up burnt round the edges and raw in the middle. Patience… mostly pays off.
- If you’re out of parchment, a bit of oil and flour will sort of do it—but expect a bit of a sticky situation.
- Let cool fully before slicing if you want them to look tidy. If not, just embrace gooey and messy. We’re among friends here.
FAQ From Real (And Sometimes Funny) Questions
- Can I make this vegan?
- Yep, just swap the eggs for flax eggs (see above). I actually think they’re a bit denser, but still ace.
- What if I don’t have a proper square pan?
- No worries, use a loaf tin or even a muffin tray; just watch the cooking time. Might be more rustic than neat squares, but really, who’s judging?
- Do these taste like banana?
- Short answer: Yes, a bit! But it’s not in-your-face. The chocolate covers most of it. If you’re really anti-banana, maybe try Sally's plain fudgy brownies instead.
- Can I use protein powder instead of cocoa?
- I tried once, and the result was… odd. Like, protein-bar-in-brownie-clothes. If you’re feeling brave, go for it, but regular cocoa is nicer.
- Can I double the recipe?
- Absolutely. Just use a 9x13 pan and crank up the bake time a little (I start checking at 35 minutes).
Digression time: Every time I make these, I end up with some sort of kitchen mishap—a splash of cocoa on the cat, or forgetting if I added salt and having to taste the batter one more time (that’s my story and I’m sticking to it). But honestly, half the fun is the chaos, right? If you give these a try, let me know how you riff on them. Or just come chat brownies with me over on Reddit’s baking subreddit—loads of good people, plenty of mishaps and wins.
Healthy banana brownies: more forgiving than your last math teacher and twice as rewarding. Let’s be real, we all need a little low-guilt chocolate in our lives.


Ingredients
- 2 large ripe bananas, mashed
- ½ cup unsweetened applesauce
- ¼ cup maple syrup
- 2 tablespoons coconut oil, melted
- 1 teaspoon vanilla extract
- ¾ cup whole wheat flour
- ⅓ cup unsweetened cocoa powder
- ½ teaspoon baking soda
- ¼ teaspoon salt
- ⅓ cup dark chocolate chips (optional)
Instructions
-
1Preheat the oven to 350°F (175°C). Line an 8x8-inch baking pan with parchment paper.
-
2In a large bowl, mash the bananas until smooth. Stir in applesauce, maple syrup, melted coconut oil, and vanilla extract until well combined.
-
3In another bowl, whisk together the whole wheat flour, cocoa powder, baking soda, and salt.
-
4Gradually add the dry ingredients to the wet ingredients, stirring until just combined. Fold in dark chocolate chips if using.
-
5Pour the batter into the prepared baking pan and spread it evenly.
-
6Bake for 22-25 minutes or until a toothpick inserted into the center comes out mostly clean. Cool completely before slicing and serving.
Approximate Information for One Serving
Nutrition Disclaimers
Number of total servings shown is approximate. Actual number of servings will depend on your preferred portion sizes.
Nutritional values shown are general guidelines and reflect information for 1 serving using the ingredients listed, not including any optional ingredients. Actual macros may vary slightly depending on specific brands and types of ingredients used.
To determine the weight of one serving, prepare the recipe as instructed. Weigh the finished recipe, then divide the weight of the finished recipe (not including the weight of the container the food is in) by the desired number of servings. Result will be the weight of one serving.
Did you make this recipe?
Please consider Pinning it!!