
The Story Behind These Spooky Cupcakes
Okay, so you know how every year Halloween creeps up and suddenly you’re the designated treat-bringer? That’s basically how I stumbled into making these Halloween Eyeball Cupcakes. My nephew, who has a serious sweet tooth (he once tried to convince me ketchup counts as a vegetable), begged for something “gross but tasty.” First attempt? Disaster—red food coloring everywhere, including the cat. But now these are basically a family legend, and honestly, I look forward to making them as much as the kids do. Or more, if I’m being honest.
Why You’ll Love This Recipe (Or Maybe Just Have a Laugh)
I make these when I want to see a table full of kids giggle and pretend to be grossed out. My family goes bonkers for these because they’re chocolatey, gooey, and look just the right amount of creepy. Plus, if you’re a little heavy-handed with the frosting (like me), nobody complains. And here’s the thing: if you mess up? They just look more monstrous! My brother-in-law once ate three in one sitting, though he claims it was for “quality control.” Right.
What You’ll Need (And What You Can Swap)
- 1 box chocolate cake mix (or hey, homemade if you’re feeling fancy; I won’t judge)
- 3 eggs (sometimes I use flax eggs when my vegan cousin comes over)
- ½ cup oil (honestly, any neutral oil works, my gran used sunflower but canola is fine)
- 1 cup water (or coffee, if you want extra chocolate oomph)
- 1 tub vanilla frosting (store-bought is fine, but homemade is better, or at least that’s what my mom says)
- Red gel icing (the kind for writing; sometimes I use strawberry syrup if I’m out, honestly not the same but it works in a pinch)
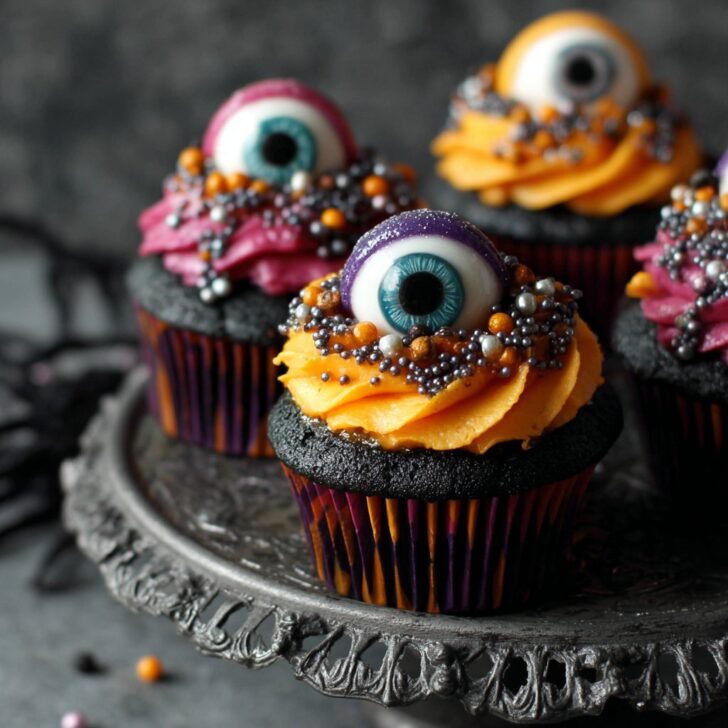
- Large candy eyeballs (or white chocolate melts with a drop of chocolate for the pupil. I once used M&Ms—wasn’t quite as convincing, but they got eaten anyway)
- Optional: food coloring (blue or green for iris, if you want to get artsy)
How To Make Halloween Eyeball Cupcakes (No Pressure)
- Preheat the oven to 350°F (that’s about 180°C, in case you’re wondering). Line a muffin tin with those fun Halloween papers, or just use whatever you have—nobody’s inspecting.
- Mix together the cake mix, eggs, oil, and water (or coffee). I usually just toss everything in a bowl and let the mixer do its thing. If you’re feeling ambitious, sift the cake mix first. I never do, but maybe you’re classier than me.
- Scoop the batter into the cupcake liners—about ⅔ full is my sweet spot. Sometimes I overfill and end up with cupcake mushrooms. Oh well.
- Bake for 18-22 minutes. Here’s where I always get impatient and poke them with a toothpick too early. Don’t do that—give them a minute. If the pick comes out clean (or mostly clean; chocolate’s tricky), you’re golden.
- Let them cool completely! Seriously, don’t rush this or your frosting will slide right off. Learned that the hard way... twice.
- Frost generously. Pile it on! Smooth tops are great, but uneven frosting makes the eyeballs look more like they’ve been through something. For the iris, I sometimes stir a drop of food coloring into a little bit of frosting and make a ring, but you can skip that honestly.
- Stick a candy eyeball (or your DIY version) in the center. Press gently. They’re delicate, and I’ve cracked more than I’d like to admit.
- Now the fun part—draw wiggly red veins with gel icing. If your hand shakes, good, it looks spookier. This is where I usually sneak a taste.
Notes From the Trenches
- If you try to frost warm cupcakes, the whole horror show will just slide off. Learned that the sticky way.
- I used to think the candy eyeballs were optional, but honestly, it’s not quite as fun without them. Though, on second thought, a plain frosted cupcake’s better than nothing.
- Don’t stress about perfect “vein” lines. I promise, kids love the messier ones best.
If You Want to Change Things Up
Sometimes I use red velvet mix for a sort of double-creepy effect (looks like bloody eyes—yikes). Once I tried peanut butter frosting instead of vanilla—tasted great, looked like zombie eyes from a cartoon. Oh, and I tried to stuff a raspberry inside for extra goo. Didn’t work. Just made the center weirdly soggy, so… maybe skip that experiment.
About the Gear (And Improv Solutions)
You’ll want a muffin tin and liners, but I’ve baked these straight in a well-greased pan when I ran out. They kind of stick, but hey, it’s rustic. A mixer is helpful, but I’ve definitely used a whisk and some elbow grease. For the eyeball decorations, you don’t need a fancy piping bag; a zip-top bag with the corner snipped works fine. Or just drizzle with a spoon if you’re not fussed.


How to Store (But Will They Last?)
Technically, you can keep these in an airtight container for up to three days on the counter, or a bit longer in the fridge. But, honestly, in my house they never last more than a day! If you do store them, put parchment between the layers so the frosting doesn’t smear everywhere. Unless you like sticky fingers, which, it’s Halloween, so maybe you do?
This Is How I Like To Serve Them
I love to pile them up on a black platter with a fake spider or two (once I used a real one by accident – that’s a story for another time, yikes). We usually set them out for a Halloween movie night—nothing says festive like eating an eyeball while watching something spooky. Leftovers—if we ever have any—make a decent breakfast the next day, though don’t tell my doctor.
Lessons I Learned the Hard Way
- I once tried rushing the cooling step, and the frosting just melted right into the cupcake. So, don’t do that unless you want a gooey mess (which, okay, kids might love, but still!).
- Don’t overdo the food coloring. I got a little too enthusiastic one year and ended up with blue teeth all night. Not a good look.
- If you use too much gel icing, it can get tacky and sticky real fast—less is more here.
Real Questions I’ve Gotten (And Some I Wish I Had)
- Can I make these ahead? Yep! Actually, I find they taste better the next day, but that could just be me. Just keep ‘em covered.
- Do I have to use chocolate cake? Nah, use whatever you like. I made them with lemon once (ran out of chocolate, blame the kids), and it was surprisingly tasty, just a bit odd-looking.
- Can you freeze these? Sure, but the candy eyes kind of sweat and get weird. So, I wouldn’t really recommend unless you’re desperate.
- Where do you get those eyeballs? I get mine online from Baking Mad or sometimes at Michaels if I’m in town. But honestly, any big supermarket seems to have them around Halloween.
- How do you keep the red gel from running? Less is more, let it set before moving them. I learned that form, uh, experience. Also, sometimes I just embrace the goo—kids think it looks more “real.”
Oh, and did you know you can make your own candy eyes with white chocolate discs and a dot of black icing? Saw it on Sally’s Baking Addiction, and it actually works (though mine looked a bit wonky the first time, but hey, spooky is the goal).
So, whether you’re baking for a crowd or just want to gross out your siblings, these Halloween Eyeball Cupcakes are a sure way to liven up the party. And even if you mess up a bit, trust me—they’ll get eaten. Happy haunting!