
These Sparkly Sugar Cookies Make Me Feel Fancy (Even in Pajamas)
I have this thing about cookies that look super elegant but are sneakily simple—like, put-on-your-fancy-music-but-don’t-iron-your-shirt simple. Every December (or honestly whenever I need a little edible sparkle), I break out this Gold-Flecked Elegant Decorated Sugar Cookies recipe. There was a Christmas where I made three dozen of these for a last-minute holiday swap. A winter storm hit, and I munched half a batch myself, hiding them from my partner "for presentation." Whoops. Anyway, these cookies are pretty much the edible version of jazz hands. And you don’t need to know how to pipe like a pastry chef to make them look stunning. Trust me, my first batch looked what you’d call "rustic." Still tasted amazing.


Why I Keep Coming Back to This Recipe
I make these anytime company’s coming and I want to pretend I’ve got it all together (though you should see my kitchen afterwards). My family goes wild for the buttery taste and, let’s be honest, the shimmer of edible gold is a total show-off move. I tried a few recipes that were supposed to be “easier,” but everything kept sticking or spreading—so annoying—and, well, my patience is not infinite after a day at work. Plus, these cookies hold their shape, which is important for those cut-out snowflakes or stars. Bonus: the gold flecks mean no one notices if your icing job goes a bit awry. And yes, my youngest insists we call them “treasure cookies.”
Ingredients I Use (and How I Cheat Sometimes)
- 2 ¾ cups all-purpose flour (my grandma used self-rising once by accident—don’t do that, unless you like puffy cookies!)
- 1 teaspoon baking powder
- ½ teaspoon salt
- 1 cup (2 sticks) unsalted butter, softened (when I’m in a rush, salted butter, just skip the salt)
- 1 cup granulated sugar
- 1 large egg
- 2 teaspoons pure vanilla extract (I’ve used almond extract instead—yum for grown-ups, not so much with kids...)
- ½ teaspoon almond extract (optional, but it’s my secret weapon for depth)
- Royal icing, homemade or store-bought (look, I’ve used the tub from the shop when I forgot to get meringue powder and no one noticed)
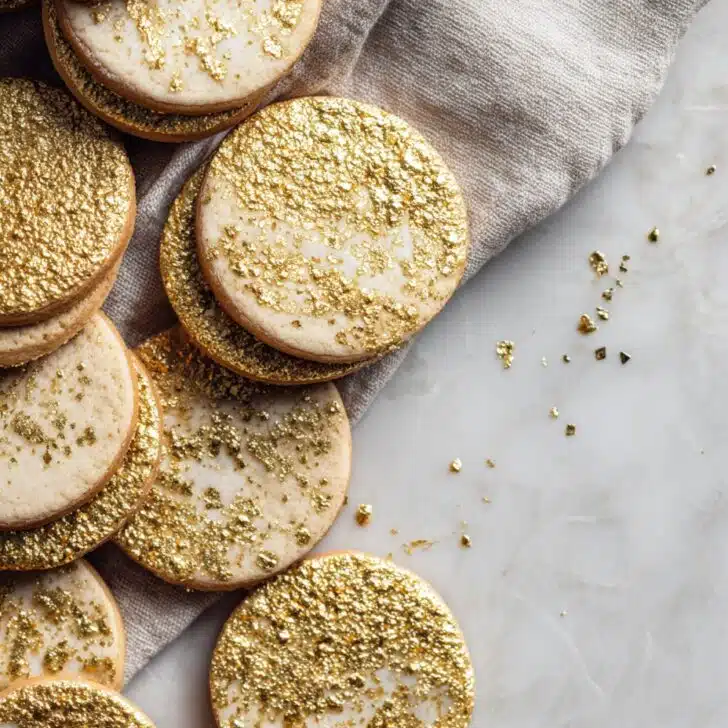
- Edible gold leaf sheets—or gold luster dust mixed with a smidge of vodka
- Sprinkles in gold, pearl, or whatever bling you like (sometimes I use silver if I’m out of gold, but then it’s technically not “gold-flecked”...let’s not get technical)
Let’s Make These Cookies! Directions With A Few Lumps & Bumps
- Whisk the flour, baking powder, and salt together in a big bowl—give it a good mix, I always find flour hiding at the bottom if I skip this step.
- In another bowl, cream butter and sugar until it’s light and a bit fluffy. I use my hand mixer on medium, but a sturdy wooden spoon works if you’re feeling old-school or can’t be bothered digging out the attachments.
- Add egg, vanilla, and almond extract (if using). Mix until combined. Also, this is where I sneak a taste—no regrets.
- Gently add the dry mix to the wet mix in two or three batches. Don’t overmix; once it forms a soft dough, stop—seriously, I always want to mix more, but it makes it tough.
- Divide the dough in half, flatten into discs, and wrap. Fridge for at least 1 hour. Don’t skip this! (I did once, disaster ensued. Just, trust me.)
- Preheat your oven to 350°F (180°C). Roll dough on a lightly floured surface to about ¼ inch thick (I’m not measuring, just eyeball “not too thin, not too chunky”).
- Cut out shapes with your favorite cookie cutters. Place them on a lined baking tray. If you want the sharpest edges, pop the trays back in the fridge for 10 minutes before baking, but sometimes I can’t be bothered, and no one’s complained yet.
- Bake 8–11 minutes, until the edges just hint at gold (pun intended). Let them cool completely. Seriously, don’t ice warm cookies or things get melty.
- Time to decorate! Flood with royal icing; I use a piping bag, but a zipper bag with the tip snipped works too. Don’t worry if it’s not perfect—gold covers all.
- Once icing is just set but still a tiny bit tacky, dab on gold leaf with a clean paintbrush, or splatter a mix of luster dust and vodka. Flick on some metallic sprinkles. Have fun, really go for the bling.


My Real-Life Cookie Notes
- If your dough feels super sticky, add a tablespoon more flour. Or let it chill even longer (sometimes I forget and leave it overnight; works fine!).
- Dough scraps? Just squish together and roll again—I ignore the “only re-roll once” rule. Sometimes second-generation cookies taste even better, who knows.
- Gold leaf is fussy. Don’t stress if it tears—just patch another bit on top! Texture = luxury, I say.
Variations I’ve Actually Tried (And One Fail)
- Tried swapping some vanilla for orange extract—total winner for springtime.
- I did chocolate royal icing + gold. It looks super rich, but honestly a bit too sweet for my taste.
- Once tried adding dried lavender. Thought I’d be fancy. It was... not a hit (tasted like soap), haha.


Here’s What You’ll Need (I Swear It’s Doable)
- Hand or stand mixer (but strong arms and a sturdy whisk will do in a pinch—I’ve made these while my mixer was hiding form me)
- Rolling pin (wine bottle as a substitute if you don’t have one—no judgment!)
- Cookie cutters (or a drinking glass if you’re not fussed about shapes)
- Baking sheets and parchment or a silicone mat
- Cooling rack—though honestly, sometimes I just use the oven rack with the door open
- Piping bags or zipper bags for icing
- Clean paintbrush for gold leaf
How They Keep (Or Don’t, in My House...)
Store in an airtight container, with parchment between layers. In theory, they’ll stay fresh 4–5 days at room temp, but honestly, they’re usually devoured before then. If you stack, just be gentle—the gold and icing like to get cozy and stick a bit.
How I Love to Serve These (And a Family Quirk)
I like to pile them high on a tiered cake stand and watch people try to just grab one—but my youngest insists we “treasure hunt” and find which has the most gold. At Christmas, we’ll tie a couple up in cellophane bags for quick gifts. Oh, and I think the flavor deepens overnight (so if you can hold off, they’re even better the next day...if you can resist).
Pro Tips I Learned the Hard Way
- Don’t skip the chilling step—or you’ll have wobbly, pancake-ish cookies. I tried to rush it once (got too impatient), regretted it.
- If you’re using gold luster dust, a little goes a long way. Splash too much vodka and everything runs, ask me how I know...
- Let the icing dry before stacking, even if you’re in a hurry. Patience, grasshopper.
FAQs from My Actual Friends and Cookie Eaters
- Can I freeze the dough? Oh, totally. Wrap it up tight and freeze for up to two months. Thaw overnight in the fridge before rolling out.
- Does the gold leaf taste weird? Nope! It’s tasteless—I was nervous the first time, but it’s just for the wow factor. Like glitter, but edible.
- I’m out of piping bags—what do I do? Snip the corner off a clean freezer bag. Actually, sometimes that’s even easier for squiggly lines.
- Any way to make these gluten-free? I haven’t tried myself, but heard good things about swapping in a cup-for-cup gluten free flour. If you give it a go, let me know?
- Why do my cookies spread? Usually, it’s warm butter or skipping the chill. Pop that dough back in the fridge for a bit and try again.
So there you go, my Gold-Flecked Elegant Decorated Sugar Cookies adventure. If they end up a bit wonky or you cover a misshapen one with extra gold, you fit right in at my kitchen table. Happy baking—and if you’re like me, try not to eat all the extras before company comes!
Ingredients
- 2 ¾ cups all-purpose flour (my grandma used self-rising once by accident—don’t do that, unless you like puffy cookies!)
- 1 teaspoon baking powder
- ½ teaspoon salt
- 1 cup (2 sticks) unsalted butter, softened (when I’m in a rush, salted butter, just skip the salt)
- 1 cup granulated sugar
- 1 large egg
- 2 teaspoons pure vanilla extract (I’ve used almond extract instead—yum for grown-ups, not so much with kids...)
- ½ teaspoon almond extract (optional, but it’s my secret weapon for depth)
- Royal icing, homemade or store-bought (look, I’ve used the tub from the shop when I forgot to get meringue powder and no one noticed)
- Edible gold leaf sheets—or gold luster dust mixed with a smidge of vodka
- Sprinkles in gold, pearl, or whatever bling you like (sometimes I use silver if I’m out of gold, but then it’s technically not “gold-flecked”...let’s not get technical)
Instructions
-
1Whisk the flour, baking powder, and salt together in a big bowl—give it a good mix, I always find flour hiding at the bottom if I skip this step.
-
2In another bowl, cream butter and sugar until it’s light and a bit fluffy. I use my hand mixer on medium, but a sturdy wooden spoon works if you’re feeling old-school or can’t be bothered digging out the attachments.
-
3Add egg, vanilla, and almond extract (if using). Mix until combined. Also, this is where I sneak a taste—no regrets.
-
4Gently add the dry mix to the wet mix in two or three batches. Don’t overmix; once it forms a soft dough, stop—seriously, I always want to mix more, but it makes it tough.
-
5Divide the dough in half, flatten into discs, and wrap. Fridge for at least 1 hour. Don’t skip this! (I did once, disaster ensued. Just, trust me.)
-
6Preheat your oven to 350°F (180°C). Roll dough on a lightly floured surface to about ¼ inch thick (I’m not measuring, just eyeball “not too thin, not too chunky”).
-
7Cut out shapes with your favorite cookie cutters. Place them on a lined baking tray. If you want the sharpest edges, pop the trays back in the fridge for 10 minutes before baking, but sometimes I can’t be bothered, and no one’s complained yet.
-
8Bake 8–11 minutes, until the edges just hint at gold (pun intended). Let them cool completely. Seriously, don’t ice warm cookies or things get melty.
-
9Time to decorate! Flood with royal icing; I use a piping bag, but a zipper bag with the tip snipped works too. Don’t worry if it’s not perfect—gold covers all.
-
10Once icing is just set but still a tiny bit tacky, dab on gold leaf with a clean paintbrush, or splatter a mix of luster dust and vodka. Flick on some metallic sprinkles. Have fun, really go for the bling.
Approximate Information for One Serving
Nutrition Disclaimers
Number of total servings shown is approximate. Actual number of servings will depend on your preferred portion sizes.
Nutritional values shown are general guidelines and reflect information for 1 serving using the ingredients listed, not including any optional ingredients. Actual macros may vary slightly depending on specific brands and types of ingredients used.
To determine the weight of one serving, prepare the recipe as instructed. Weigh the finished recipe, then divide the weight of the finished recipe (not including the weight of the container the food is in) by the desired number of servings. Result will be the weight of one serving.
Did you make this recipe?
Please consider Pinning it!