Cake and Coffee with a Side of Chaos
Picture this: it's Sunday afternoon, rain's tapping at the window, and I'm elbows deep in flour, trying (for the third time this month) to replicate that glorious fritter cake my Aunt Peg brought to our last family get-together. Except, as always, I've got apples rolling off the counter, my dog is hoping I'll drop something (let's be honest, I usually do), and the radio's stuck on some classic rock station. But hey, that's half the fun, right?
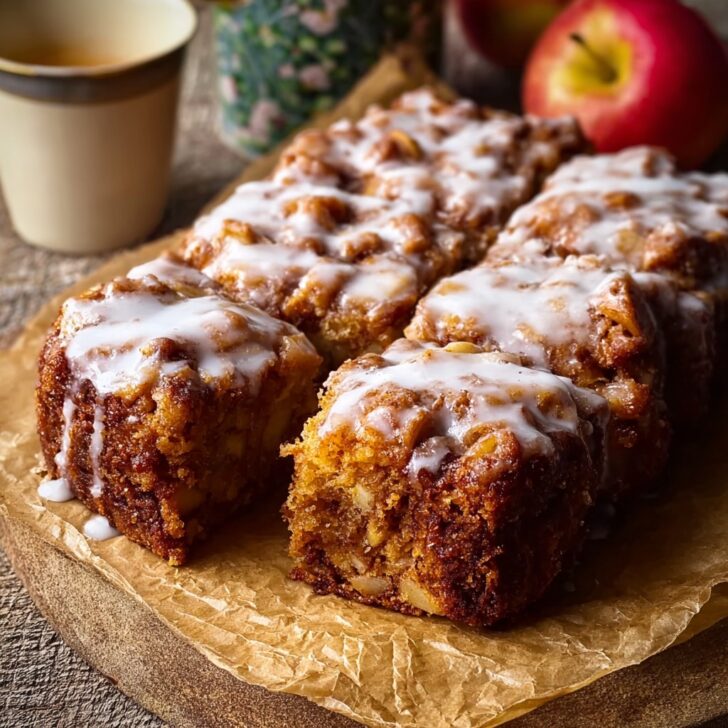
I swear this Glazed Honeycrisp Apple Fritter Cake Recipe is the one cake that gets demolished at warp speed in my house. My dad legit calls dibs on the corner piece with the most glaze before it even cools. And okay, sometimes it comes out looking a bit 'rustic' (I've nicked that word from a British baking show) but flavor? Off the charts.
Why You'll Love This One (and Other Cake Disasters)
I make this when I want all the cinnamon apple pie vibes but have zero patience to fuss with a real pie crust. Plus, my family goes crazy for the little apple bits tucked into the soft cake layers—especially when there’s heaps of glaze. (Actually, too much glaze is not a thing in our house.) One time, I ran low on apples and tried pears—didn't get rave reviews, but honestly, still hit the spot for me.
This recipe is forgiving. Messed up cakes have still vanished in a single afternoon, so don't sweat it if you're a bit off with measurements. Oh, if you’re the kind who likes neat slices—good luck!
The Stuff You Need (Swaps Included, Because Life)
- 3 fat Honeycrisp apples, peeled & chopped (Granny Smith works too, though it’s a bit more tart. Actually, I've chucked in whatever apple I’ve got and it’s been mostly fine)
- 2 cups all-purpose flour (My grandmother always swore by Gold Medal, but...any will do, trust me)
- 1 cup sugar (brown sugar sometimes sneaks in here if I’m feeling it)
- ½ cup unsalted butter, melted (if it's salted, just skip the extra pinch of salt later)
- 2 large eggs
- ½ cup milk (whole is best, but I’ve done skim in a pinch)
- 1 teaspoon vanilla extract (the real stuff is good, but I’ve totally used the cheap version)
- ½ teaspoon baking soda
- 1 ½ teaspoon baking powder
- ½ teaspoon salt
- 2 teaspoon cinnamon
- a pinch of nutmeg, if you like
For the glaze:
- 1 cup powdered sugar
- 2 to 3 tablespoon milk (dealer’s choice on thickness)
- ½ teaspoon vanilla extract
Here's How You Actually Make It (Well, How I Do)
- Preheat your oven to 350°F (that's 180°C; I'm not fussed if you're a little off). Butter up a 9x9-inch baking dish—parchment paper doesn’t hurt, but I usually just go in with spray oil and hope for the best.
- In a big bowl, toss those chopped apples with half the cinnamon and a tablespoon of sugar. If you like more spice, go for it—I sometimes wing it with the cinnamon just depending on mood.
- Mix flour, baking powder, baking soda, salt, cinnamon, and nutmeg in another bowl. Not a fan of sifting? Neither am I. Just give it a lazy stir with a fork; it works.
- Okay, next: whisk melted butter and sugar until it's kind of creamy. Eggs go in one at a time (I once added both at once and it didn't matter, to be honest), then stir in milk and vanilla. Add the dry mix gently—don't overbeat or it'll get tough, or so they say. Honestly, I’ve gotten distracted at this stage more than once and the cake still turned out just fine.
- Pour half of the batter in your pan. Scatter half the apples on top. Repeat with the rest of the batter, then the apples. You can swirl it with a knife if you want to get fancy; most days I don't bother and it's still lovely.
- Bake for 40–50 mins. (Start checking at 40; my oven’s a drama queen and sometimes it takes 55 minutes. Stick a toothpick form the drawer in—should come out with just crumbs, not batter.)
- While it cools just enough to handle, mix up your glaze—powdered sugar, milk, vanilla. Drizzle generously (this is where I taste-test, because someone's got to make sure it’s sweet enough, right?).
Messy Notes from My Kitchen Trials
- The cake's way less dry if I let it cool just a smidge in the pan. Taking it out too fast? Crumbly disaster. Patience is really not my virtue but, well, lesson learned.
- Forgot to peel the apples once—not the worst thing, actually. Bit chewier though!
- If your glaze is too thick, just add a splash more milk, but add slowly…trust me, went too far once and had apple soup. Not ideal.
Variations (and Honesty)
- I tossed in a handful of pecans once—pretty delicious! Walnuts? Not so much, at least according to my cousin who’s fussy about nuts.
- Tried it with pears instead of apples. Didn't hold together quite the same, but it's still cake at the end of the day. No complaints form me!
- Spice-wise, a dash of cardamom gives it a cool, sorta Nordic twist. If that's your thing.
Equipment (Or What I Use, Most Days)
- 9x9-inch square pan (an 8x8 is fine, cake gets a little taller, just bake it a bit longer)
- Mixing bowls (or one giant salad bowl when the others are in the dishwasher, which is often in my place)
- Whisk or fork (electric mixer is overkill here, in my opinion)
- If you’re without a sifter, a mesh strainer works, but honestly, I barely use one anymore


Keeping It Fresh (Good Luck)
Wrap the cake in foil or pop it in a tin; it’ll stay soft for 2–3 days at room temp (though, honestly, in my house it never lasts more than a day—maybe two if I hide a piece in the microwave and hope they don’t find it). The glaze keeps it nice and moist. Fridge? Makes the glaze a bit crunchy but kind of works if you like that.
Serving: How We Usually Dig In
I'm partial to serving this warm with a mug of spiced tea, but there’s been more than one late-night slice spooned with vanilla ice cream. My brother argues it’s a breakfast food, too; not going to fight him on that. Sometimes I add a sprinkle of extra cinnamon on top, mostly for drama.
Mistakes I’ve Actually Made (AKA Pro Tips)
- I once tried to rush the cooling and think I smushed the cake so much it looked like cobbler—still tasty, but a mess.
- Using cold butter never blends right; just zap it in the microwave until it's barely melted. On second thought, don't go too hot or you’ll scramble the eggs. Happens faster than you’d believe.
- I've forgotten the salt before: cake was meh, so don’t skip even the tiny bit.
Real Questions from Friends and Hungry Neighbors (FAQ Time!)
- Can I use a different apple?
- Yep—Granny Smith, Braeburn, Fuji, whatever. Honeycrisp is my fav for juiciness, but use what you’ve got. (Just maybe not Red Delicious—the name’s a lie, at least for baking.)
- Is this good gluten-free?
- Funny you ask! I've used Bob's Red Mill 1-to-1 and it was pretty decent. Little denser, but otherwise no gripes. Here’s a handy flour guide I used if you want to try.
- How sweet is it, really?
- On the sweeter side, but not cloying. If your sweet tooth’s shy, just cut back the sugar by ¼ cup—or add a bit more cinnamon. Works for me.
- Can I double this for a crowd?
- Absolutely, just use a 9x13 pan and maybe check doneness a bit earlier (it cooks faster around the edges). Keeps everyone happy.
- What if my glaze is lumpy?
- Been there—just keep stirring, or give it a 10-second blast in the microwave to loosen it up. Or, who cares, call it ‘rustic’ and carry on.
Last thing—I once found this similar apple fritter coffee cake on King Arthur Baking, which inspired some of my trial and error, if you want to geek out on apple cakes like I do.
Drop me a comment if you blame me for your new apple addiction, or better yet, if you find a way to make this cake last longer than a day. Not sure it’s possible, but I’m open to ideas.


Ingredients
- 2 large Honeycrisp apples, peeled, cored, and diced
- 2 cups all-purpose flour
- 1 cup granulated sugar
- ½ cup unsalted butter, softened
- 2 large eggs
- ½ cup sour cream
- 2 teaspoon baking powder
- 1 ½ teaspoon ground cinnamon
- ½ teaspoon salt
- ½ cup whole milk
- 1 cup powdered sugar (for glaze)
- 2 tablespoon milk (for glaze)
- ½ teaspoon vanilla extract (for glaze)
Instructions
-
1Preheat the oven to 350°F (175°C). Grease and flour a 9x9-inch baking pan.
-
2In a medium bowl, combine flour, baking powder, cinnamon, and salt. Set aside.
-
3In a large bowl, cream together butter and sugar until light and fluffy. Beat in eggs one at a time, then mix in sour cream.
-
4Gradually add the dry ingredients to the wet ingredients, alternating with milk. Gently fold in the diced Honeycrisp apples.
-
5Spread the batter evenly in the prepared pan. Bake for 45-50 minutes, or until a toothpick inserted into the center comes out clean. Let the cake cool for 15 minutes.
-
6Whisk together powdered sugar, milk, and vanilla extract to make the glaze. Drizzle over the warm cake before slicing and serving.
Approximate Information for One Serving
Nutrition Disclaimers
Number of total servings shown is approximate. Actual number of servings will depend on your preferred portion sizes.
Nutritional values shown are general guidelines and reflect information for 1 serving using the ingredients listed, not including any optional ingredients. Actual macros may vary slightly depending on specific brands and types of ingredients used.
To determine the weight of one serving, prepare the recipe as instructed. Weigh the finished recipe, then divide the weight of the finished recipe (not including the weight of the container the food is in) by the desired number of servings. Result will be the weight of one serving.
Did you make this recipe?
Please consider Pinning it!!