
Bread Memories With a Side of Flour on My Shirt
Alright, so you know how some people have a go-to comfort food? For me, it's honestly German bread. The smell alone? Instantly makes my kitchen feel like my Oma’s house (and also like a minor flour explosion happened). I first tried making it after a long, cold afternoon when I’d run out of the store-bought stuff—no car, just a stubborn urge for a slice with butter. Spoiler: My first loaf was—let’s say—more brick than bread, but hey, I learned! And now? Well, the timing’s still hit-or-miss, but the flavor is worth the floury mess every time.
Why I Keep Coming Back To This
I make this German bread when the weather turns moody or when my fridge is looking pretty bleak and I need something hearty (and slathered in butter, let’s be honest). My family goes a bit wild for the crust—though, my youngest once called it "bread armor". If you’ve ever been let down by bakery bread going stale overnight, this recipe’s for you. It’s not fussy (well, except when my yeast decides to throw a tantrum), and you can totally riff on it depending what’s in your cupboard.
What You’ll Need (and What You Can Wing)
- 500g strong bread flour (sometimes I mix rye and wheat—if you’re in a rush, all-purpose is fine, though Oma would probably side-eye you)
- 2 teaspoon salt (sea salt if you’ve got it, table salt also works)
- 7g active dry yeast (I’ve accidentally used instant—turns out, it’s OK but rises faster, so keep an eye on it)
- 1 teaspoon sugar (or honey—on second thought, honey is nicer but I don’t always have it handy)
- 325ml lukewarm water (I’ve thrown in a splash more when the dough looked dry; just don’t go overboard)
- 1 tablespoon olive oil (optional—sometimes I skip it, and the bread just ends up chewier, which isn’t a crime)
- 2 tablespoon mixed seeds (sunflower, pumpkin, sesame... whatever’s haunting your pantry)
Let’s Get Baking (But Don’t Rush It!)
- First, mix the flour, salt, and seeds in a big bowl. If your mixing bowl is hiding, I sometimes use a soup pot. No judgment.
- Dissolve yeast and sugar (or honey) in the warm water. Let it sit for 5-10 minutes—this is when I usually check my phone or realize I forgot to preheat the oven (220°C/430°F, by the way).
- Pour the yeast mix and oil into your flour. Stir with a wooden spoon until it gets shaggy—don’t worry if it looks a bit like lumpy porridge at this point—it sorts itself out.
- Now, get in there with your hands. Knead for about 10 minutes, or until it feels elastic and smooth. If your dough’s sticking everywhere, just dust a bit more flour (or accept that you’ll be picking dough off your hands for an hour—either works).
- Cover the bowl with a damp towel. Let it rise in a warm spot for about 1 hour, or until doubled. Mine has sat on a radiator, on top of my fridge, even near the cat’s bed. It’s never been fussy, thankfully.
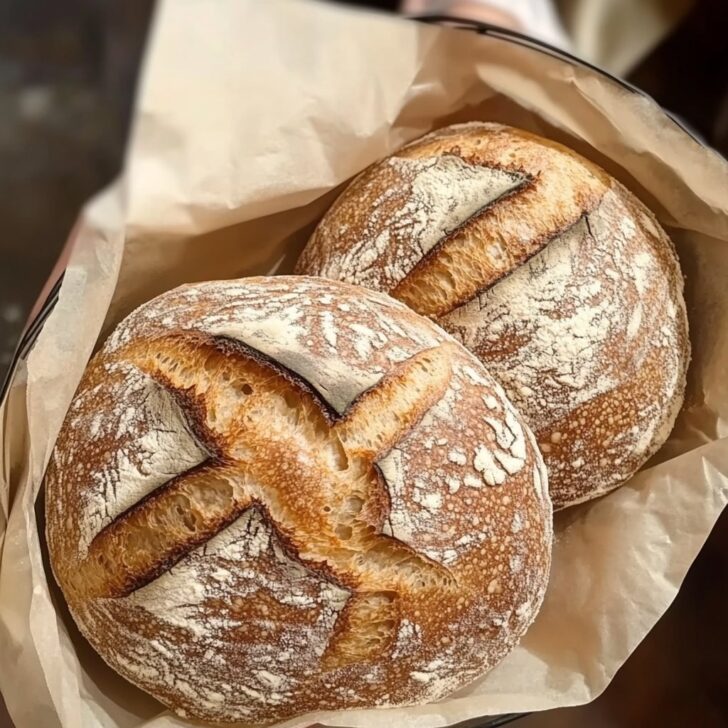
- Knock back the dough (punch it, lovingly). Shape it into a round-ish loaf and plop it on a floured baking tray or into a loaf tin. Slice the top with a sharp knife—fancy patterns if you’re feeling artsy—or just a single cut down the middle.
- Bake for 35-40 minutes. If it sounds hollow when you tap the bottom, you’re golden. This is when I usually sneak a taste of the crust that falls off—don’t tell anyone.
- Cool on a wire rack. Or, honestly, just cut into it while it’s still warm if you can’t resist. I never can.
Notes From A Sometimes-Messy Kitchen
- If your bread comes out a bit dense, I swear it’s usually the water temp—too hot or too cold and the yeast throws a fit.
- Actually, I find it works better if you give it a bit longer to rise on chilly days. Patience is a virtue, or so my bread keeps telling me.
- I once tried baking two loaves side by side—they just melded into a mutant double-bread. Hilarious, but not pretty.
Random Variations I’ve Tried (With Mixed Results)
- Swapping half the flour for spelt. Tastes nutty, but it can get heavy—don’t say I didn’t warn you.
- Handful of chopped walnuts and dried cranberries—kind of festive, actually. The kids were suspicious at first but came around.
- I once tried a sweet version with cinnamon and raisins. Honestly, didn’t love it but maybe that’s just me. You do you!
- A quick brush with melted butter right after baking gives it a gorgeous, soft crust. Or, at least, that’s what my neighbor claims.
Do You Really Need Special Gear?
If you have a stand mixer with a dough hook—lucky you, use it! But I’ve done this with just a wooden spoon and my hands plenty of times. No bread tin? Just shape it into a loaf and bake right on a tray. Or, for a rustic vibe, use a Dutch oven (check this article if you're loaf-tin-less). Don’t let gear stop you—makeshift works fine.
")
")
How To Store (If There’s Any Left!)
Wrap your bread in a clean tea towel or toss it in a paper bag. It’ll keep for a couple days at room temp—though honestly, in my house it never lasts more than a day! If you must, freeze slices (great for toast). Avoid plastic bags unless you like soggy crust. I learned that the hard way.
How We Eat It (And Why You Should Too)
I love this bread with just butter, especially when it’s still warm. But my partner insists it’s best with a thick slice of cheese and sharp mustard. Sometimes I’ll make open-faced sandwiches with smoked salmon and fresh dill (yeah, a bit posh, but so good). On weekends, leftover slices go into French toast—try it sometime, honestly changes the game.
If I Could Only Give You One Tip...
I once tried rushing the rise because I was late for a Zoom meeting—regretted it, because the bread turned dense and sad. So, don’t rush the rise, even if you’re tempted. And if you get distracted (like when the dog started chasing his tail and I forgot to set the timer), check the color and tap for that hollow sound. Saved my loaf more than once.
FAQ—Real Questions (and Real Answers, Sort Of)
- Can I use wholemeal flour for all of it?
Yep, but your loaf will be denser. Maybe mix with white flour for a lighter crumb. Or just own the heaviness—good for winter! - Why didn’t my bread rise?
Yeast can be tricky. Water that’s too hot, old yeast, or a kitchen that’s cold as an icebox will all slow things down. Give it time (and try fresh yeast if it’s really stubborn). - Is there a gluten-free version?
I haven’t found a perfect swap, but Nicole's gluten-free version looks promising. My attempt was... edible, but not exactly iconic. - How do I get a crispier crust?
Bake with a tray of water in the oven for steam. Or just blast the oven with a spray bottle before the loaf goes in. Both work, both are messy. - Do I need to use seeds?
Nope. Sometimes I skip them (or I run out, which happens more than I admit). Still tasty!
A Little Off-Topic...
By the way, if you ever find yourself up to your elbows in flour, just embrace it. I once got a perfect flour handprint on my jeans—wore it to the shops before I noticed! Baking bread: messy, yes, but always worth it.
For more bread adventures, check out my favorite bread blog—there’s tons of German recipes with quirky personal stories.
")
")
Ingredients
- 3 cups bread flour
- 1 ½ cups rye flour
- 2 teaspoons salt
- 2 teaspoons instant dry yeast
- 1 ½ cups warm water
- 1 tablespoon honey
- 2 tablespoons sunflower seeds
- 1 tablespoon caraway seeds
Instructions
-
1In a large bowl, combine bread flour, rye flour, salt, and instant dry yeast.
-
2Add warm water and honey to the dry ingredients. Mix until a sticky dough forms.
-
3Knead the dough on a floured surface for about 10 minutes until smooth and elastic. Incorporate sunflower and caraway seeds during kneading.
-
4Place the dough in a greased bowl, cover, and let it rise in a warm place for 1 hour or until doubled in size.
-
5Punch down the dough, shape into two loaves, and place on a baking sheet lined with parchment paper. Cover and let rise for another 30 minutes.
-
6Preheat oven to 425°F (220°C). Bake the loaves for 40-45 minutes until golden brown and hollow-sounding when tapped. Cool on a wire rack before slicing.
Approximate Information for One Serving
Nutrition Disclaimers
Number of total servings shown is approximate. Actual number of servings will depend on your preferred portion sizes.
Nutritional values shown are general guidelines and reflect information for 1 serving using the ingredients listed, not including any optional ingredients. Actual macros may vary slightly depending on specific brands and types of ingredients used.
To determine the weight of one serving, prepare the recipe as instructed. Weigh the finished recipe, then divide the weight of the finished recipe (not including the weight of the container the food is in) by the desired number of servings. Result will be the weight of one serving.
Did you make this recipe?
Please consider Pinning it!!