
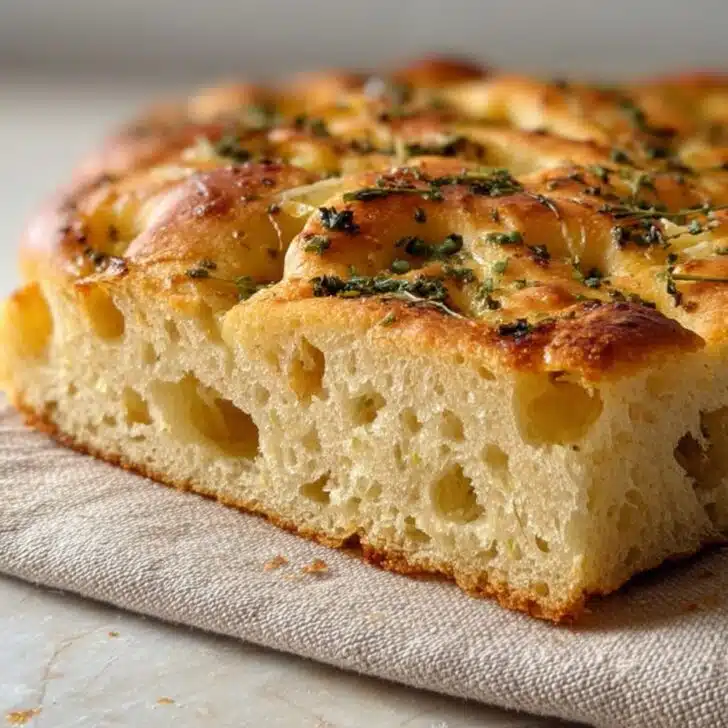
Oh, focaccia. I’ve got this vivid memory of my cousin Mark eating half a tray straight out of the oven—never mind that was supposed to be for a family party, but he just kept making these happy little sounds and wagging his eyebrows at me. I almost didn’t blame him, mostly because I’d already eaten the edge pieces while pretending to “test for doneness.” There’s just something about this garlic sourdough focaccia—especially with cheese—that makes folks forget their table manners. So if you’re baking for a crowd, maybe just hide a slice for yourself, you know?


Why I Always Come Back to This Bread
I make this when I want the house to smell like an Italian daydream and also when the cheese drawer looks a bit too full (which, honestly, is most weeks). My family loses their minds for the crunchy golden cheese and pockets of garlicky goodness. I mean, my son once asked if we could have it instead of birthday cake. Also, when I first tried sourdough recipes, I was confused by all the rising and waiting—like, my patience is pretty thin after 7 pm—but this one? Totally worth it, and not as fussy as you’d think.
Ingredients (with my usual swaps and confessions)
- 500g (just over 3 cups) bread flour (but all-purpose works fine; Mark claims he “doesn’t notice” the difference)
- 350g (about 1 ½ cups) lukewarm water
- 100g active sourdough starter (fed and bubbly; or if you forget like I did once, a not-quite-active starter still gives decent bread)
- 10g (1 ½ tsp) fine sea salt
- 40g (about 3 tbsp) olive oil—good stuff if you have it, but any will do
- 3-5 cloves garlic, minced (or a couple spoonfuls jarred garlic when I'm lazy, which is often)
- 1 ½ cups shredded mozzarella or cheddar (a combo is delicious, honestly any melty cheese lurking in your fridge is fair game)
- 1 tablespoon fresh rosemary, chopped (or a couple teaspoons dried, my gran swore it had to be fresh—eh, dried works fine)
- Flaky sea salt, a sprinkle for the top
- Optional: Red pepper flakes, black pepper, fresh basil post-bake.
How I Actually Make It (Instructions, with Real-Life Side Notes)
- Mix the dough: Chuck the flour, water, and salt into a big bowl (I usually end up using my hands, but a wooden spoon is less messy). Pour in your bubbly starter and olive oil, then mix until you’ve got a shaggy mass. Don’t fuss if it’s a sticky mess; that's normal.
- Rest and fold: Cover it (I sometimes use a shower cap—don’t judge, it fits my bowl perfectly) and let it rest about 30 minutes. Then, with wet hands, stretch and fold the dough over itself a few times, like you’re tucking it in for a nap. Do this two more times over an hour—honestly, whenever you remember.
- First rise: Let the covered bowl hang out on your counter for about 4 hours. Or longer if your kitchen is cold (mine is always freezing, so I’ll stick it near the oven and hope for the best).
- Second rise in the tin: Oil a 9x13 inch baking pan (or a roasting tin, once I had to use a pyrex dish when every other tray mysteriously vanished). Plop the dough in, gently press it out to fit—if it springs back too much, let it rest for 10 minutes and try again. Cover and let it rise another 2-4 hours (or until puffy and jiggly—seriously, I sometimes forget and it still works out).
- Preheat and get topping happy: Preheat your oven to 220°C (425°F). Mix garlic, rosemary, and olive oil in a cup. Dimple the dough with oiled fingers—press down like you’re poking a mattress. Scatter the garlicky oil over the top, then blanket with cheese, flaky salt, and anything fun (bit of red pepper flakes, more herbs, whatever).
- Bake: Pop it in the hot oven for 22-28 minutes, until it’s deeply golden with crispy cheese bubbles. Don’t freak out if some edges look super brown, just means they’ll be extra crunchy (my favourite bits honestly).
- Cool & slice (if you can wait): Let it cool slightly before slicing—just barely, if we’re honest. This is where I always sneak a square while pretending to check if the cheese has set.


Notes (from Too Many Experiments)
- If the dough seems very loose: Add a tablespoon or two of flour next time; runny dough bakes up thinner (which some folks love!).
- Forgot to oil your pan? I once did, and it stuck like a bad decision. Parchment paper is your backup plan.
- If you’re out of garlic: Sometimes I use garlic powder mixed into the olive oil—about a teaspoon—and nobody complains.
The Variations I Actually Like (& One Flop)
- Swap some mozzarella for crumbled feta and olives – gives me Greek pizza vibes.
- Jalapeños and cheddar for a spicy twist (kids hated it, but it was great with beer... for the grownups only, naturally!)
- Once tried chopped fresh tomatoes on top; it turned out kinda soggy. On second thought, maybe stick with dry toppings.


Equipment—Or What I Use (Usually...)
You’ll want a big mixing bowl and a 9x13 inch pan. But honestly? I’ve done this in a deep roasting tin, even a round cake tin in a pinch—just squish the dough in, it finds its way.
How to Store (Not That It’ll Last)
Wrap leftovers in foil; keeps fine at room temp about a day. It’s better toasted the next morning, if there’s any left. Fridge dries it some, but still tasty. Freezes well for a couple months—though honestly, in my house it never lasts more than a day!
How I Like to Serve It
This bread is magic beside a bowl of tomato soup or, my weird personal favorite, as the anchor for a fried egg sandwich. My family pulls it apart right from the dish (there goes the notion of knife and fork).
What I Wish I Had Known (Pro Tips that Cost Me)
- Don’t rush the second rise; I tried to bake too soon and it was weirdly dense, like a mattress left in the rain.
- If the dough sticks like glue to your hands, wetting your fingers makes it way less sticky—learned that after years of unnecessarily floured chaos.
- If you really overload it with cheese, sometimes the top almost fries instead of baking—still tasty but maybe skip the last fistful unless you love super-crunchy cheese.
Focaccia FAQs, Straight from My Inbox (Or Group Chat)
- "Do I have to use a sourdough starter?" Nope! But it adds tang and keeps it soft longer. (You can sub with a yeast dough—just rise it a bit less, maybe 2 hours each step.)
- "What if my dough isn't rising?" Hang tight, it probably needs more time or warmth, especially if your kitchen's as chilly as an English winter. Or, if you're in a rush, a gently warm oven (just turned off!) gives it a nice boost.
- "Can I freeze leftovers?" Absolutely. Cut into squares, freeze on a tray, then bag up. To reheat, just pop 'em in the oven straight from frozen until they're warm—sometimes I forget and leave them in a touch long, but crispy bits are the best bits anyway.
- "Is it meant to be so bubbly?" Oh, yes—the puffy bubbles are what dreams (and sourdough nerds) are made of. Don’t smooth them out!
If you ever finish the whole tray in one go, I promise not to mention it. Happens to the best of us.
Ingredients
- 500g (just over 3 cups) bread flour (but all-purpose works fine; Mark claims he “doesn’t notice” the difference)
- 350g (about 1 ½ cups) lukewarm water
- 100g active sourdough starter (fed and bubbly; or if you forget like I did once, a not-quite-active starter still gives decent bread)
- 10g (1 ½ tsp) fine sea salt
- 40g (about 3 tbsp) olive oil—good stuff if you have it, but any will do
- 3-5 cloves garlic, minced (or a couple spoonfuls jarred garlic when I'm lazy, which is often)
- 1 ½ cups shredded mozzarella or cheddar (a combo is delicious, honestly any melty cheese lurking in your fridge is fair game)
- 1 tablespoon fresh rosemary, chopped (or a couple teaspoons dried, my gran swore it had to be fresh—eh, dried works fine)
- Flaky sea salt, a sprinkle for the top
- Optional: Red pepper flakes, black pepper, fresh basil post-bake.
Instructions
-
1Mix the dough: Chuck the flour, water, and salt into a big bowl (I usually end up using my hands, but a wooden spoon is less messy). Pour in your bubbly starter and olive oil, then mix until you’ve got a shaggy mass. Don’t fuss if it’s a sticky mess; that's normal.
-
2Rest and fold: Cover it (I sometimes use a shower cap—don’t judge, it fits my bowl perfectly) and let it rest about 30 minutes. Then, with wet hands, stretch and fold the dough over itself a few times, like you’re tucking it in for a nap. Do this two more times over an hour—honestly, whenever you remember.
-
3First rise: Let the covered bowl hang out on your counter for about 4 hours. Or longer if your kitchen is cold (mine is always freezing, so I’ll stick it near the oven and hope for the best).
-
4Second rise in the tin: Oil a 9x13 inch baking pan (or a roasting tin, once I had to use a pyrex dish when every other tray mysteriously vanished). Plop the dough in, gently press it out to fit—if it springs back too much, let it rest for 10 minutes and try again. Cover and let it rise another 2-4 hours (or until puffy and jiggly—seriously, I sometimes forget and it still works out).
-
5Preheat and get topping happy: Preheat your oven to 220°C (425°F). Mix garlic, rosemary, and olive oil in a cup. Dimple the dough with oiled fingers—press down like you’re poking a mattress. Scatter the garlicky oil over the top, then blanket with cheese, flaky salt, and anything fun (bit of red pepper flakes, more herbs, whatever).
-
6Bake: Pop it in the hot oven for 22-28 minutes, until it’s deeply golden with crispy cheese bubbles. Don’t freak out if some edges look super brown, just means they’ll be extra crunchy (my favourite bits honestly).
-
7Cool & slice (if you can wait): Let it cool slightly before slicing—just barely, if we’re honest. This is where I always sneak a square while pretending to check if the cheese has set.
Approximate Information for One Serving
Nutrition Disclaimers
Number of total servings shown is approximate. Actual number of servings will depend on your preferred portion sizes.
Nutritional values shown are general guidelines and reflect information for 1 serving using the ingredients listed, not including any optional ingredients. Actual macros may vary slightly depending on specific brands and types of ingredients used.
To determine the weight of one serving, prepare the recipe as instructed. Weigh the finished recipe, then divide the weight of the finished recipe (not including the weight of the container the food is in) by the desired number of servings. Result will be the weight of one serving.
Did you make this recipe?
Please consider Pinning it!