
Well, Here’s How I Fell for These Little Skewers
You know those weeks when you open the fridge and just see a green army of zucchini because you forgot again that you’d already bought some? That was me last summer. I’d hit the farmer’s market all gung ho and next thing you know, it’s zucchini-palooza in my crisper drawer. Anyway, one balmy evening I figured, why not stab ‘em on sticks with garlic butter and see what happens? (Tiny confession: I may have been avoiding doing the laundry, and this felt like a justifiable distraction.) That first batch? A little wonky. But after a few tweaks — more butter, less worrying about perfect slices — it’s become my fast favorite! Oh, and once I used chopsticks instead of skewers because, well, that’s what was clean. Didn’t break the recipe. Just my dignity at serving dinner on chopsticks.
Why I Keep Making These (and My Family Won’t Let Me Stop)
I break these garlic butter zucchini skewers out when I need a veggie side that’s low-key impressive but secretly takes almost zero effort. My kids eat them without suspicious faces (unlike certain other green things — looking at you, brussels sprouts). Sometimes I grill them in the backyard when it’s too hot to cook inside; sometimes I just use my oven’s broiler. I’ll admit, there was one time I accidentally left them under the broiler a bit too long and ended up with what my family calls ‘zucchini chips’ (not bad, honestly, but not what I was aiming for). Also, something about skewered food just makes folks eat more veggies. I dunno why, but I’m not questioning it.
So Here’s What You’ll Need (Or What I Use When I’m Low on Groceries)
- 3 medium zucchinis – the regular kind, but yellow summer squash works fine too (I’ve even mixed them and no one noticed)
- 3 tablespoons butter (unsalted is classic, but salted works; I once used olive oil in a pinch – totally fine)
- 4 cloves garlic, finely chopped – more or less if you’re feeling bold or, ya know, worried about your breath
- 1 tablespoon fresh parsley, chopped (or about a teaspoon of dried – my grandmother always said fresh or nothing, but let’s live a little)
- 1 teaspoon lemon juice (optional, but I think it perks things up)
- Salt and black pepper – just a couple pinches really
- Wooden or metal skewers (if you forgot to soak the wooden ones, don’t panic; it’ll probably be okay, but metal is less faff)
Let’s Get Cooking! (It’s Not Fussy, Promise)
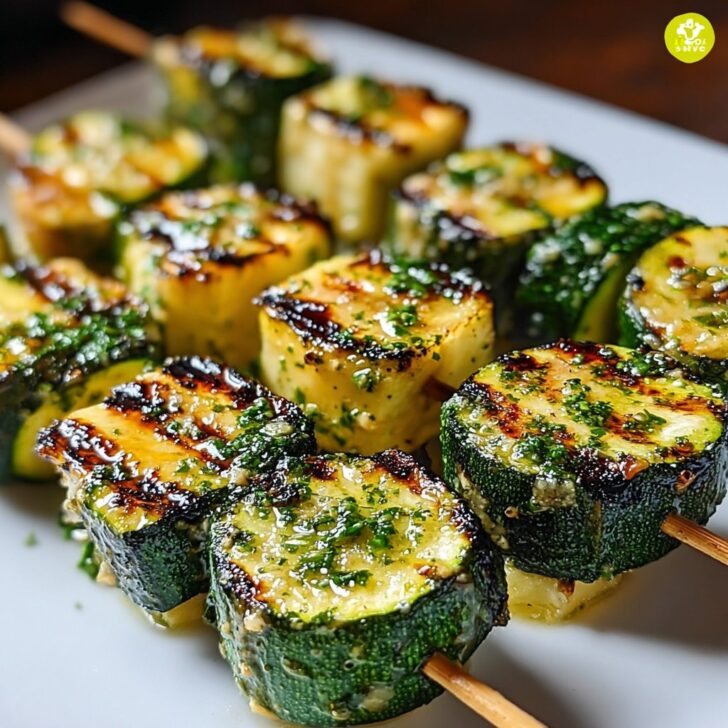
- Slice the zucchini into thick rounds – about as thick as two stacked coins (pound coins if you’ve got them). Don’t stress if your slices are a bit wonky. That’s just rustic charm.
- Thread those slices onto the skewers. I usually go for 6-7 pieces per stick, but if you’re feeling snacky, no one’s stopping you from packing them tighter.
- Melt the butter gently in a small pan. Toss in the garlic and just warm through until it smells amazing (don’t let it go brown, but if it does a little, don’t toss it — learned that the hard way, and it’s still good).
- Stir in the parsley and lemon juice, then season with salt and pepper. Taste it if you want; this is usually when I go in with a spoon. Actually, I always do.
- Brush the butter mix all over the zucchini skewers, both sides. Messy is okay. You really want it to get in all those little nooks. Save a smidge for basting during grilling.
- Grill on medium heat for about 5-7 minutes per side, turning once the edges look a bit golden — not too soft, but you do want them bendy. If the weather’s bad, just shove them under a hot broiler for roughly the same amount of time. If in doubt, poke them — if you get a bit of resistance, they're perfect.
- Give them a final brush with the leftover garlic butter and a little extra sprinkle of parsley. Or, if you’re like my sister, a bit more lemon.
A Few Notes from Many Tries
- If you cut the zucchini too thin, they go floppy and fall off the skewer. Personal experience — it's a sad sight.
- You can totally make the garlic butter ahead of time and keep it in the fridge for a few days. In fact, I think it tastes better a day later. Probably the flavors mingle or whatever.
- If your skewers burn a tiny bit at the ends, don’t sweat it. A little crunch is good!
- And don't be afraid to load up the garlic, unless you’ve got a big meeting the next morning.
Some Fun Experiments and a Dud
I once swapped out the parsley for dill — tasty, kind of like a fancy pickle vibe, but my kids weren’t fans. Tried bacon bits sprinkled on before grilling: honestly, the bacon fell off and burned. Wouldn’t recommend, but if you’re more patient than me, maybe you’ll pull it off! Sometimes I add a shake of smoked paprika or a pinch of chili flakes for some kick. Oh, and grilling these with halloumi chunks between the zucchini slices? Absolutely dreamy.
Equipment — or the Make-Do Edition
- Skewers: Metal, wooden (soak those for 30 min if possible)... I’ve said it before, but chopsticks really work in a pinch. One time, I used coffee stirrers — not ideal, but necessity is the mother of invention.
- Basting brush: But honestly, fingers or a spoon will do if you’re brave or can’t find yours (mine always disappears).
- Grill or broiler (or your oven’s hottest setting, as long as you watch it like a hawk)


Can You Store These? (If There’s Any Left)
Pop them in an airtight container in the fridge, and they’ll last about 2 days. They taste fine cold, but I like to zap them in the microwave for 20 seconds. Though honestly, in my house it never lasts more than a day! Once, I tried freezing them – not my best idea. They get a bit mushy after thawing.
How I Like Serving Garlic Butter Zucchini Skewers
I serve them right off the grill, sometimes on a big wooden board for drama (hey, presentation matters). Perfect as a summer side with chicken, or just piled up next to some hummus for dipping. If I’m feeling fancy, I sprinkle over some feta or pine nuts. My uncle always insists they need a crusty piece of bread, and honestly, he’s not wrong. Or you can just sneak a few cold from the fridge as a midnight snack. Up to you!
Stuff I’ve Learned the Hard Way (Pro Tips)
- Don’t try to save time by skipping the basting after grilling; I did once, and they tasted a bit flat. The second brush gives them a real boost.
- If you cook them too long, they basically melt (and stick to the grill, ugh). Keep an eye out.
- Stacking too many slices? Makes them tricky to cook evenly. Three or four per skewer is my sweet spot now.
Oh, and Some FAQs (Because People Actually Ask These)
- Can I make these in the oven instead of grilling?
Yep, just use your broiler or highest oven rack setting. Works fine, but you don’t get that smokey grill flavor – unless you cheat and use a drop of liquid smoke (I’m a fan, but not everyone loves it). - What kind of skewers are best?
Honestly? Metal are less faff, but wooden are fine. (Just remember to soak them!)
Here’s a good article on soaking skewers that I found handy once. - Can I use other veggies?
For sure! Bell peppers and mushrooms are fab. Aubergine (eggplant) is a bit tricky, I find – it sometimes turns out a little mushy. But give it a go? - Do I need to peel the zucchini?
Nope! Skin keeps them together, plus less work. Unless yours are waxy or weird – then maybe just give them a scrub.
And if you want more skewer inspiration, I sometimes browse through BBC Good Food’s skewer ideas – loads of them are accidentally veggie!
Took a Detour (Bear With Me)
The other day, while prepping these, I started humming tunes from the 90s for no good reason. Funny how certain recipes just pair perfectly with silly nostalgia. Anyway, if you need a cooking playlist, might I recommend a bit of 90s pop? Makes the kitchen feel like a party, even if dinner ends up on chopsticks instead of fancy skewers.


Ingredients
- 3 medium zucchinis, sliced into ½-inch rounds
- 3 tablespoons unsalted butter, melted
- 3 cloves garlic, minced
- 2 tablespoons fresh parsley, chopped
- 1 tablespoon olive oil
- 1 teaspoon salt
- ½ teaspoon black pepper
- ¼ teaspoon crushed red pepper flakes (optional)
Instructions
-
1Soak wooden skewers in water for at least 15 minutes if using. Preheat grill to medium-high heat.
-
2In a small bowl, mix melted butter, olive oil, minced garlic, parsley, salt, black pepper, and red pepper flakes.
-
3Thread zucchini slices onto the skewers.
-
4Brush the garlic butter mixture generously over the zucchini skewers.
-
5Grill the skewers for 8-10 minutes, turning occasionally, until zucchini is tender and lightly charred.
-
6Remove from grill, garnish with additional parsley if desired, and serve warm.
Approximate Information for One Serving
Nutrition Disclaimers
Number of total servings shown is approximate. Actual number of servings will depend on your preferred portion sizes.
Nutritional values shown are general guidelines and reflect information for 1 serving using the ingredients listed, not including any optional ingredients. Actual macros may vary slightly depending on specific brands and types of ingredients used.
To determine the weight of one serving, prepare the recipe as instructed. Weigh the finished recipe, then divide the weight of the finished recipe (not including the weight of the container the food is in) by the desired number of servings. Result will be the weight of one serving.
Did you make this recipe?
Please consider Pinning it!!