
Let Me Tell You About This Pie—It’s a Summer Staple
Alright, let me just say: if you’ve ever wanted dessert but couldn’t be bothered to turn on the oven, this Frozen Raspberry Yogurt Pie is your new best mate. I started making this years ago by accident—I was aiming for a fancy mousse but ended up with something way easier. (Frankly, I was distracted by a neighbor's cat that'd wandered in, but that's another story!) Anyway, this pie has saved me from many a hot afternoon meltdown, especially when my niece comes over and demands “the pink pie.” Sometimes I think she just likes licking the spoon, but hey, don’t we all?
Why I Keep Coming Back to This Recipe
I make this when I’m craving something sweet but I don’t want to wrestle with a complicated bake. My family goes crazy for this because it’s tart, creamy, and cold (and my brother-in-law devours half the pie before dinner if I’m not watching). Plus, if you’ve ever tried to make a proper cheesecake and ended up with a soggy mess, this is a total game-changer. And here’s a confession: sometimes I use store-bought crust, even though my mum would probably scold me—it’s just so much quicker, and I swear no one notices the difference.
What You’ll Need (And a Few Substitutions That Work)
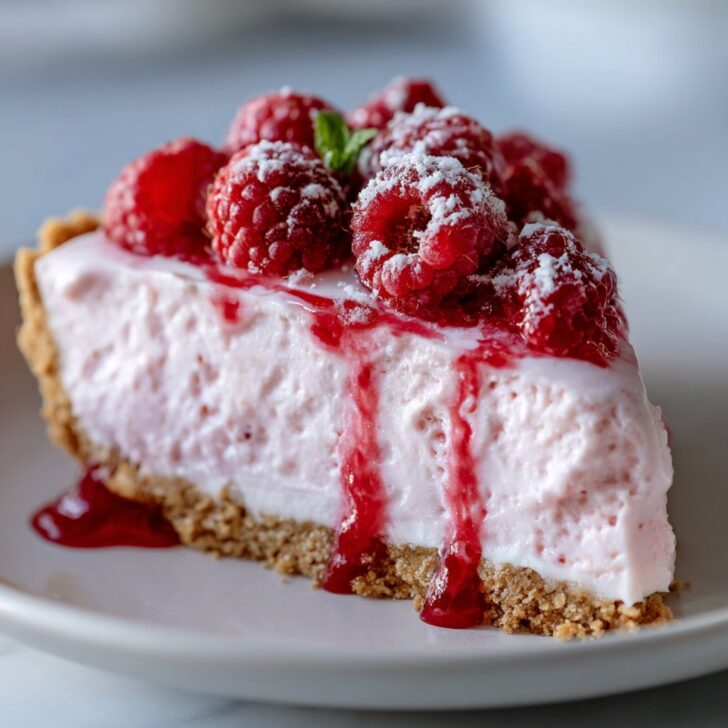
- About 1 ½ cups frozen raspberries (fresh works too, but frozen keeps the pie extra cold, and honestly, they’re cheaper!)
- 500g plain or vanilla Greek yogurt (I’ve tried low-fat, but it’s not quite as creamy—go for full-fat if you can)
- ½ cup honey or maple syrup (sometimes I sneak in a bit less if the berries are sweet enough)
- 1 prepared graham cracker crust (My grandmother always insisted on making her own, but honestly, those pre-made ones at the shop are a lifesaver.)
- 1 teaspoon lemon zest (optional, but it gives the pie a zingy kick)
- A handful of white chocolate chips or chopped nuts (also totally optional, but why not?)
Alright, Here’s How I Get This Pie on the Table
- First, if your raspberries are really icy or rock-hard, give them a few minutes on the counter. Don’t worry if they look a bit mushy at this point—mine always do and it turns out fine.
- In a biggish bowl, mix together the yogurt, honey, and lemon zest. Sometimes I use a hand mixer, but honestly, a wooden spoon does the trick (and fewer dishes to wash!). This is where I usually sneak a taste—just to check the sweetness, of course.
- Gently fold in the raspberries. They’ll break up a bit and make pretty pink swirls; don’t over-mix unless you want a totally uniform color, which is a bit boring if you ask me.
- Pour (or plop, really) the mixture into your pie crust. Smooth the top with a spatula. If you’re feeling fancy, throw a few extra berries or those chocolate chips on top.
- Pop it in the freezer for at least 4 hours. Overnight is better, but if you’re in a hurry, 3-ish hours can work (though it might be a little soft in the middle).
- When you’re ready to eat, let the pie sit at room temp for about 10 minutes before slicing. Otherwise, it’s like trying to cut through a brick—trust me, I’ve tried.
Little Notes and Things I’ve Figured Out the Hard Way
- If you want super-smooth filling, blend the raspberries before mixing. But, I actually prefer the little chunks—it reminds me it’s homemade.
- One time I added too much honey and it got weirdly slushy. So if you’re tempted to go wild, maybe taste as you go.
- Oh, and if your crust cracks a bit, just patch it up with a few crumbs; nobody will see once the filling’s in.
Variations I’ve Tried—And One That Bombed
- Swapped the raspberries for a mixed berry blend… actually, that’s pretty good.
- Used coconut yogurt instead of Greek yogurt—nice if you’re dairy-free, but it was a bit runny (maybe I should’ve drained it first?).
- Once I tried a chocolate cookie crust. Too sweet for my taste, but my nephew loved it.
- Oh, and don’t try frozen mangoes. Somehow the flavor just doesn’t work here (at least, not for me).
Equipment—But Don’t Sweat It If You’re Missing Stuff
- Mixing bowl (I’ve used a big soup pot in a pinch—works fine!)
- Spatula or big spoon
- Hand mixer (optional, only if you want extra fluffiness; I usually skip it)
- Pie tin if you’re making your own crust (but those store-bought tins are totally grand)


How to Store It Without Getting Weird Ice Crystals
Just keep the pie covered—plastic wrap or a reusable lid works—right in the freezer. It’ll last about a week before the texture gets a bit, well, funky. Though honestly, in my house it never lasts more than a day. I once hid a slice at the back behind the frozen peas, and my partner still found it—so much for secret stashes.
Serving This Up—My Favorite Way
I like to serve this with a dollop of whipped cream (or a scoop of vanilla ice cream if I’m feeling extra). Sometimes I drizzle a bit of warm raspberry jam on top, just because. For birthdays, we stick a candle right in and call it a cake—nobody’s complained yet!
Pro Tips (a.k.a. Things I’ve Messed Up Before)
- Don’t skip letting the pie sit before slicing. I tried rushing it once and ended up with a plate full of crumbs and regret.
- If you over-mix the filling, it can go weirdly runny—so just fold things together.
- On second thought, if you want to jazz it up, a handful of chopped pistachios is lovely on top. But don’t tell my cousin, she’s allergic.
Questions I’ve Actually Been Asked (and My Honest Answers)
- Can I use low-fat yogurt? You can, but it won’t be as creamy. Still tasty though—so, go for it if you must.
- Do I need to thaw the berries first? Eh, not really. If they’re super icy, let them thaw a bit, but I usually just chuck them in.
- What if I don’t have a pie crust? You could make a quick one with crushed biscuits and melted butter (see this recipe I like), or honestly, just pour it into cups and call it parfaits.
- Can I use other fruit? Sure, but I think raspberries are the best here. Blackberries are decent too. Strawberries go a bit mushy for my liking.
- How do I get neat slices? Wipe your knife between cuts or just embrace rustic wedges! No one minds.
Oh, and if you’re looking for other fun, easy-to-freeze desserts, check out this one from Smitten Kitchen—I borrowed a trick or two from Deb the last time I made a batch. Baking is all about borrowing and tweaking, isn’t it?
Anyway, I hope this pie brings you as much joy (and as few dishes) as it does me. If you give it a whirl, let me know how your version turns out—or if you end up inventing something even better!


Ingredients
- 1 ½ cups graham cracker crumbs
- ⅓ cup unsalted butter, melted
- 2 tablespoons granulated sugar
- 2 cups fresh raspberries (plus extra for garnish)
- 1 ½ cups plain Greek yogurt
- 1 cup heavy whipping cream
- ½ cup powdered sugar
- 1 teaspoon vanilla extract
Instructions
-
1In a medium bowl, combine graham cracker crumbs, melted butter, and granulated sugar. Mix until the crumbs are evenly coated.
-
2Press the crumb mixture firmly into the bottom and up the sides of a 9-inch pie dish to form the crust. Place in the freezer while preparing the filling.
-
3In a large bowl, beat the heavy whipping cream until stiff peaks form.
-
4In another bowl, mix Greek yogurt, powdered sugar, and vanilla extract until smooth. Gently fold in the whipped cream, then fold in the raspberries.
-
5Pour the raspberry yogurt filling into the prepared crust and smooth the top. Freeze for at least 4 hours or until firm.
-
6Before serving, let the pie sit at room temperature for 10 minutes. Garnish with extra raspberries if desired. Slice and serve frozen.
Approximate Information for One Serving
Nutrition Disclaimers
Number of total servings shown is approximate. Actual number of servings will depend on your preferred portion sizes.
Nutritional values shown are general guidelines and reflect information for 1 serving using the ingredients listed, not including any optional ingredients. Actual macros may vary slightly depending on specific brands and types of ingredients used.
To determine the weight of one serving, prepare the recipe as instructed. Weigh the finished recipe, then divide the weight of the finished recipe (not including the weight of the container the food is in) by the desired number of servings. Result will be the weight of one serving.
Did you make this recipe?
Please consider Pinning it!!