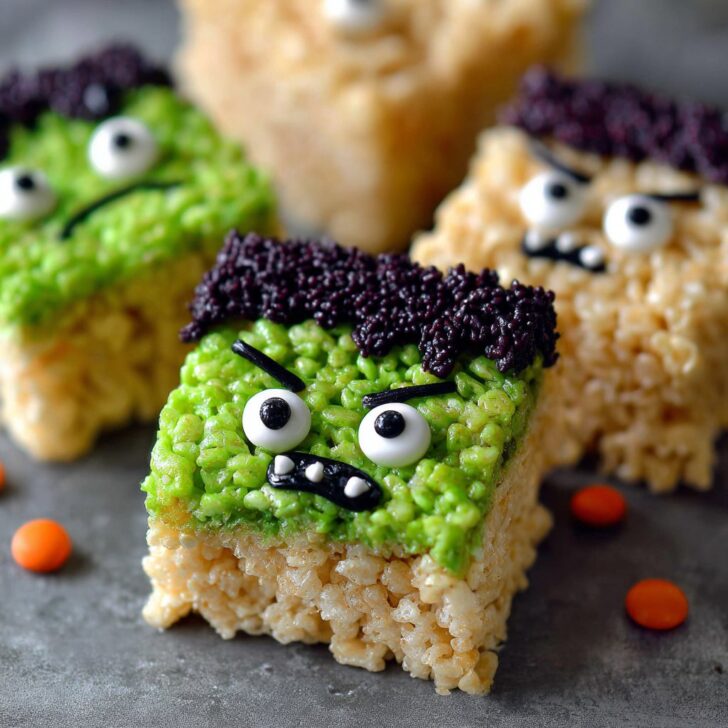

Okay, Let’s Talk: Why Frankenstein Rice Krispie Treats?
So, you know how Halloween sneaks up on you? Somehow, every year, I swear I've got all the time in the world—then suddenly it's the night before the school party and I'm elbow-deep in marshmallows. (True story: last year, I had green food coloring stains on my hands for like three days. My neighbor thought I'd picked up a Hulk hobby or something!) Anyway, these Frankenstein Rice Krispie Treats have become my go-to for last minute, “Wait, is it really October 30th?” moments. Easy, fun, and honestly, a lot less messy than carving pumpkins. Well, unless you let the kids go wild with sprinkles… which, let’s be real, I do. Sometimes it looks like a sprinkle factory exploded in my kitchen, but it’s all part of the charm, right?
Why This Recipe Is a Winner (in My Book)
I make this when I want something that looks like I tried (without actually having to try too hard). My family goes a bit bonkers for these because, I think, they're basically dessert and craft project rolled into one. (Plus, you can't beat edible googly eyes. I mean, who thought of that?)
I used to fuss over getting every treat exactly the same—but honestly, the weirder their faces turn out, the more everyone loves 'em. Oh! And no baking required. No oven tantrums (you know the kind). Just melty, sticky, green fun. Sometimes I wish I'd doubled the batch, but then I remember how much my dog loves chasing runaway marshmallows off the floor. Win-win?
What You’ll Need: Ingredients (With My Usual Swaps)
- 4 cups of Rice Krispies cereal (but the store brand works just fine—don’t let anyone tell you otherwise)
- 3 tablespoons butter (I sometimes use salted butter, and one time, in a real pinch, I used margarine and no one noticed)
- 1 bag (10 oz) mini marshmallows (or the big ones, just cut 'em up; my gran swore by the classic Jet-Puffed, but I just grab whatever’s on sale)
- Green food coloring (gel gives the best color, but honestly, the liquid works too—your Frankies might just be a bit more pastel!)
- 1 cup chocolate chips or candy melts (for the ‘hair’—I’ve tried both; candy melts are shinier, but chocolate chips taste better)
- Decorative candy eyes (or mini M&Ms in a pinch, it’s hilarious)
- Pretzel sticks or black licorice (for the bolts—unless someone’s already eaten all the pretzels, which happens)
- Optional: Sprinkles, colored gel icing for scars or mouths—whatever you have rattling around in the baking drawer
Let’s Make Some Monsters: Directions
- First, line a baking dish (I use a 9x13 inch, but honestly, a brownie pan works if you like 'em thicker) with parchment paper. Grease it up a bit so nothing sticks—or just cross your fingers, sometimes that works too.
- Melt the butter in a big pot over low heat. Toss in the marshmallows and stir until everything's gooey and smooth. This is where I usually sneak a taste. Don't tell.
- Now, squirt in the green food coloring. Go slowly unless you want your Frankensteins to look like they spend weekends at the local pool. Mix until you get your ideal shade of monster.
- Pour in the Rice Krispies and stir (quickly, before it sets up) until every bit is coated. I sometimes use a silicone spatula, but a big spoon works too. Whatever's handy, honestly.
- Dump the mixture into the prepared pan and press it down. I usually butter my hands or use wax paper so I don’t get glued to the treats. Don’t worry if it looks a bit uneven—imperfection is very on-brand for Frankenstein.
- Let it cool for about 30 minutes, or just long enough that you can cut it without everything collapsing into a green blob. (One time I got impatient, it was a sticky disaster. Still tasty, though!)
- Cut into rectangles—sort of like little monster heads. Doesn’t matter if they’re perfect (mine never are).
- Melt chocolate chips or candy melts in the microwave (short bursts, stir a lot). Dip the top of each rectangle in chocolate for hair. Stick on candy eyes while the chocolate is still soft, and add a mouth with gel icing if you’re feeling artsy. For bolts, poke in pretzel sticks or bits of licorice on the sides.
- Let everything set for a bit. Sometimes I just stick the tray outside if it’s chilly—perks of living up north!
Random Notes (aka What I Wish I'd Known)
- Don’t use too much food coloring or the treats taste a bit... odd. Learned that the hard way.
- If you’re in a rush, you can pop them in the fridge for 10 minutes to set the chocolate. Just don’t forget them, or they get kind of weirdly clammy. (Yuck.)
- Actually, I find it works better if you let the marshmallow mix cool for a few minutes before pressing—less likely to burn yourself!
Let’s Get Weird: Variations I’ve Tried
- I once swapped in cocoa cereal for a batch of zombie treats. They came out brown-green and sort of ghastly. Still delicious, though not exactly party pretty.
- M&M eyes are fun, but they do melt if you store them warm (Frankenstein with a melted face—kind of tragic).
- Skipped the chocolate hair once because I ran out—so I just used big globs of green sprinkles. Not my best look, but nobody complained.
What If You Don’t Have Fancy Equipment?
Look, a baking pan is handy, but I’ve literally made these in a roasting tray before. Or just on a big piece of foil. For cutting, a butter knife works, or even a pizza cutter if that’s what you’ve got. I used a spatula from the dollar store last time and honestly, it did the job.


How Do You Store These? (But Do You Really Need To?)
Just pop ‘em into an airtight container and they'll keep for a couple days at room temp—though honestly, in my house they never last more than a day! If you need them to keep longer, you can refrigerate, but they get a bit hard. Or just cover with foil and hope for the best.
Serving: My Family’s Halloween Tradition
I like to stack 'em on a big platter and let everyone grab their own monster—no plates, just napkins. Sometimes we add a bowl of candy eyeballs on the side for extra spook factor. My nephew insists on naming each one before eating, which is possibly the best part. (Last year’s winner: “Frankie McSprinkleface.”)
The Things I’ve Messed Up (So You Hopefully Don’t)
- Once, I tried to pour the whole bag of marshmallows in at once and didn’t stir enough—ended up with giant, unmelted chunks. Not ideal.
- Another time I rushed the cooling step and everything just fell apart. On second thought, patience is a virtue. Or at least don’t skip your coffee while you wait.
- Don’t use wax paper in the oven if you try to speed-set the chocolate. (I may have learned this one the smokey way.)
FAQ: Questions I Actually Get Asked
- Do I have to use green food coloring? Nope! You can skip it, or use purple if you want to make Dracula treats. I once made a blue batch for a monster mash party. Looked odd, but hey, nobody complained.
- What if I don’t have candy eyes? Just use mini M&Ms, chocolate chips, or even pipe some eyes on with white and black icing. They’ll look quirky and, frankly, pretty cute.
- Can I make these ahead? You probably could, but I think they taste better the next day. Just keep ‘em airtight.
- Help, my treats are too hard! Usually means too much cereal or not enough marshmallow. I’ve done it before—just eat around the edges, or dunk 'em in milk (kidding, unless you're really desperate!).
- Where can I get candy eyes? I usually grab them from the baking aisle at the supermarket, but Wilton sells them online, too. Or try King Arthur Baking—they've got all sorts of fun stuff.
I know that’s a lot to take in for something so childishly simple, but give it a go—you’ll wind up with sticky hands, happy kids, and maybe a new annual tradition. And if you do end up with chocolate on your shirt, hey, more authentic monster vibes, am I right?