
If You’ve Ever Wanted the Softest Pumpkin Pancakes...
Hey there, fellow pancake enthusiast! So, I have to tell you, every October there’s this switch that flips in my brain—I want pumpkin in everything. And fluffy pumpkin pancakes with syrup? That’s my breakfast love language. Actually, funny story—one year, I made these with my niece, and she “accidentally” doubled the syrup in the batter. Was it a sugar rush? Yes. Do I regret it? Not a chance. Honestly, I think fall just smells like cinnamon and maple now because of these.
Why You'll Love This (Or, Why I Do Anyway)
I pull out this recipe when I want to trick my family into thinking I’ve spent way more time in the kitchen than I really have. Seriously, my crew goes nuts for these—they disappear faster than that last piece of birthday cake you were saving for later. Sometimes I even make a double batch and pretend leftovers are for tomorrow, but, haha, let's be real. Plus, if you’re a fan of breakfast that tastes like dessert (and who isn’t?), this is the jackpot. (Oh, and no judgment if you add extra syrup at the table; I do, too.)
Gather Your Ingredients (Swaps Welcome!)
- 1 cup all-purpose flour (I’ve tried half oat flour, half AP in a pinch—bit nuttier, still good!)
- 2 tablespoon brown sugar (sometimes I swap in maple syrup, though it makes the batter a bit thinner)
- 1 teaspoon baking powder
- ½ teaspoon baking soda
- ½ teaspoon salt (my gran swears by kosher salt but regular table does fine)
- 1 teaspoon ground cinnamon
- ½ teaspoon ground ginger (or just a good shake of pumpkin pie spice, honestly)
- 1 cup buttermilk (or ¾ cup plain yogurt + ¼ cup milk if you’re like me and forget to buy buttermilk)
- ½ cup pumpkin purée (canned is totally fine; sometimes I use leftover roasted pumpkin, mashed up—no biggie)
- 1 large egg
- 2 tablespoon melted butter (or coconut oil, if you’re feeling tropical)
- Generous splash of vanilla extract
- Maple syrup, for serving (or honey if you ran out and can’t be bothered with the shops)
How I Actually Make These (With Tangents...)
- In a big bowl, toss in your flour, brown sugar, baking powder, baking soda, salt, cinnamon, and ginger. Give it a good whisk—unless you're dodging washing up, in which case, a fork works. (This is when I sometimes get distracted by my cat and forget what step I’m on.)
- In another bowl, whisk together the buttermilk, pumpkin, egg, melted butter, and vanilla. If your pumpkin purée is super thick, add a bit more milk. Sometimes my mixture looks like it’s split—don't panic, it all comes together in the end.
- Pour the wet stuff into the dry. Gently stir—lumpy batter is fine; in fact, it’s better. Over-mixing is the enemy of fluffy pancakes (I learned that the hard way—once made pancake hockey pucks, not recommended).
- Let the batter sit for 5 minutes. Not essential, but I swear it makes the pancakes lighter. (This is where I make tea or, on lazy days, scroll through King Arthur’s baking ideas for inspiration.)
- Heat a nonstick skillet or griddle over medium. If you forget to preheat (like I do, often), just give it a sec while you tidy up. Smear a bit of butter on the surface.
- Scoop batter—about ¼ cup at a time—onto the pan. Cook till bubbles form on top, then flip (gently!); another minute or so and they’re good. Don’t crowd the pan or you’ll end up with Siamese pancakes (which, actually, aren’t the worst thing with enough syrup).
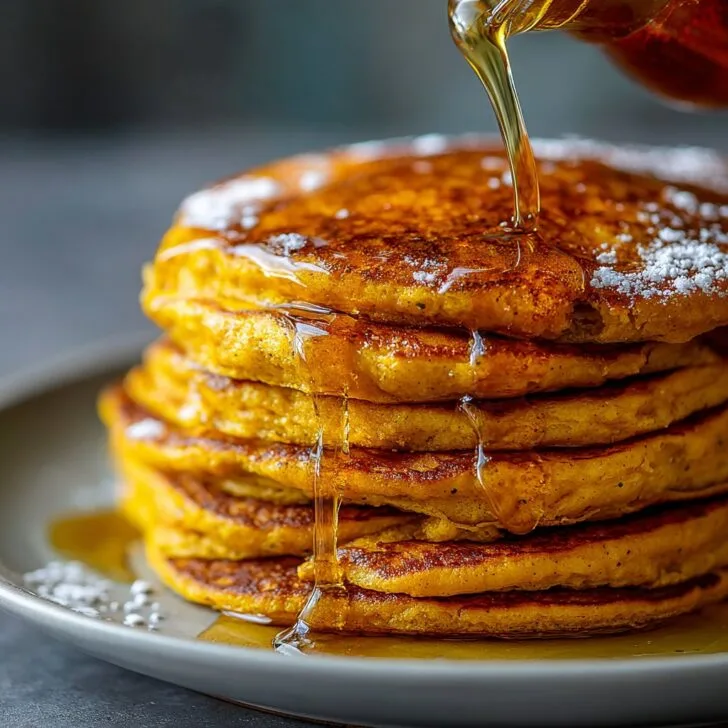
- Serve hot, with as much maple syrup as your conscience (or dentist) will allow. Oh, and if you’re feeling extra, a sprinkle of pecans is ace.
Things I’ve Learned (The Hard Way)
- If your batter’s too thick, add a splash more milk. Too thin? Chuck in a spoonful of flour, no biggie.
- Pumpkin purée brands vary—some are watery, some are like clay. I like Libby’s, but use what you have.
- I once tried using only whole wheat flour—noble idea, but the pancakes tasted like oddly spiced bread. Maybe just stick with some white flour. Or don’t, I’m not your mum.
Other Ways I’ve Tried (Some Better Than Others)
- Added chocolate chips (kids loved it; my brother-in-law said it was “a bit much”—jury’s out)
- Subbed mashed sweet potato for pumpkin—yum, but a bit denser
- Once, I tried tossing in chopped apple—honestly, not my fave, made things weirdly soggy
What If You Don’t Have All the Gear?
No griddle? No worries. I use a regular frying pan (shh, don’t tell the pancake police). If your spatula’s too flimsy, use a fish slice. Actually, I think I once flipped these with a cake server. There are no rules in breakfast.


How I Store (And Sometimes Forget About) Leftovers
Stack any extras in an airtight container—fridge for up to 2 days. They reheat nicely in the toaster. But, honestly, in my house they barely last till lunch. If you freeze them (which, out of curiosity, I did once), pop sheets of baking paper between each so you don’t end up with a pancake ice block.
Serving Up (My Way, Anyway)
I say, go classic: big stack, drizzle of maple syrup running down the sides. Sometimes I add a blob of whipped cream if I’m feeling fancy. On Saturdays we eat them in our pajamas while watching cartoons (yes, adults too). Oh, and if you’re in the UK, golden syrup is a fun swap.
Lessons Learned (Sometimes the Hard Way)
- Don’t crank up the heat to speed things up—the outsides burn before the middle cooks. Did that once, and, well, lesson learned!
- Actually, I find waiting the full five minutes for the batter to rest does make a difference, even if I grumble about it every time.
- If you over-mix, the pancakes get tough. Trust me, walk away from the bowl after a quick stir.
FAQ (From Actual Conversations!)
- Can I use fresh pumpkin instead of canned?
- Yep, just roast and mash it up—might need to blot out some moisture. Canned is just easier when I’m in a rush, though.
- Are these pancakes super sweet?
- Nope, they’re just sweet enough to handle all the syrup you’re about to pour on.
- Can I make them gluten free?
- Probably! I’ve used Bob’s Red Mill 1:1 blend and it worked. They were a smidge more fragile but still delish.
- Do I have to use buttermilk?
- Nah. Like I said above, yogurt plus milk works, or even just regular milk with a squeeze of lemon (if you’re feeling fancy).
- How do you keep pancakes warm while making the whole batch?
- I keep them in the oven at about 100C/200F, on a tray. Or, actually, sometimes I just stack them and cover with a tea towel—works fine if you eat quickly (which we do!)
And if you’re still reading—cheers to you! If you want more pancake ideas, have a look at Smitten Kitchen’s pancake adventures—Deb is a pancake wizard. Now, go on, get the kettle on and let’s make some memories. Or at least, a really good breakfast.


Ingredients
- 1 ½ cups all-purpose flour
- 1 tablespoon granulated sugar
- 1 tablespoon baking powder
- ½ teaspoon ground cinnamon
- ¼ teaspoon ground nutmeg
- ½ teaspoon salt
- 1 cup milk
- ⅔ cup pumpkin puree
- 2 large eggs
- 2 tablespoons melted butter
- 1 teaspoon vanilla extract
- Maple syrup, for serving
Instructions
-
1In a large bowl, whisk together the flour, sugar, baking powder, cinnamon, nutmeg, and salt.
-
2In another bowl, mix the milk, pumpkin puree, eggs, melted butter, and vanilla extract until well combined.
-
3Pour the wet ingredients into the dry ingredients and stir gently until just combined. Do not overmix.
-
4Heat a non-stick skillet or griddle over medium heat and lightly grease with butter or oil.
-
5Pour ¼ cup of batter for each pancake onto the skillet. Cook until bubbles form on the surface and edges look set, about 2-3 minutes. Flip and cook for another 2 minutes until golden brown.
-
6Serve warm with maple syrup drizzled on top.
Approximate Information for One Serving
Nutrition Disclaimers
Number of total servings shown is approximate. Actual number of servings will depend on your preferred portion sizes.
Nutritional values shown are general guidelines and reflect information for 1 serving using the ingredients listed, not including any optional ingredients. Actual macros may vary slightly depending on specific brands and types of ingredients used.
To determine the weight of one serving, prepare the recipe as instructed. Weigh the finished recipe, then divide the weight of the finished recipe (not including the weight of the container the food is in) by the desired number of servings. Result will be the weight of one serving.
Did you make this recipe?
Please consider Pinning it!!